Amazon MSK
Connect VeloDB Cloud to an Amazon MSK cluster and ingest data from Kafka topics over a private multi-VPC connection.
Note:
This guide describes the SaaS setup, where VeloDB Cloud connects to your MSK cluster over a managed multi-VPC private connection.
For BYOC, VeloDB Cloud runs in your own VPC, so you set up network access to the MSK cluster yourself, using either multi-VPC private connectivity or VPC peering (see Access from within AWS but outside the cluster's VPC). Then create the ingestion job with a Routine Load SQL statement (see CREATE ROUTINE LOAD). The import UI for BYOC is coming soon.
Prerequisites
Before you begin, ensure you have:
- An AWS account with permissions to create and configure MSK clusters, Secrets Manager secrets, and IAM policies
- A VeloDB Cloud warehouse in the same AWS region as the MSK cluster
- Apache Kafka version 3.x or earlier on Amazon MSK. Apache Kafka version 4.x and later on Amazon MSK is not supported.
Workflow
To connect VeloDB Cloud to Amazon MSK, complete the following tasks:
- Prepare an existing MSK cluster, or create one if needed.
- Configure the cluster for SASL/SCRAM multi-VPC private connectivity.
- Open the same-VPC broker ports and grant ACL authorization to the SASL/SCRAM user.
- Grant the VeloDB Cloud AWS account permission to create the VPC connection and retrieve broker information.
- Open the MSK security group ports used by VeloDB Cloud's multi-VPC private endpoint.
- Create the connection and import job in VeloDB Cloud.
Step 1: Prepare an MSK cluster
Use an existing MSK cluster, or create a new one if needed. The MSK cluster must be in the same AWS region as your VeloDB Cloud warehouse and must run Apache Kafka version 3.x or earlier.
If you are creating a new cluster, enable the required settings during cluster creation whenever possible, because updating them after the cluster is created can take extra time.
Before you continue, confirm that the MSK cluster has:
- ACL policy disabled.
- SASL/SCRAM authentication enabled.
- An AWS Secrets Manager secret associated.
Step 2: Enable multi-VPC connectivity
For an existing MSK cluster, start from the cluster's networking settings and enable multi-VPC private connectivity with SASL/SCRAM authentication.
Enable multi-VPC connectivity
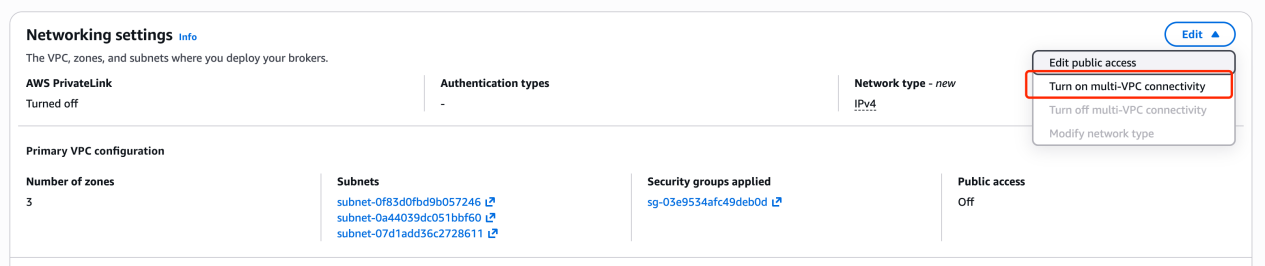
In the MSK cluster's Networking settings, click Edit, then click Turn on multi-VPC connectivity.
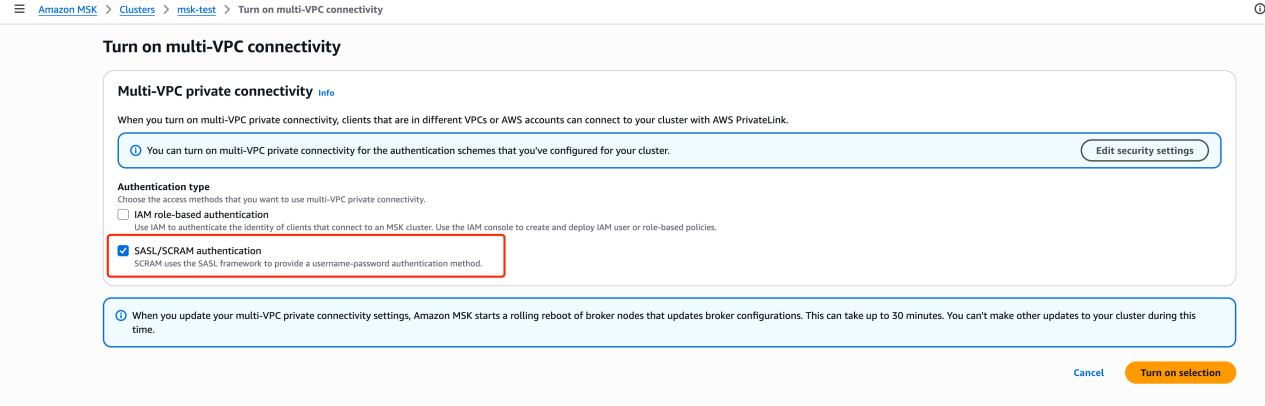
On the Multi-VPC private connectivity page, select SASL/SCRAM authentication as the authentication type, then click Turn on selection. Updating multi-VPC private connectivity starts a rolling reboot of broker nodes and can take about 30 minutes. You can't make other updates to the cluster during this time.
Disable ACL policy
If SASL/SCRAM authentication is not available on the Multi-VPC private connectivity page, update the cluster configuration first. In the MSK console, go to the cluster's Properties tab, find Cluster configuration, and click Edit. Add the following property to the cluster configuration:
allow.everyone.if.no.acl.found=false
Enable authentication
After the configuration update succeeds, return to Networking settings, click Turn on multi-VPC connectivity again, then click Edit security settings and enable both:
- SASL/SCRAM authentication: required for cross-VPC access with username/password credentials
- IAM role-based authentication: required for granting ACL permissions via kafka-cli
Associate an AWS Secrets Manager secret
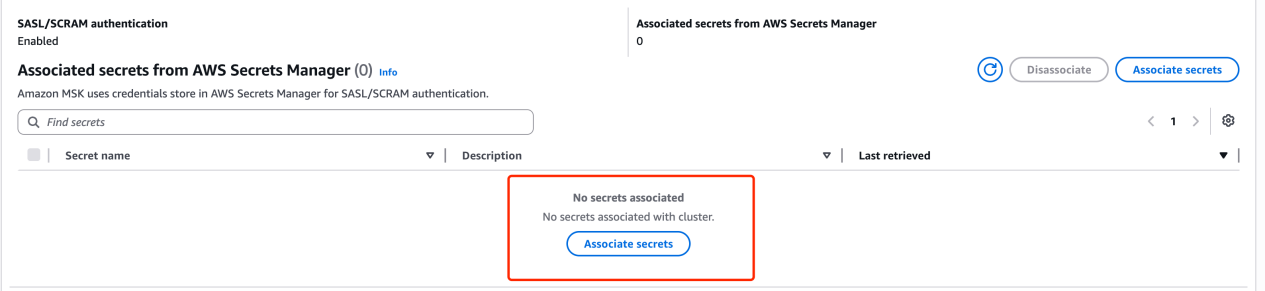
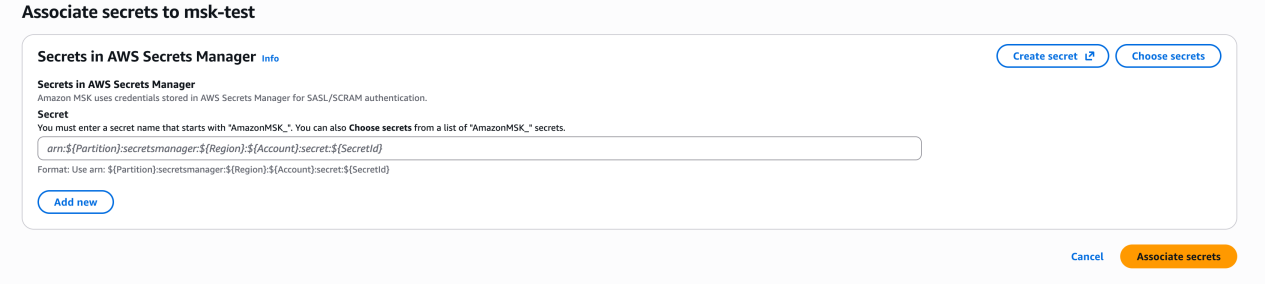
After multi-VPC connectivity is enabled, associate an AWS Secrets Manager secret with the MSK cluster. MSK uses Secrets Manager to store SASL/SCRAM credentials. For the full AWS requirements, see Sign-in credentials authentication with AWS Secrets Manager.
Requirements:
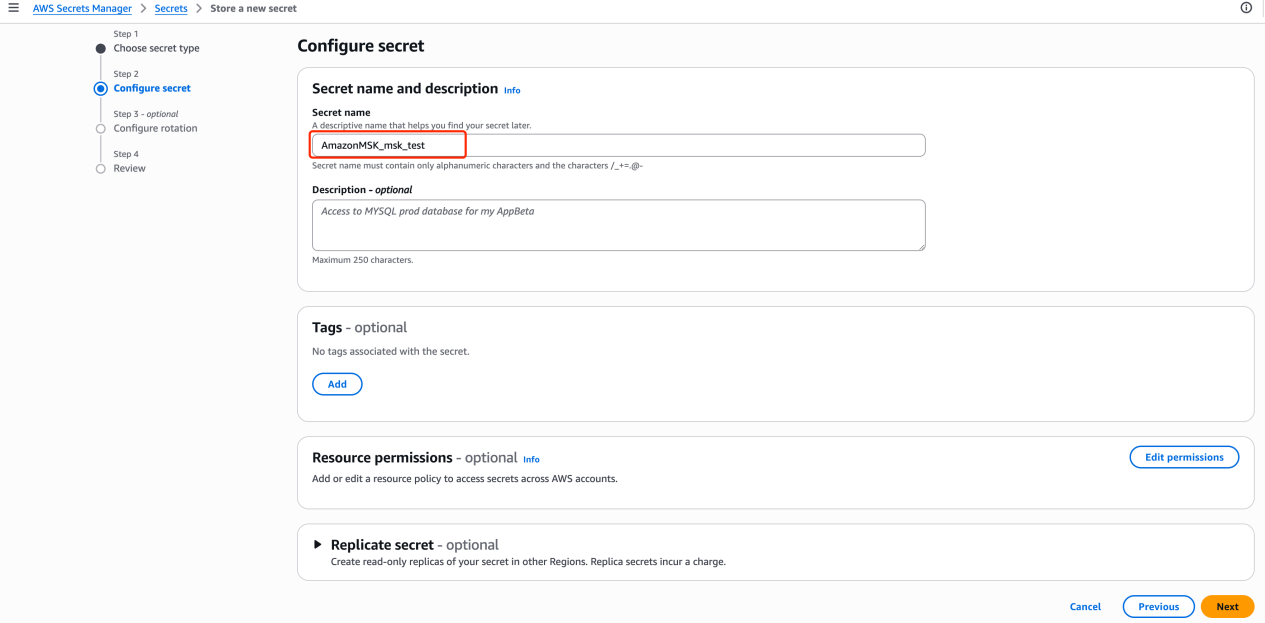
- The secret name must start with
AmazonMSK_ - The Encryption key must not be
aws/secretsmanager. Use a customer-managed KMS key. Usingaws/secretsmanagercauses the MSK association to fail.
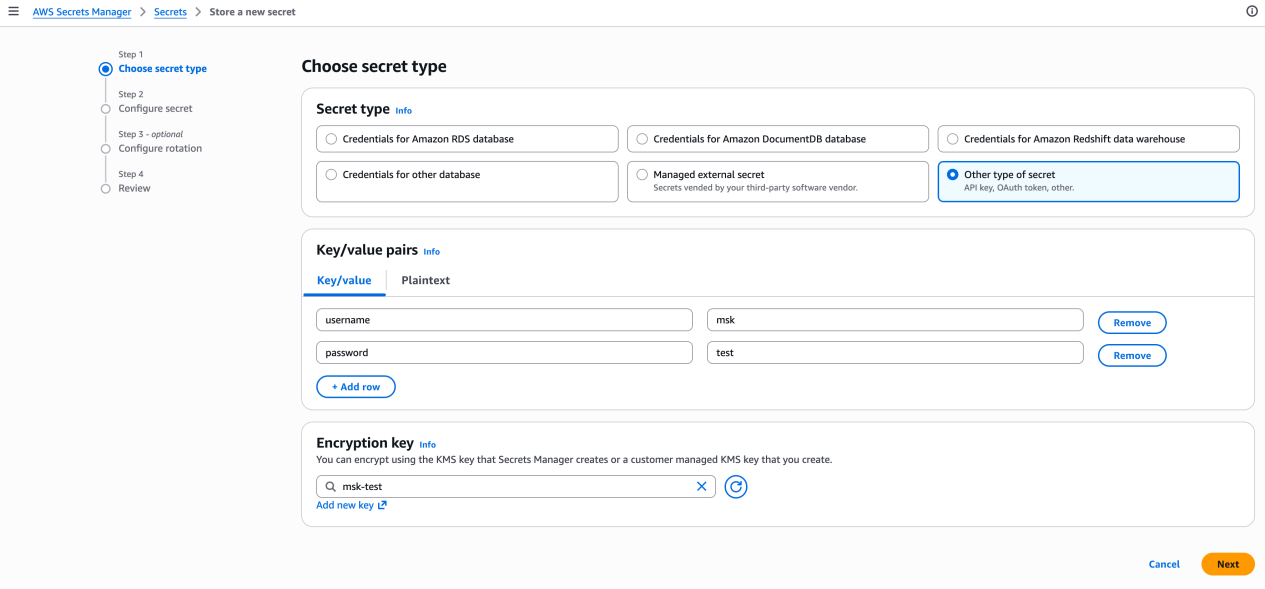
If you don't have an existing secret, create one in AWS Secrets Manager with the name prefixed AmazonMSK_, then associate it with the cluster.
When creating a new secret, choose Other type of secret and enter the username and password as key/value pairs:
Step 3: Grant ACL authorization for the associated user
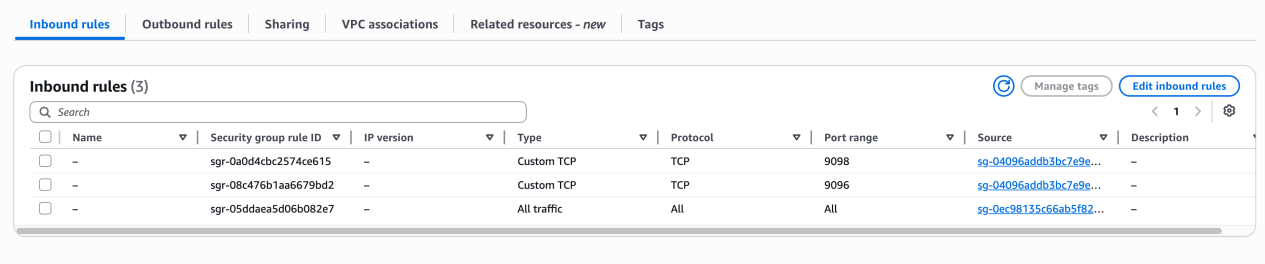
Update the security group for ACL authorization
In the MSK cluster's security group, add inbound rules to allow traffic on ports 9096-9098 (the SASL/SCRAM and IAM broker ports). Port 9096 is the SASL/SCRAM broker port, and port 9098 is the IAM broker port used for the ACL grant in the next step. Set the source to the MSK cluster's own security group, and run the ACL grant from a machine that uses this security group in the same VPC as the cluster. For the full MSK port mapping, see Port information.
Note:
A second security group update is required in Step 5 to open ports 14098-14100 for VeloDB Cloud's multi-VPC private connection.
Grant ACL permissions
Run the following commands from a machine inside the same VPC as the MSK cluster. You need the Kafka CLI, which requires the Java JDK.
-
Configure AWS credentials. Run the following to verify credentials are set up:
aws sts get-caller-identityIf credentials are not configured, add an IAM role to the EC2 instance or run
aws configure. -
Add
client-msk-iam.propertiesto the Kafka CLIconfigdirectory:security.protocol=SASL_SSL
sasl.mechanism=AWS_MSK_IAM
sasl.jaas.config=software.amazon.msk.auth.iam.IAMLoginModule required;
sasl.client.callback.handler.class=software.amazon.msk.auth.iam.IAMClientCallbackHandler -
Download the IAM auth library and place it in the Kafka CLI
libsdirectory:aws-msk-iam-auth-1.1.9-all.jar -
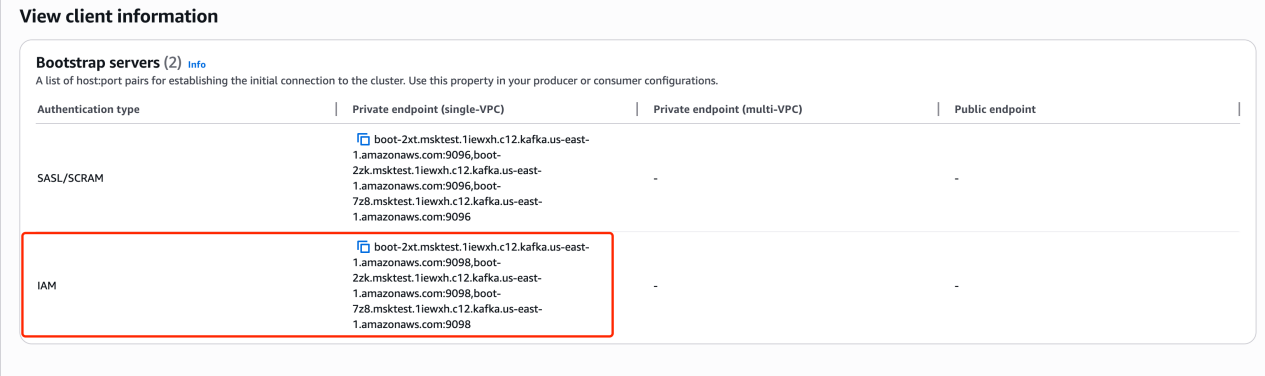
Get the IAM Private endpoint. In the MSK console, click View client information and copy the IAM bootstrap server endpoint.
-
Grant ACL permissions to the SASL/SCRAM username. Replace the placeholders with your MSK cluster's IAM Private endpoint and the associated username:
./bin/kafka-acls.sh --bootstrap-server <MSK_IAM_PRIVATE_ENDPOINT> \
  --command-config ./config/client-msk-iam.properties \
  --add --allow-principal User:<USERNAME> \
  --operation All --topic '*' --group '*' --cluster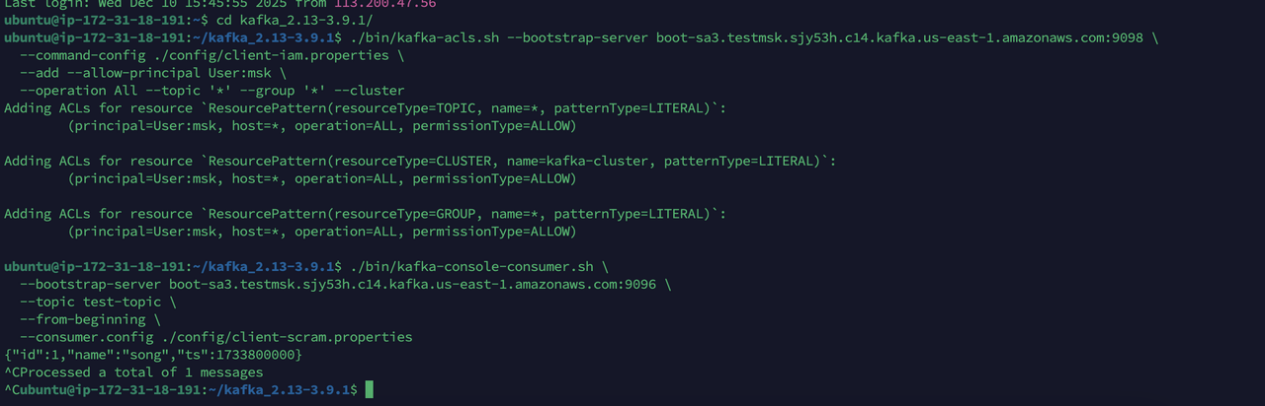
Step 4: Grant VeloDB Cloud account access
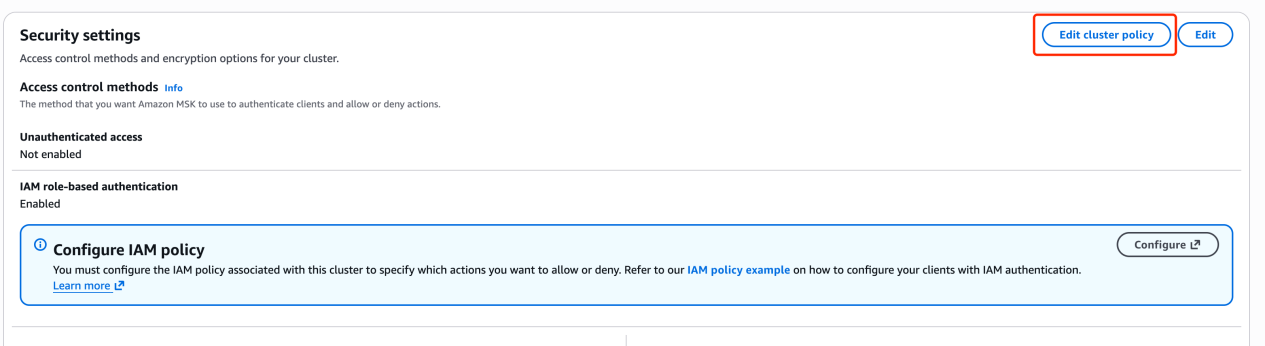
In the MSK console, go to Security and click Edit cluster policy. Attach the following resource-based policy to allow VeloDB Cloud to create a VPC connection and retrieve broker information. Replace the Resource ARN with your cluster's ARN. For the cluster policy requirements, see Permissions for multi-VPC private connectivity.
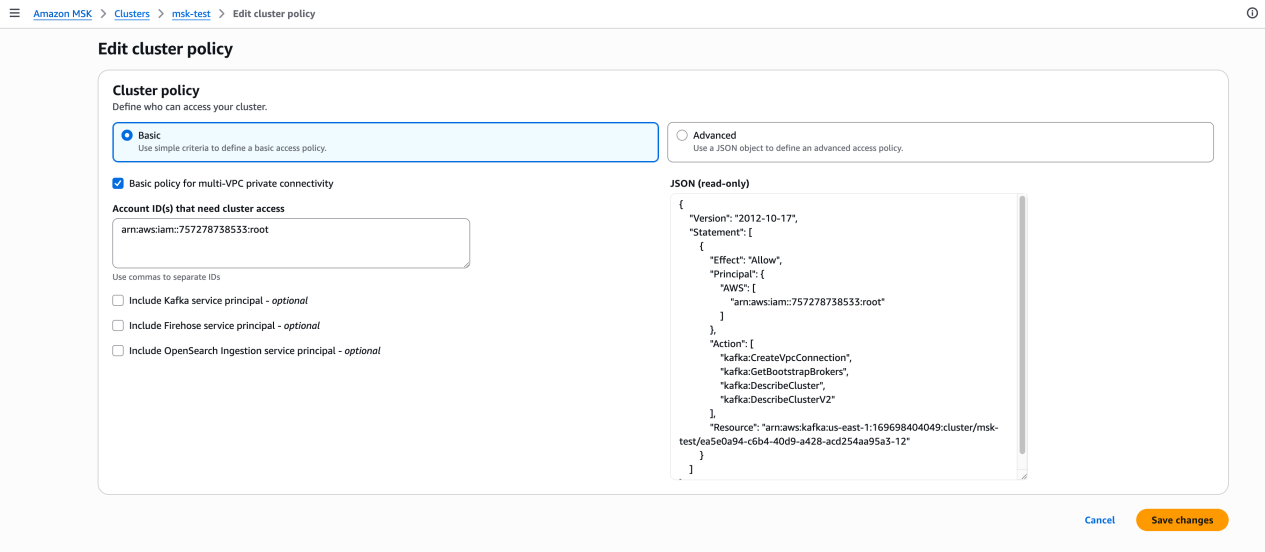
{
  "Version": "2012-10-17",
  "Statement": [
    {
      "Effect": "Allow",
      "Principal": {
        "AWS": "arn:aws:iam::757278738533:root"
      },
      "Action": [
        "kafka:CreateVpcConnection",
        "kafka:GetBootstrapBrokers",
        "kafka:DescribeCluster",
        "kafka:DescribeClusterV2"
      ],
      "Resource": "arn:aws:kafka:<REGION>:<ACCOUNT_ID>:cluster/<CLUSTER_NAME>/<CLUSTER_ID>"
    }
  ]
}
Step 5: Update the security group for VeloDB access
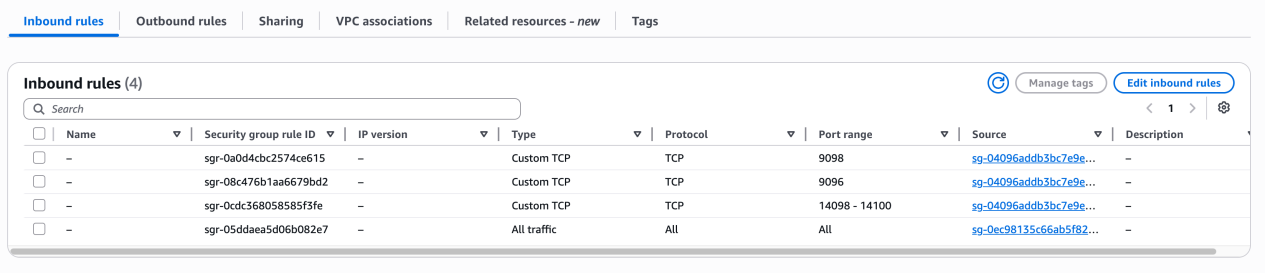
Add inbound rules to the MSK cluster's security group to allow traffic on ports 14098-14100, using the MSK cluster's own security group as the source. VeloDB Cloud connects over the multi-VPC private endpoint from a different AWS account. Because this access is cross-account, the multi-VPC network interfaces run in your VPC under the cluster's security group, so a self-referencing rule allows the traffic. You can't reference a security group or CIDR from VeloDB's account. These ports are distinct from the same-VPC broker ports opened in Step 3.
Step 6: Connect VeloDB Cloud to MSK
In the AWS Console:
-
Navigate to your MSK cluster and copy the cluster ARN.

-
Go to View client information and copy the Private endpoint (multi-VPC) bootstrap servers for SASL/SCRAM. You'll need these in the next step.
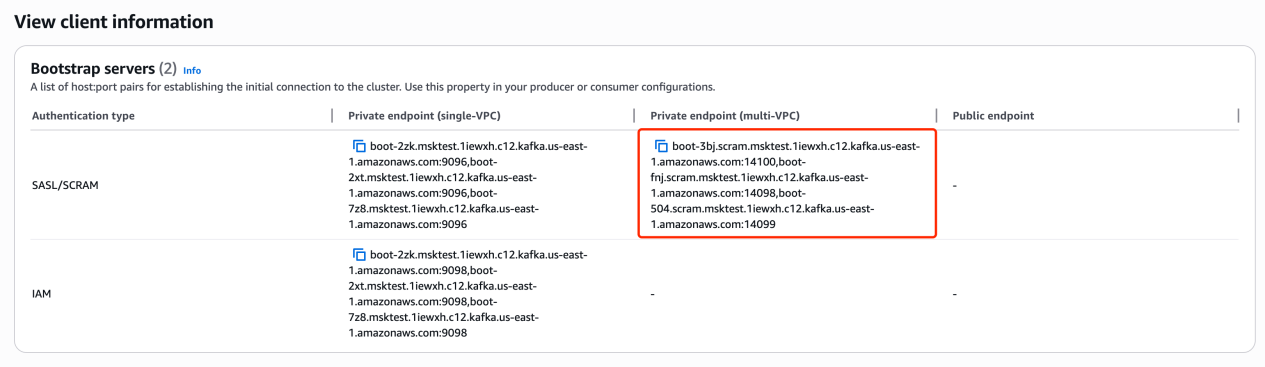
In VeloDB Cloud:
-
Log in to the VeloDB Cloud console.
-
In the upper-left corner, select the warehouse that you want to use.
-
In the left navigation pane, under INGESTION, click Import Data, then click + Add Import Job. Enable Reverse Private Endpoint and click Set up Connection.
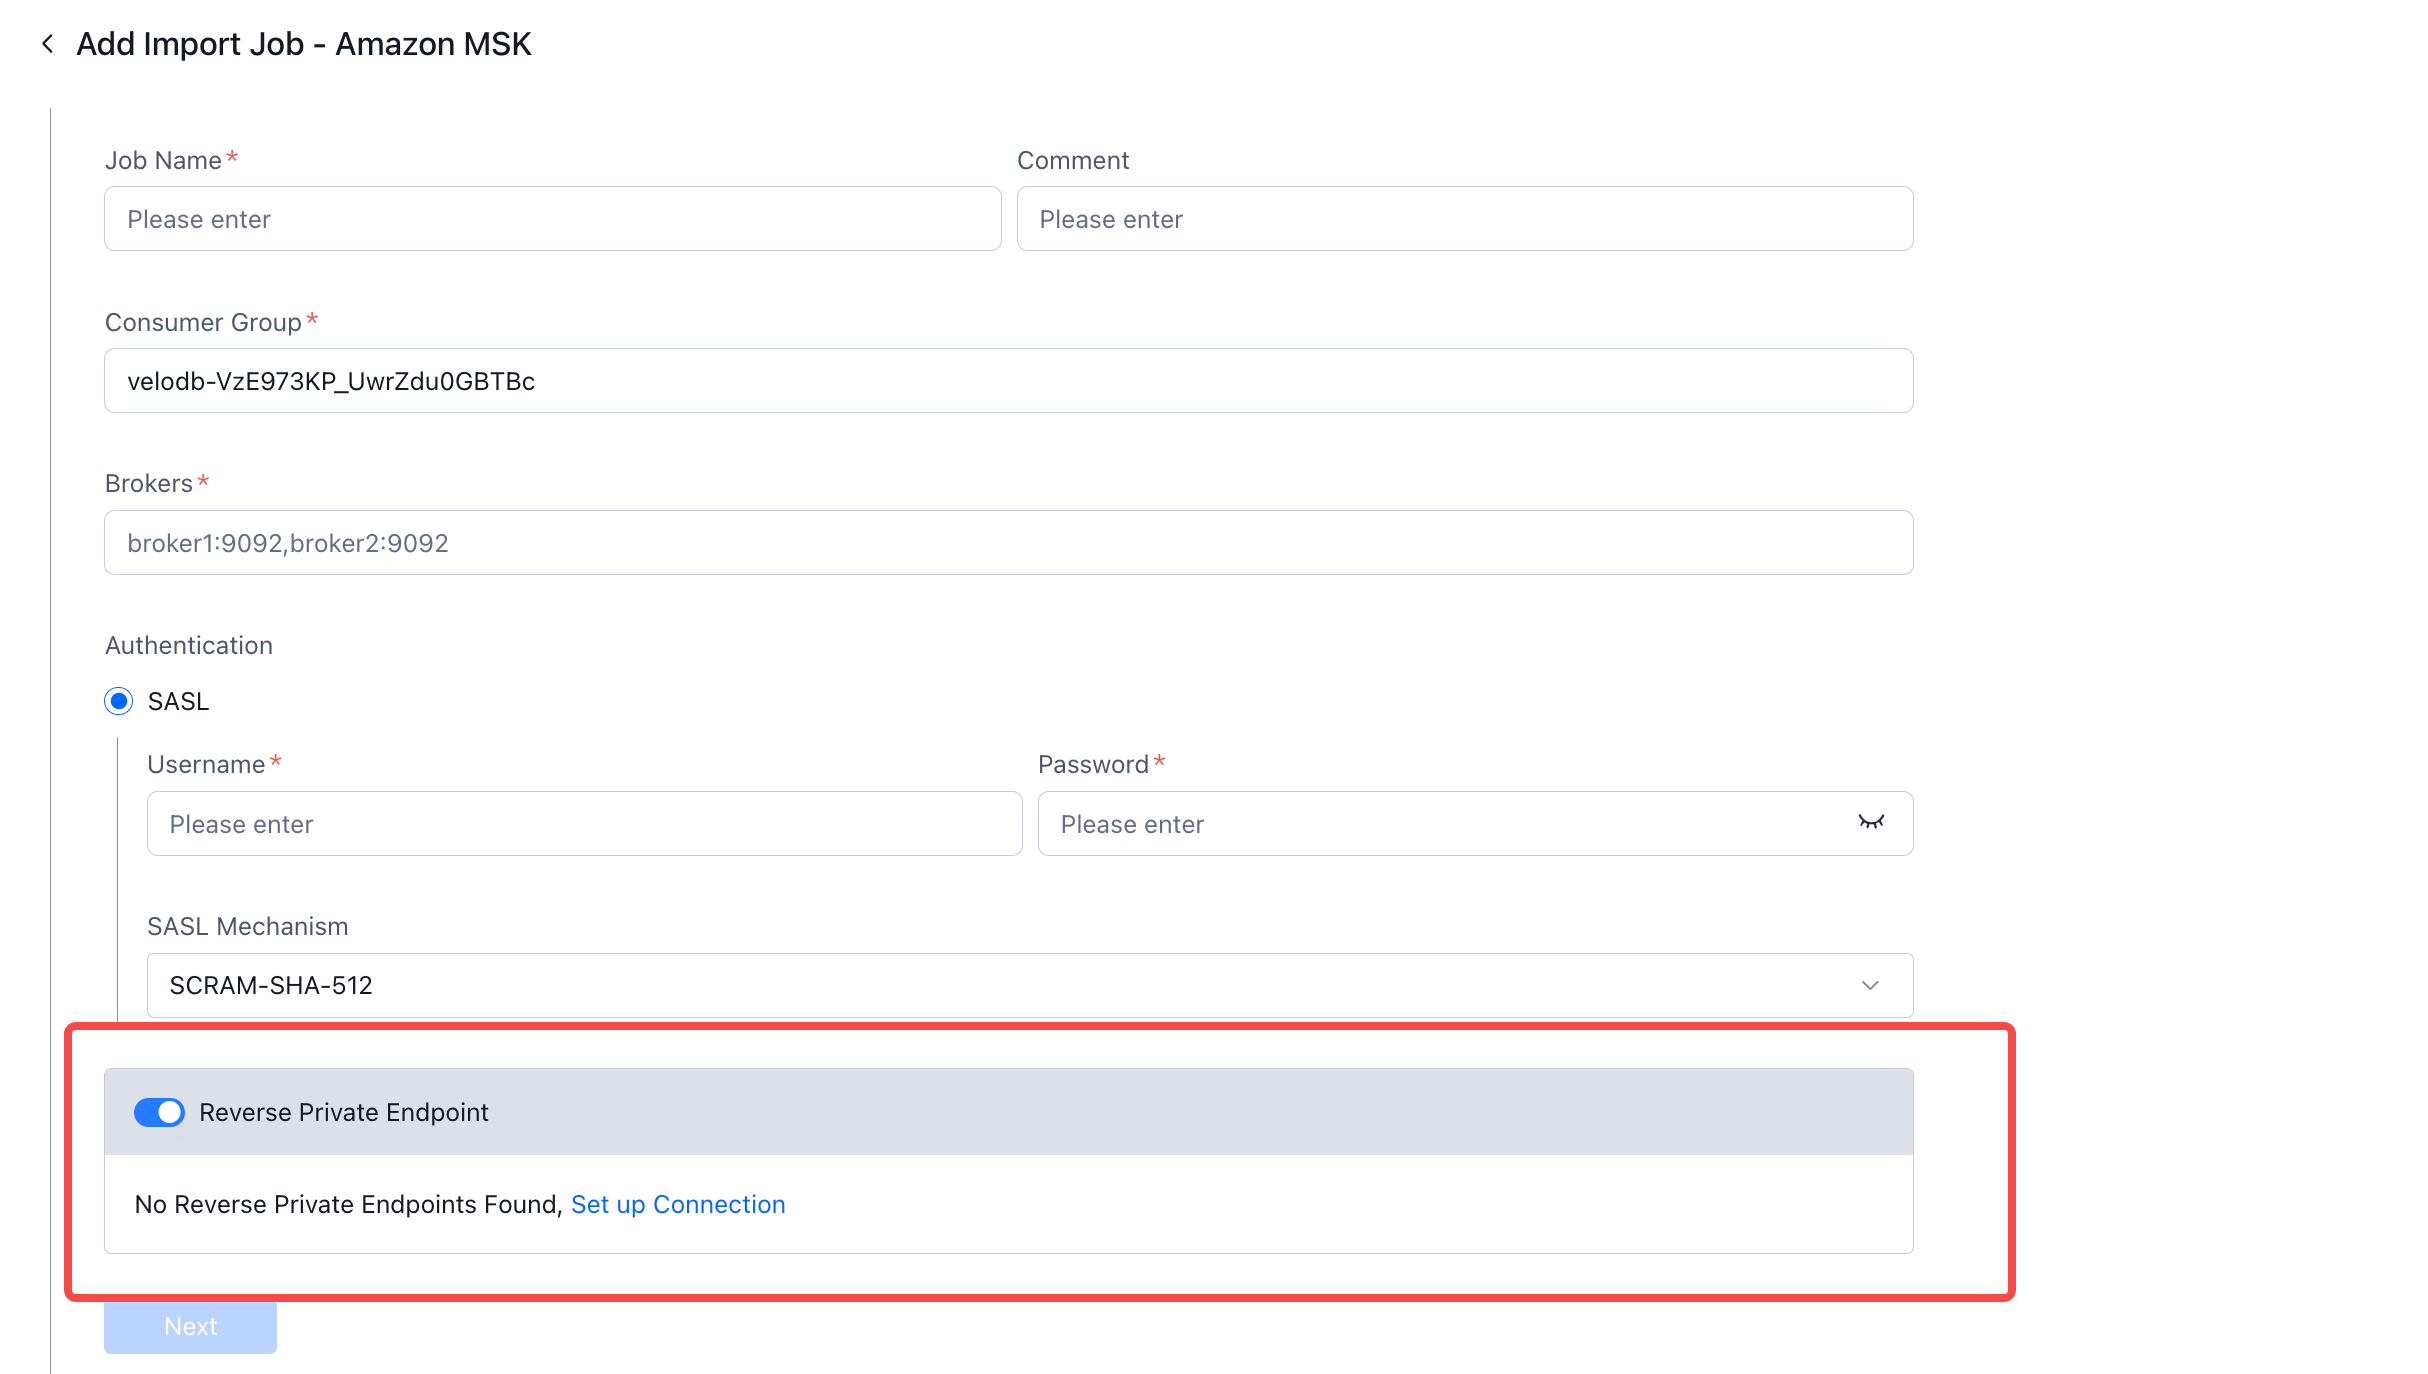
-
In the Set up Connection panel, select SASL/SCRAM as the authentication type and enter the cluster ARN.
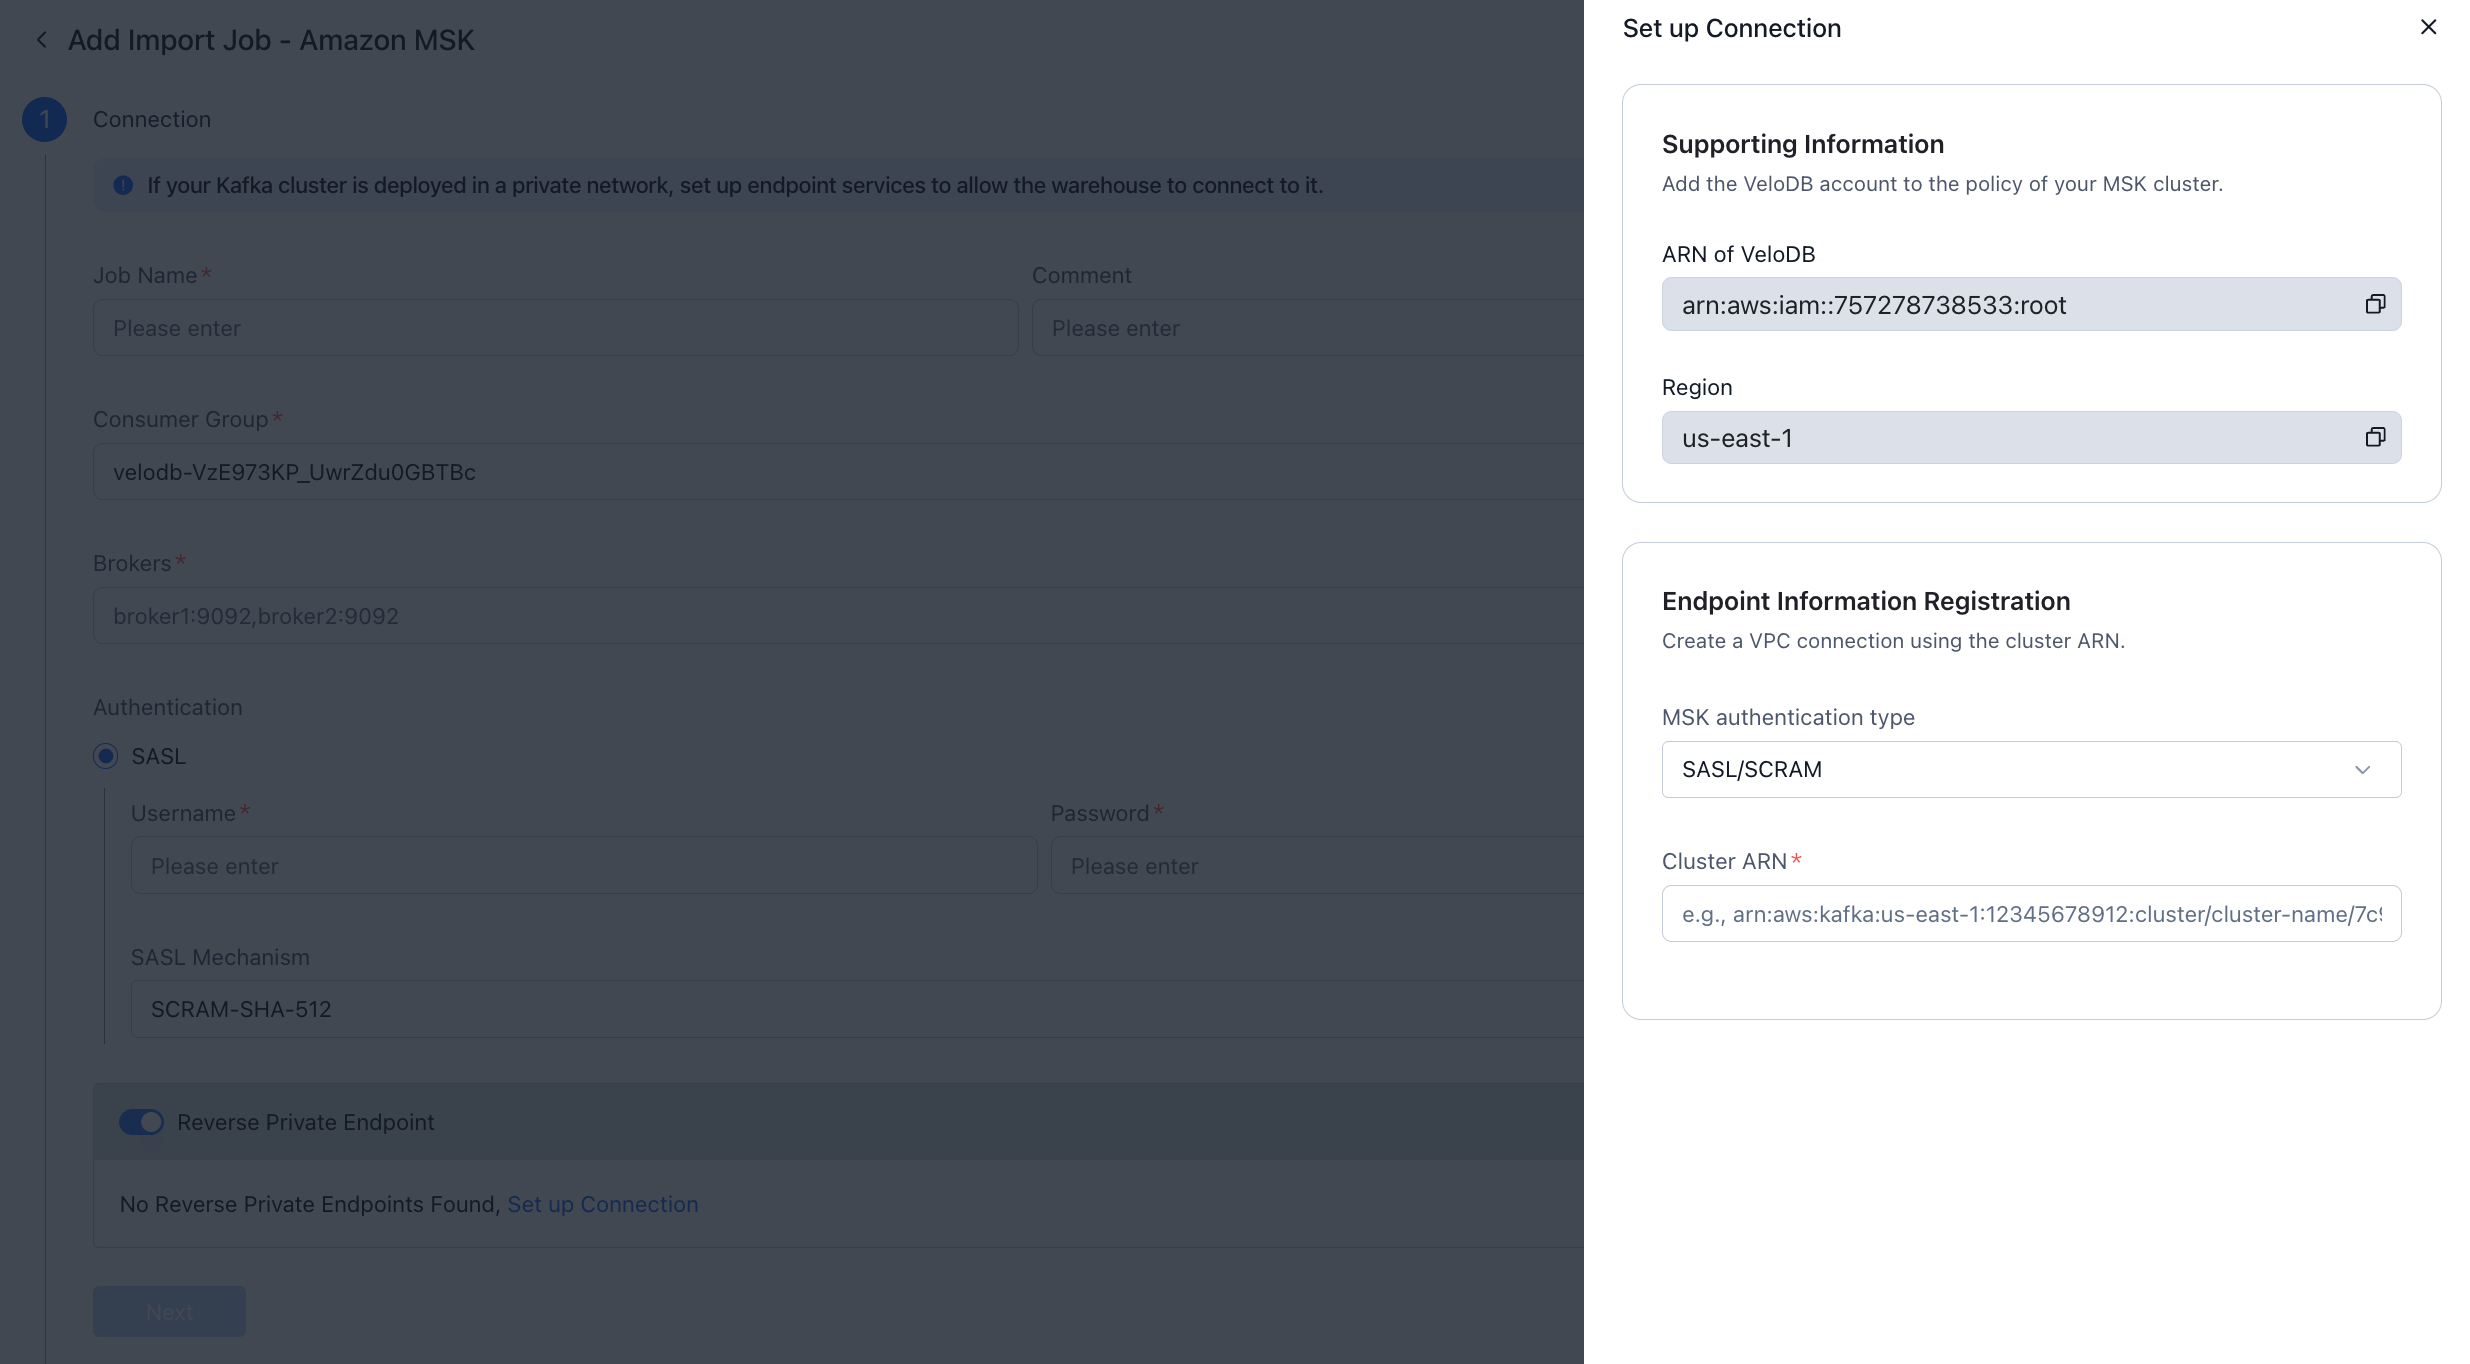
-
Fill in the import job details:
- Brokers: paste the multi-VPC bootstrap servers copied in step 2
- Authentication: select SASL, enter the SASL/SCRAM username and password, and set the SASL Mechanism to SCRAM-SHA-512
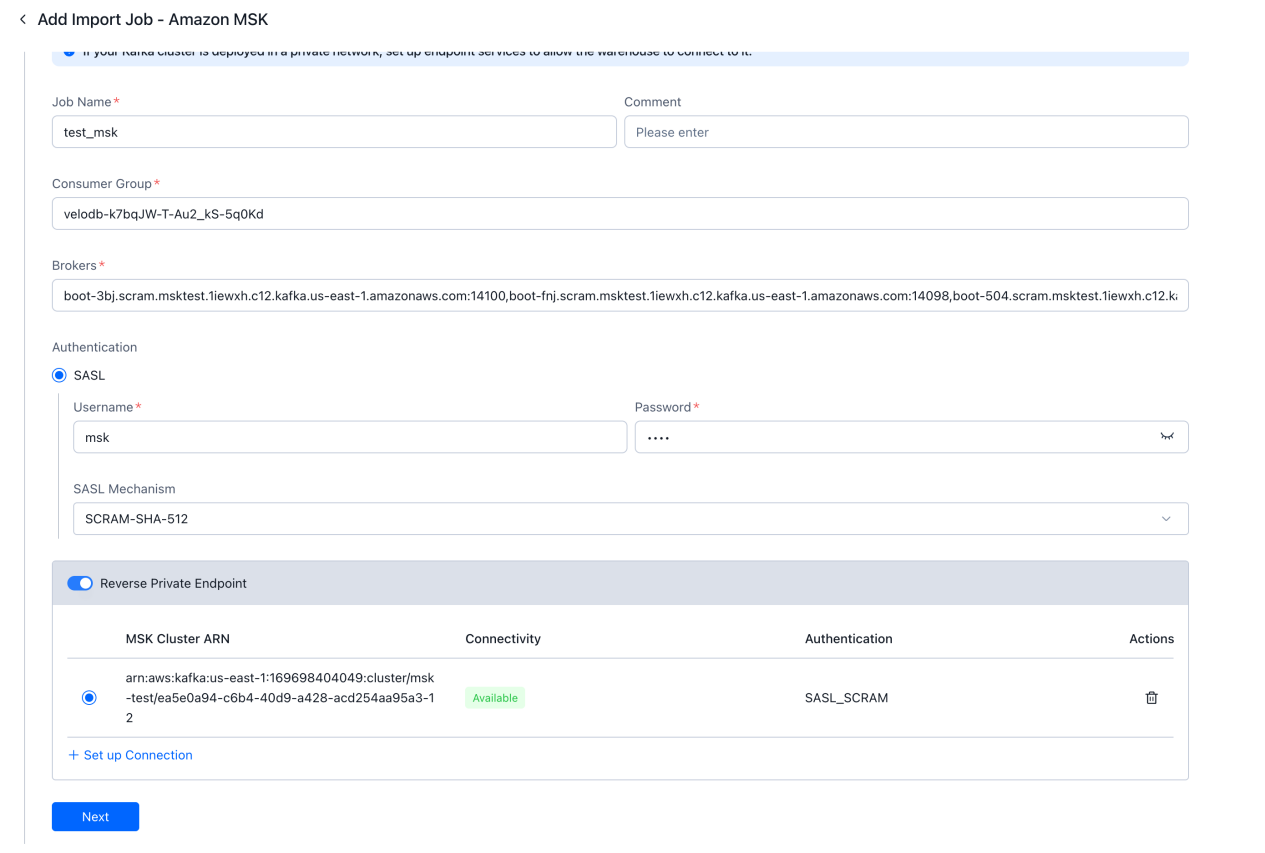
-
Click Next to complete the connection setup. VeloDB Cloud establishes a private endpoint (multi-VPC) to the MSK cluster.
Step 7: Access the MSK cluster
Once the connection is established, the MSK cluster appears in the Reverse Private Endpoint table with Available connectivity status.

Configure import jobs to consume data from Kafka topics in your MSK cluster via the Private endpoint (multi-VPC).