BYOC on AWS: Cloud Resource Preparation
This guide is a reference for cloud administrators preparing the AWS resources a VeloDB Cloud BYOC warehouse needs. How much you prepare depends on the deployment option:
- New VPC: You run a VeloDB-provided CloudFormation template in your own AWS account that creates the VPC and all other resources. You only need an AWS account with the IAM permissions to create the stack, so you can skip the rest of this page.
- Existing VPC: You run the same template into a VPC you already have, and the template creates the remaining resources. You do not prepare credentials, networks, or other resources. You only need to confirm that your VPC and subnets meet the network requirements in VPC and subnets.
- Custom Infrastructure: You prepare and manage all of the resources yourself, then register them in the console as a Credential configuration, a Network configuration, and, optionally, an Encryption key configuration. Use the full set of sections below.
Two ways to prepare cloud resources
For Custom Infrastructure, you create these configurations in either of two ways:
- Ahead of time, from the Cloud Resources page.
- Inline, while creating a warehouse with the Custom Infrastructure option, where you select an existing configuration or add a new one on the spot.
Either way, the configuration is saved and can be reused by other warehouses.
Open the Cloud Resources page
The console has two navigation scopes, each with its own left-hand menu: an organization view and a warehouse view. The Cloud Resources page is in the organization view.
- In the top bar, click your organization name (for example,
velodb20) to switch to the organization view. In this view, the warehouse selector shows All Warehouses. - In the left navigation, click Cloud Resources.
- Use the Credential Configuration, Network Configuration, and Encryption Keys Configuration tabs to view existing configurations, or click Add New Configuration to add one.
The Cloud Resources page is available to organization administrators.
The sections below describe the AWS resources behind each configuration.
Credential configuration
A Credential configuration lets a warehouse read and write your S3 bucket and lets VeloDB Cloud deploy compute in your account. You create it in the console with Create Credential, which walks through three steps, Basic Information, Storage Access, and Infrastructure Access. Prepare the AWS resources each step needs, as described below.
Basic Information
Basic Information identifies the credential and the S3 bucket where the warehouse stores data. Create the bucket first.
Create an S3 bucket
Note The bucket must be in the same AWS region as the warehouse.
- Sign in to the AWS S3 Console as an administrator and click Create bucket.
- Enter a bucket name and select the target region.
- Click Create bucket.
- Copy the bucket name. In Basic Information, enter a credential name, the cloud platform, the region, and this bucket name, then click Continue.
Storage Access
Storage Access lets the EC2 instances that run the warehouse read and write your S3 bucket, through an IAM role they assume.
Create the data-access IAM policy
-
Open the AWS IAM Console and go to Policies → Create policy.
-
On the JSON tab, paste the data-access policy. The Storage Access step of Create Credential shows it ready to copy, with your bucket name filled in. The full policy is in Reference: IAM policies.
-
Click Next, name the policy (for example,
VeloDBDataStorageAccess), and click Create policy.
Create the service IAM role
-
In IAM, go to Roles → Create role.
-
Pick AWS service as the trusted entity type and EC2 as the use case.
-
Attach the policy you just created.
-
Name the role (for example,
VeloDBDataStorageAccessRole) and create it. -
On the role's Trust Relationships tab, replace the trust policy with the following. The
AWSprincipal is this role's own ARN: replace<aws-account-id>with your AWS account ID and<role-name>with the role you created in step 4, or copy the role's ARN from its summary page.{
"Version": "2012-10-17",
"Statement": [
{
"Effect": "Allow",
"Principal": {
"Service": "ec2.amazonaws.com",
"AWS": "arn:aws:iam::<aws-account-id>:role/<role-name>"
},
"Action": "sts:AssumeRole"
}
]
} -
Copy the Instance Profile ARN (format:
arn:aws:iam::<aws-account-id>:instance-profile/<role-name>), paste it into the Storage Access step, and click Continue.
Infrastructure Access
Infrastructure Access lets VeloDB Cloud deploy and manage compute in your account, through a cross-account IAM role it assumes with an external ID. Complete Storage Access first: the deployment policy references your bucket and service role.
Create the deployment IAM policy
Note After you complete the Storage Access step, the Infrastructure Access step shows a ready-to-use policy that you can paste directly, without manual substitutions. The full policy is in Reference: IAM policies.
-
In the IAM console, go to Policies → Create policy.
-
On the JSON tab, paste the deployment policy. The Infrastructure Access step of Create Credential shows it ready to copy, with your account, bucket, and role filled in. The full policy is in Reference: IAM policies.
-
Click Next, name the policy (for example,
AllowVeloDBCrossAccountAccess), and click Create policy.
Create the cross-account IAM role
- In IAM, go to Roles → Create role.
- Trusted Entity Type: Select Custom trust policy.
- ExternalId: paste the External ID shown in the console's Infrastructure Access step. The principal account in the trust policy below is the Trust Account ID the console displays.
- Custom trust policy: Paste this trust policy.
 {
     "Version": "2012-10-17",
     "Statement": [
         {
             "Effect": "Allow",
             "Principal": {
                 "AWS": "arn:aws:iam::757278738533:role/VeloDBDeploymentAssumer"
             },
             "Action": "sts:AssumeRole",
             "Condition": {
                 "StringEquals": {
                     "sts:ExternalId": "<external-id>"
                 }
             }
         }
     ]
} - Permissions: attach the deployment policy you created earlier.
- Name the role (for example,
AllowVeloDBCrossAccountAccess) and create it. - Copy the Role ARN, paste it into the Infrastructure Access step as the Cross-Account Role ARN, then click Confirm to save the credential.
Network configuration
A Network configuration references a credential and defines where the warehouse runs: the subnets, the security group, and an optional VPC endpoint for private connectivity. In the console you create it with Add Network and choose Single-AZ or Multi-AZ. After you enter the network name, credential, subnets, security group, and any VPC endpoint, click Confirm.
VPC and subnets
A VPC that matches VeloDB's network requirements is a prerequisite for the Existing VPC and Custom Infrastructure options. For Existing VPC, you select the prepared VPC in the creation flow. For Custom Infrastructure, you register its subnets through Add Network. For New VPC, the template creates the VPC and subnets for you.
Multi-AZ deployment is available in every option and is determined by the subnets the warehouse uses. Multi-AZ is recommended for greater resilience.
- Multi-AZ (recommended): use three subnets, each in a different availability zone. In the Existing VPC and Custom Infrastructure options you provide the three subnets. In Custom Infrastructure, you also enable Multiple Availability Zones in Add Network.
- Single-AZ: use one subnet.
We recommend a public and a private subnet in each availability zone, with VeloDB deployed in the private subnets.
-
Sign in to the AWS VPC Console as an administrator.
-
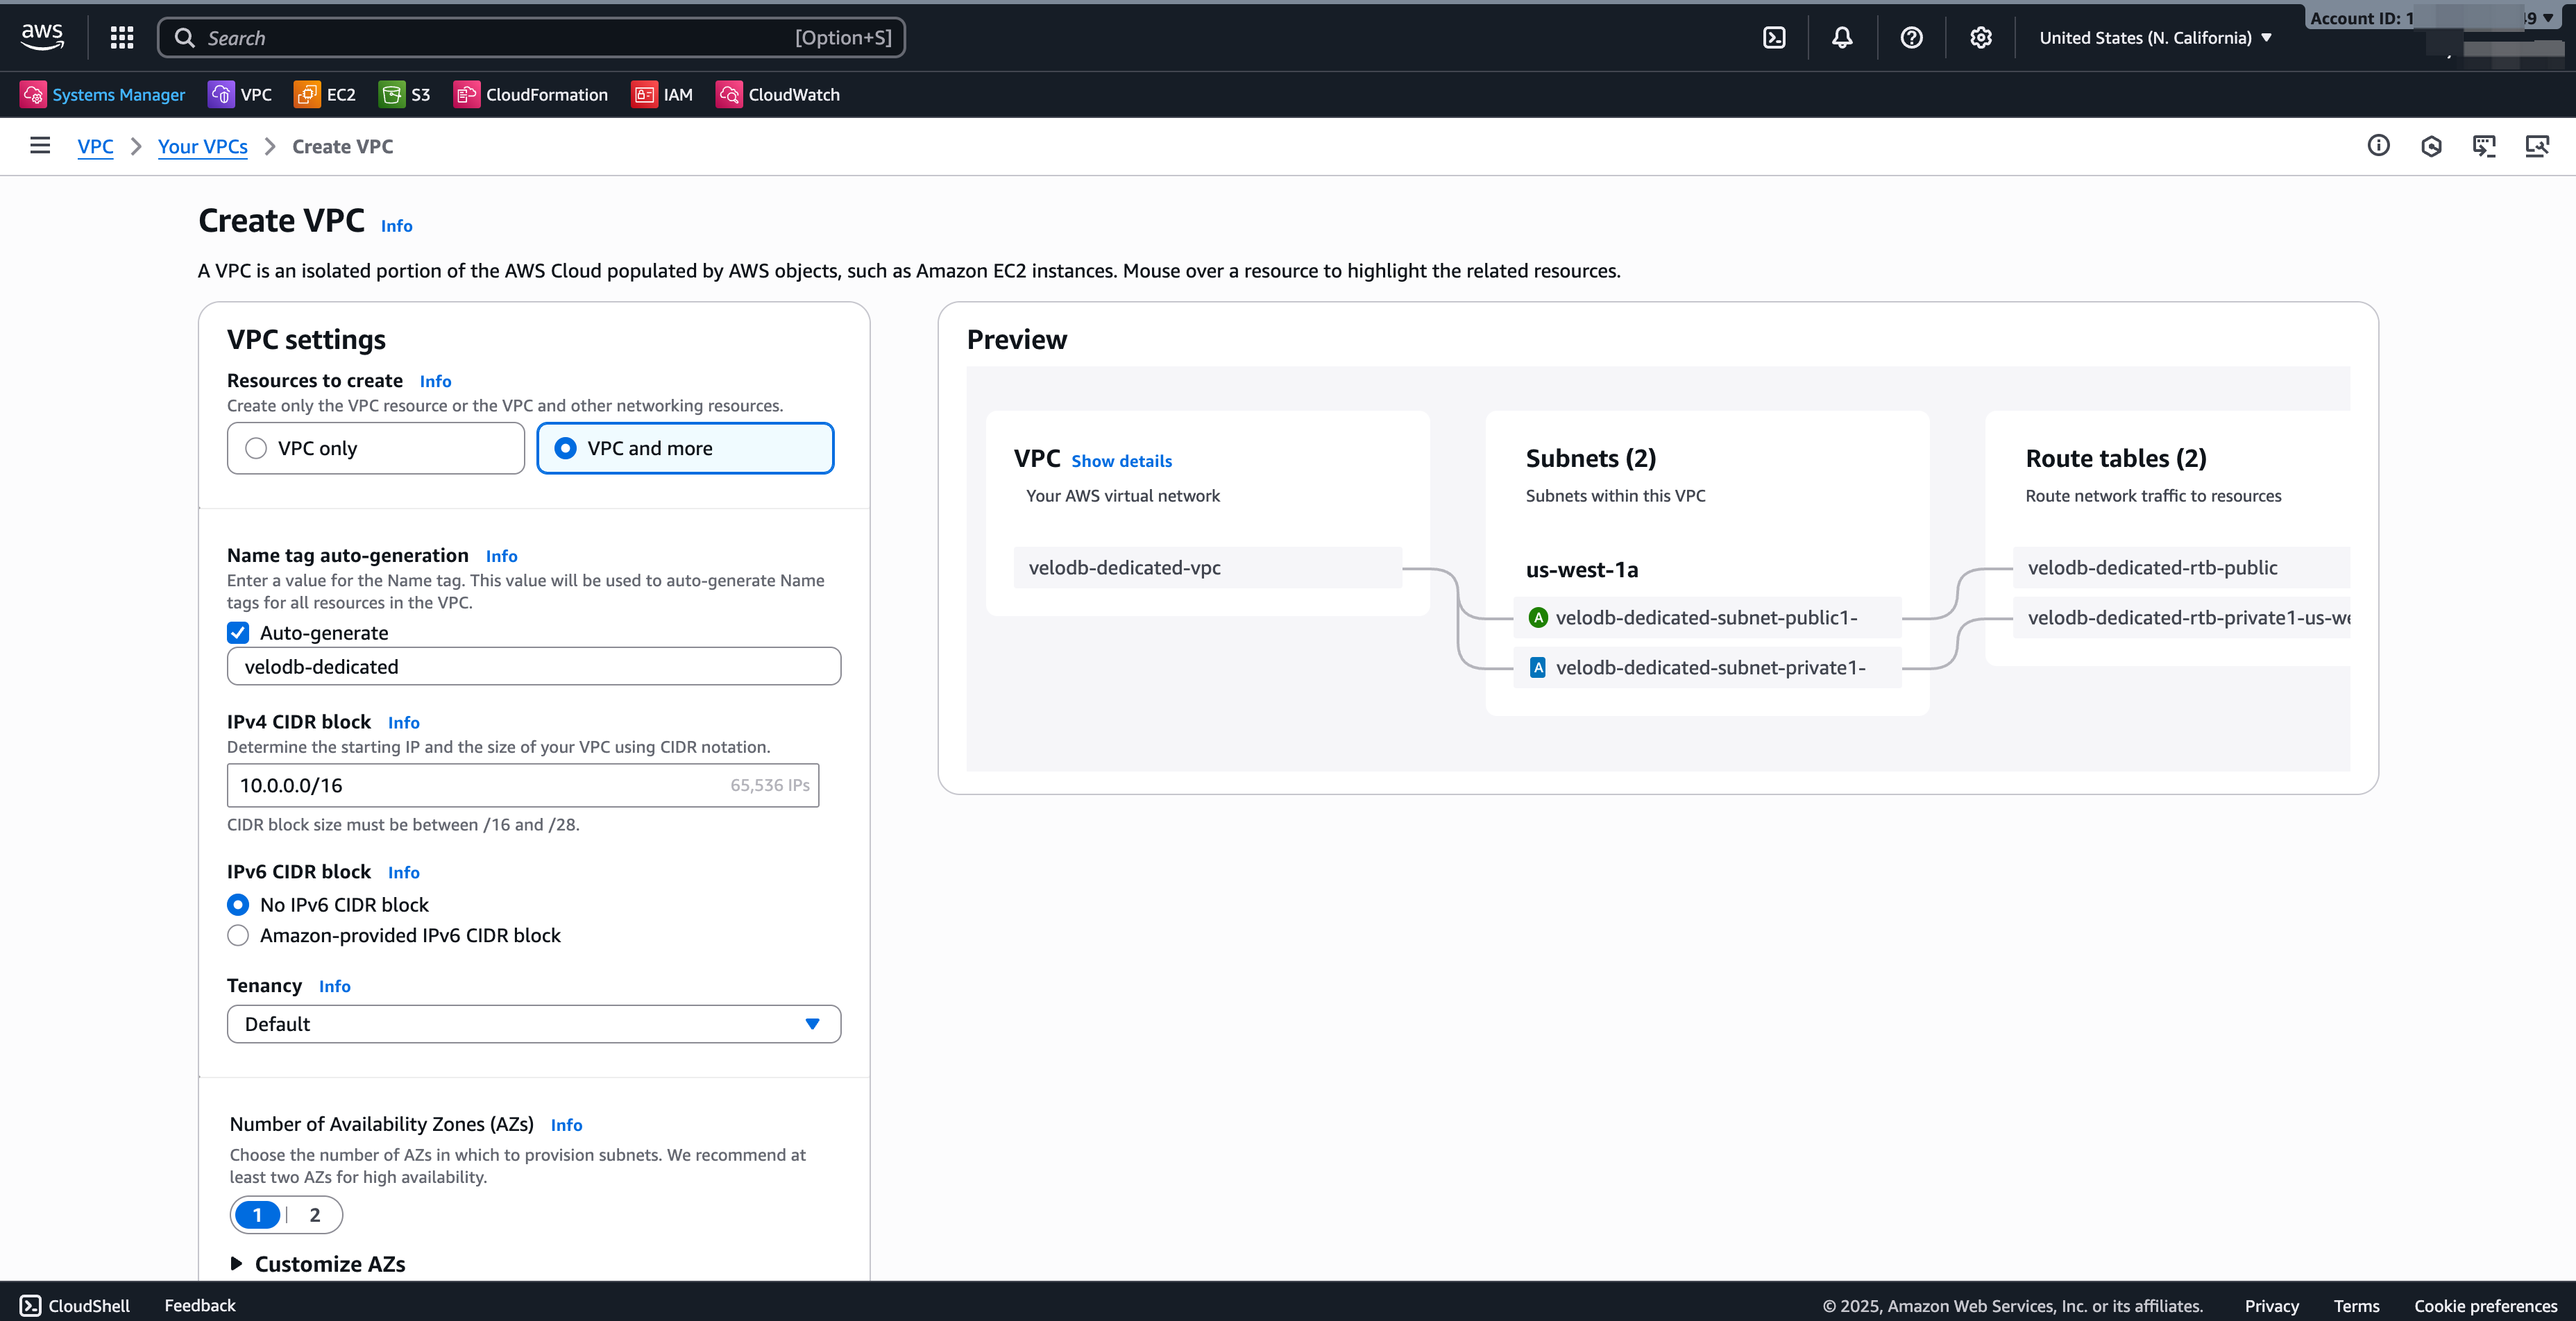
Select the target region and click Create VPC.
-
Resources to create: VPC and more.
-
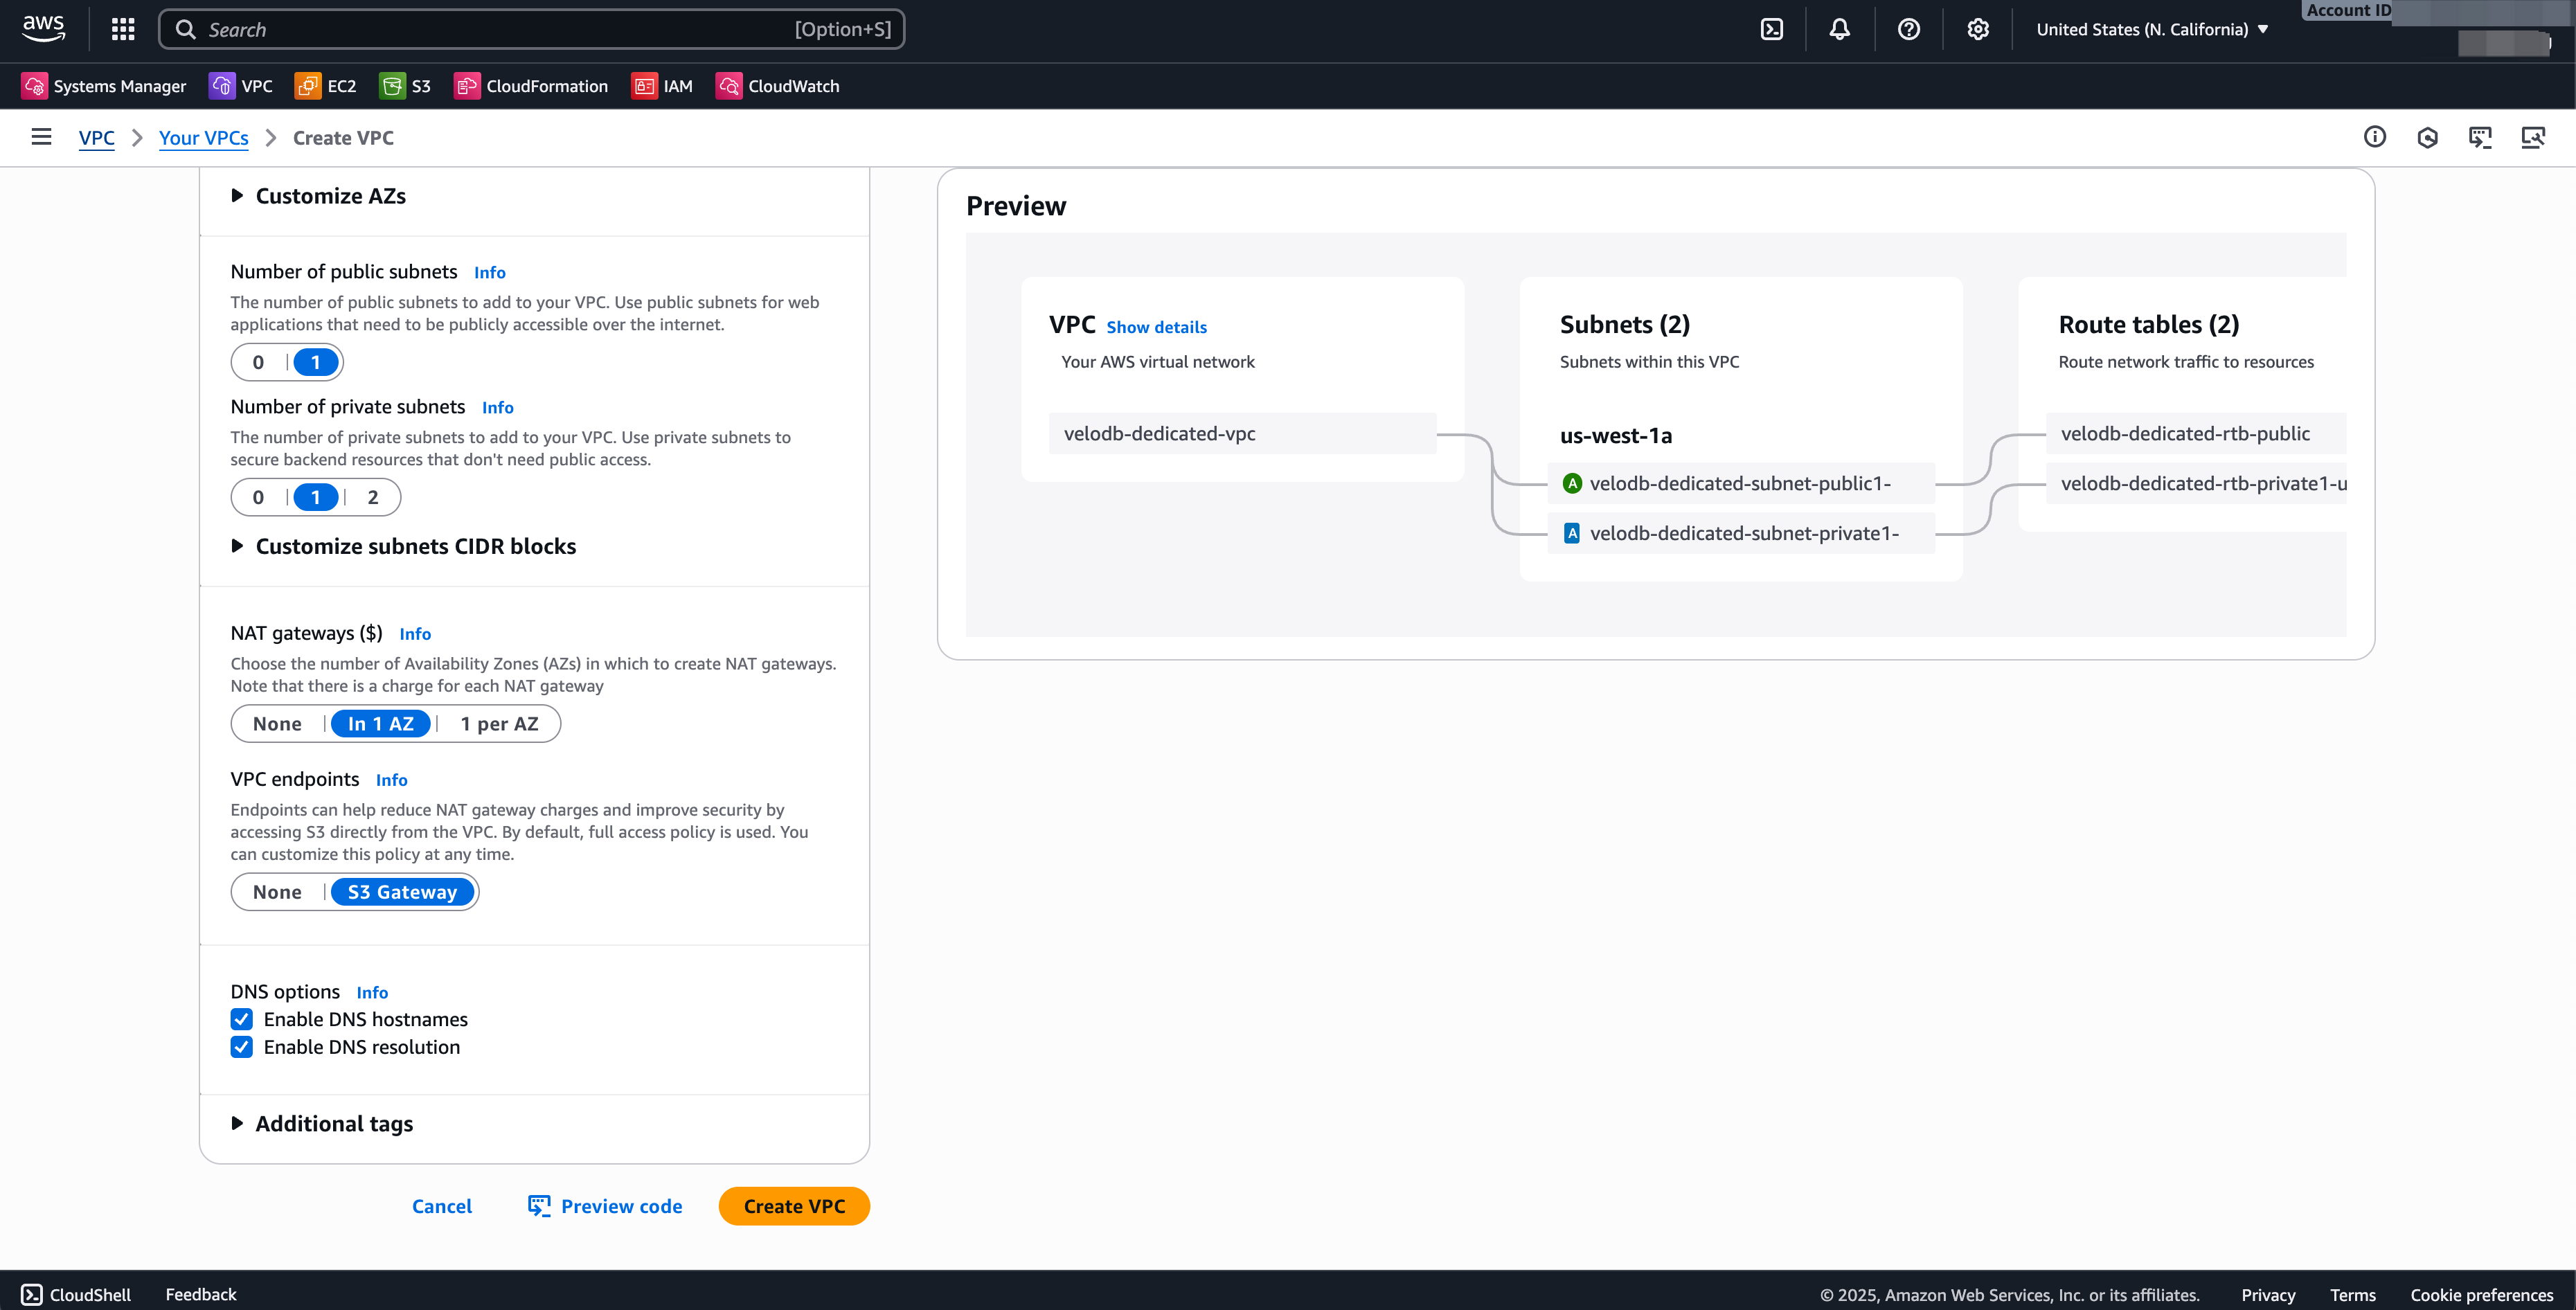
Adjust these fields (keep other defaults):
Field Value Name tag e.g. velodb-projectIPv4 CIDR block Your preferred starting IP and size. Number of Availability Zones 3 for Multi-AZ (default), or 1 for Single-AZ Number of public subnets 1 per availability zone Number of private subnets 1 per availability zone NAT gateways 1 per availability zone VPC Endpoints S3 Gateway (reduces NAT charges; access S3 privately) -
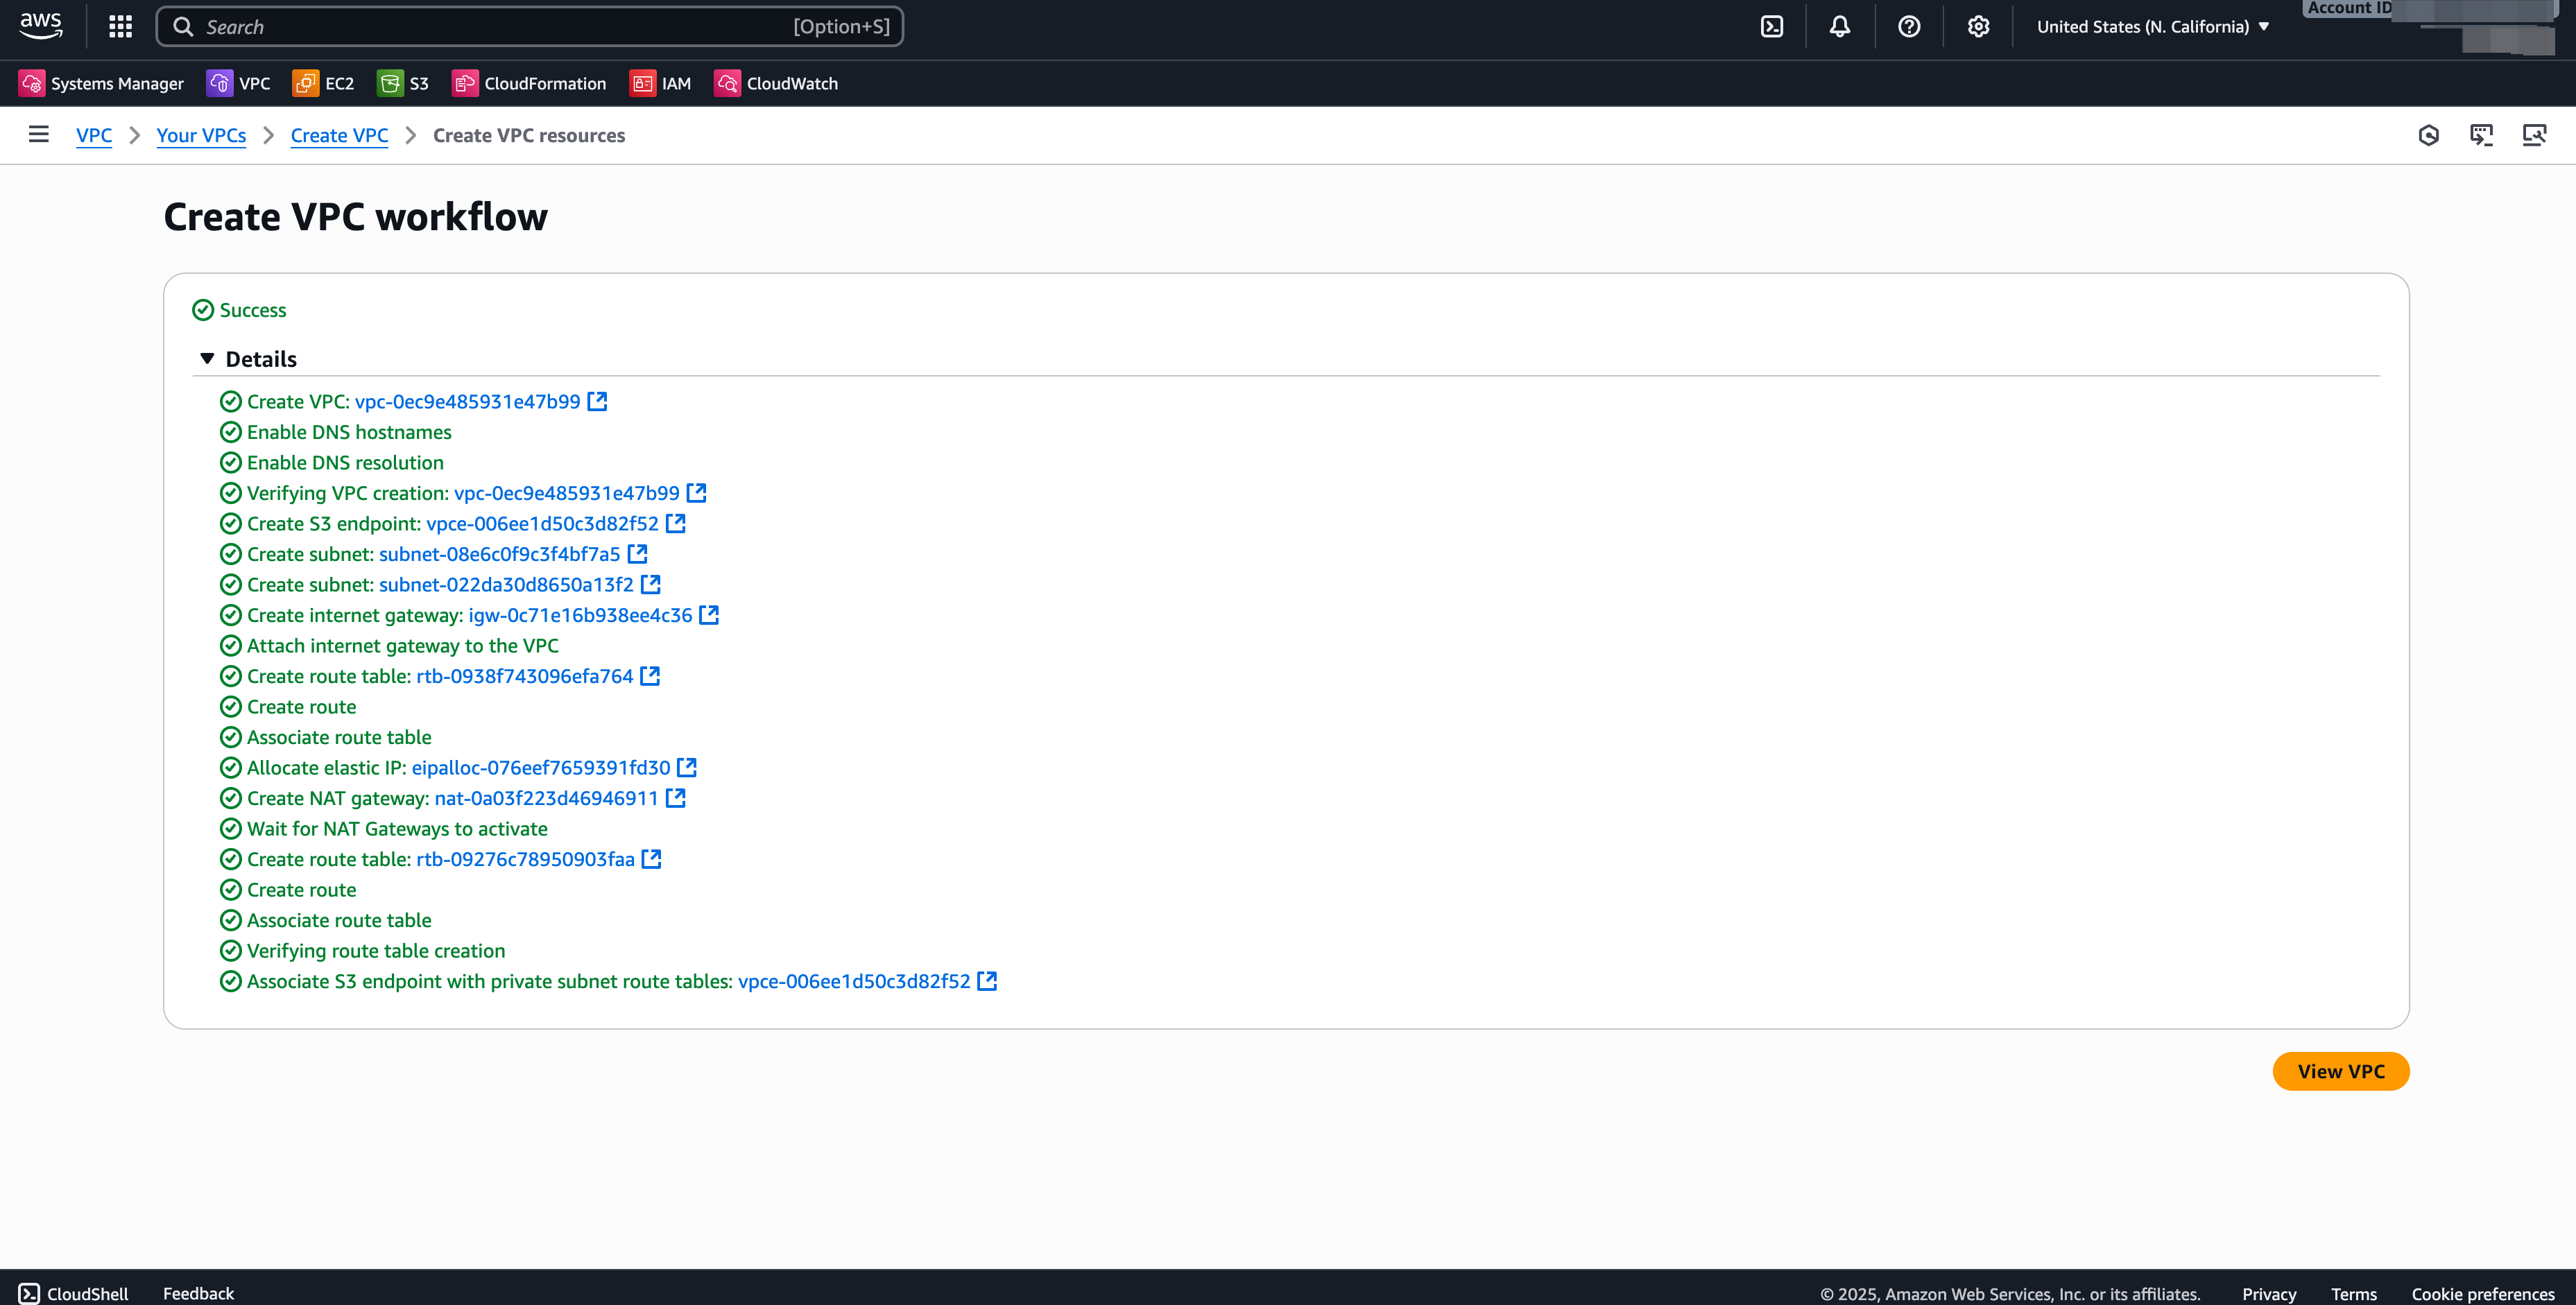
Click Create VPC, then View VPC when the workflow completes.
Security groups
A security group is a virtual firewall that controls traffic to its associated AWS resources. You typically need two security groups for BYOC, one for the VeloDB EC2 instances and one for VPC interface endpoints.
For EC2
- In the VPC Console, go to Security groups → Create security group.
- Name it (for example,
velodb-server-sg) and select the VPC. - Add inbound rules:
- Rule 1: Type All TCP, Source this security group.
- Rule 2: Type Custom TCP, Port range 8000-10000, Source the CIDR of the VPCs that need to reach the warehouse.
- Leave outbound rules as the default (all outbound allowed).
- Click Save rules and copy the Security group ID for the VeloDB console.
For VPC endpoints
- In the VPC Console, go to Security groups → Create security group.
- Name it (for example,
vpce-sg-for-velodb) and select the VPC. - Add the same inbound rules as above:
- Rule 1: Type All TCP, Source this security group.
- Rule 2: Type Custom TCP, Port range 8000-10000, Source the CIDR of the VPCs that need to reach the warehouse.
- Leave outbound rules as the default.
- Click Save rules.
Private endpoint to VeloDB
To keep BYOC traffic on the AWS backbone, create a private endpoint so your warehouse connects to the VeloDB Cloud service over PrivateLink instead of the public internet.
-
In the VPC Console, go to Endpoints → Create endpoint.
-
Fill in:
Field Value Name e.g. vpce-for-velodbService category PrivateLink Ready partner services Service name Copy the VeloDB PrivateLink service name for the warehouse region from AWS PrivateLink for VeloDB Services. Click Verify service: you should see "Service name verified". VPC The VPC to create the endpoint in. Subnets The private subnets for the endpoint's network interfaces. Security group The VPC-endpoint security group you created above (e.g. vpce-sg-for-velodb).Policy Full access (typical). -
Click Create endpoint.
S3 gateway endpoint
An S3 gateway endpoint gives instances in your VPC private connectivity to S3, avoiding the public internet and reducing NAT-gateway charges.
-
In the VPC Console, go to Endpoints → Create endpoint.
-
Fill in:
Field Value Name e.g. vpce-for-s3-gatewayService category AWS services Services Search S3, pickcom.amazonaws.{region}.s3with type Gateway.VPC The VPC to create the endpoint in. Route tables The route tables associated with your private subnets. Policy Full access or Custom. -
Click Create endpoint.
Encryption keys configuration
An Encryption key configuration registers one of your AWS KMS keys so a Custom Infrastructure warehouse can use it for Transparent Data Encryption (TDE), EBS encryption, or both. Encryption keys apply only to the Custom Infrastructure option. Add one from Add New Configuration on the Cloud Resources page, or inline while creating the warehouse.
To add an encryption key configuration:
- Basic: enter an Encryption Key Configuration Name, then in Choose Credential Configuration select the credential the key belongs to.
- Usage: choose what the key encrypts: Both TDE and EBS encryption, TDE only (encrypts warehouse data at rest), or EBS only (encrypts the cluster EBS volumes). TDE encryption keys can be changed after warehouse creation, while EBS encryption keys are fixed at creation and cannot be changed later.
- Grant KMS Access: create or choose a symmetric key in AWS KMS, then copy the KMS policy the console shows and add it to the key's key policy so VeloDB Cloud can encrypt and decrypt with it.
- Specify Key: enter the AWS Key ARN (
arn:aws:kms:<region>:<aws-account-id>:key/<key-id>), then click Confirm.
For how these keys are selected during warehouse creation, see Warehouse Encryption.
IAM role for cross-account S3 access (Catalogs integrations)
If you plan to use Catalogs integrations to read from S3 buckets in a different account, create an IAM role in the target account and grant VeloDB permission to assume it.
-
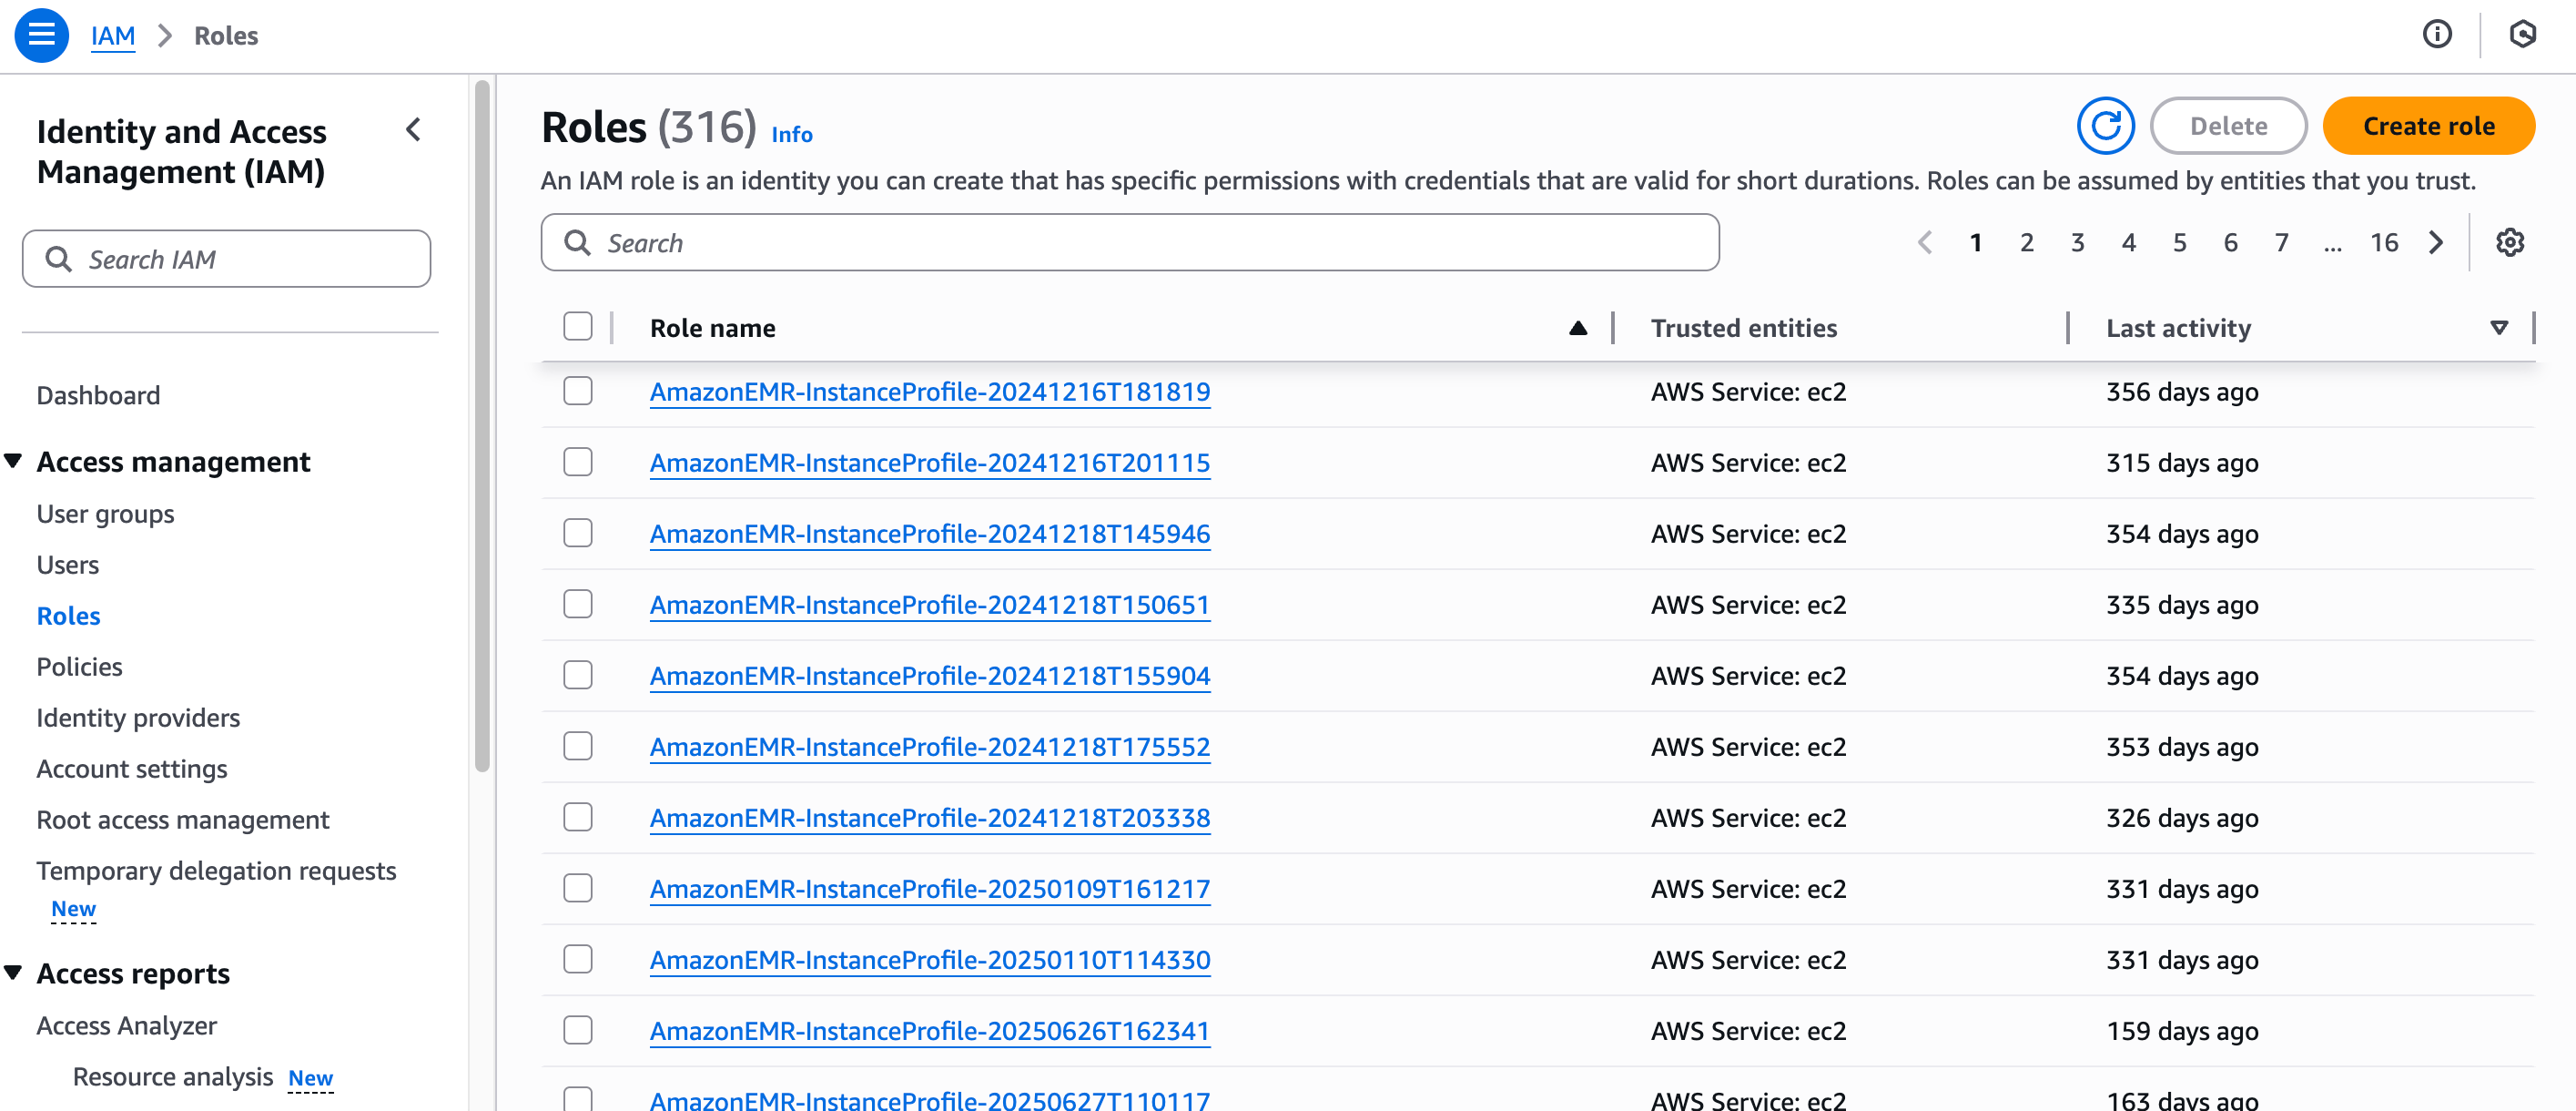
In the target AWS account, open IAM → Roles → Create role.
-
Select Custom trust policy and replace
<velodb-role-arn>with the IAM Role ARN of your VeloDB warehouse: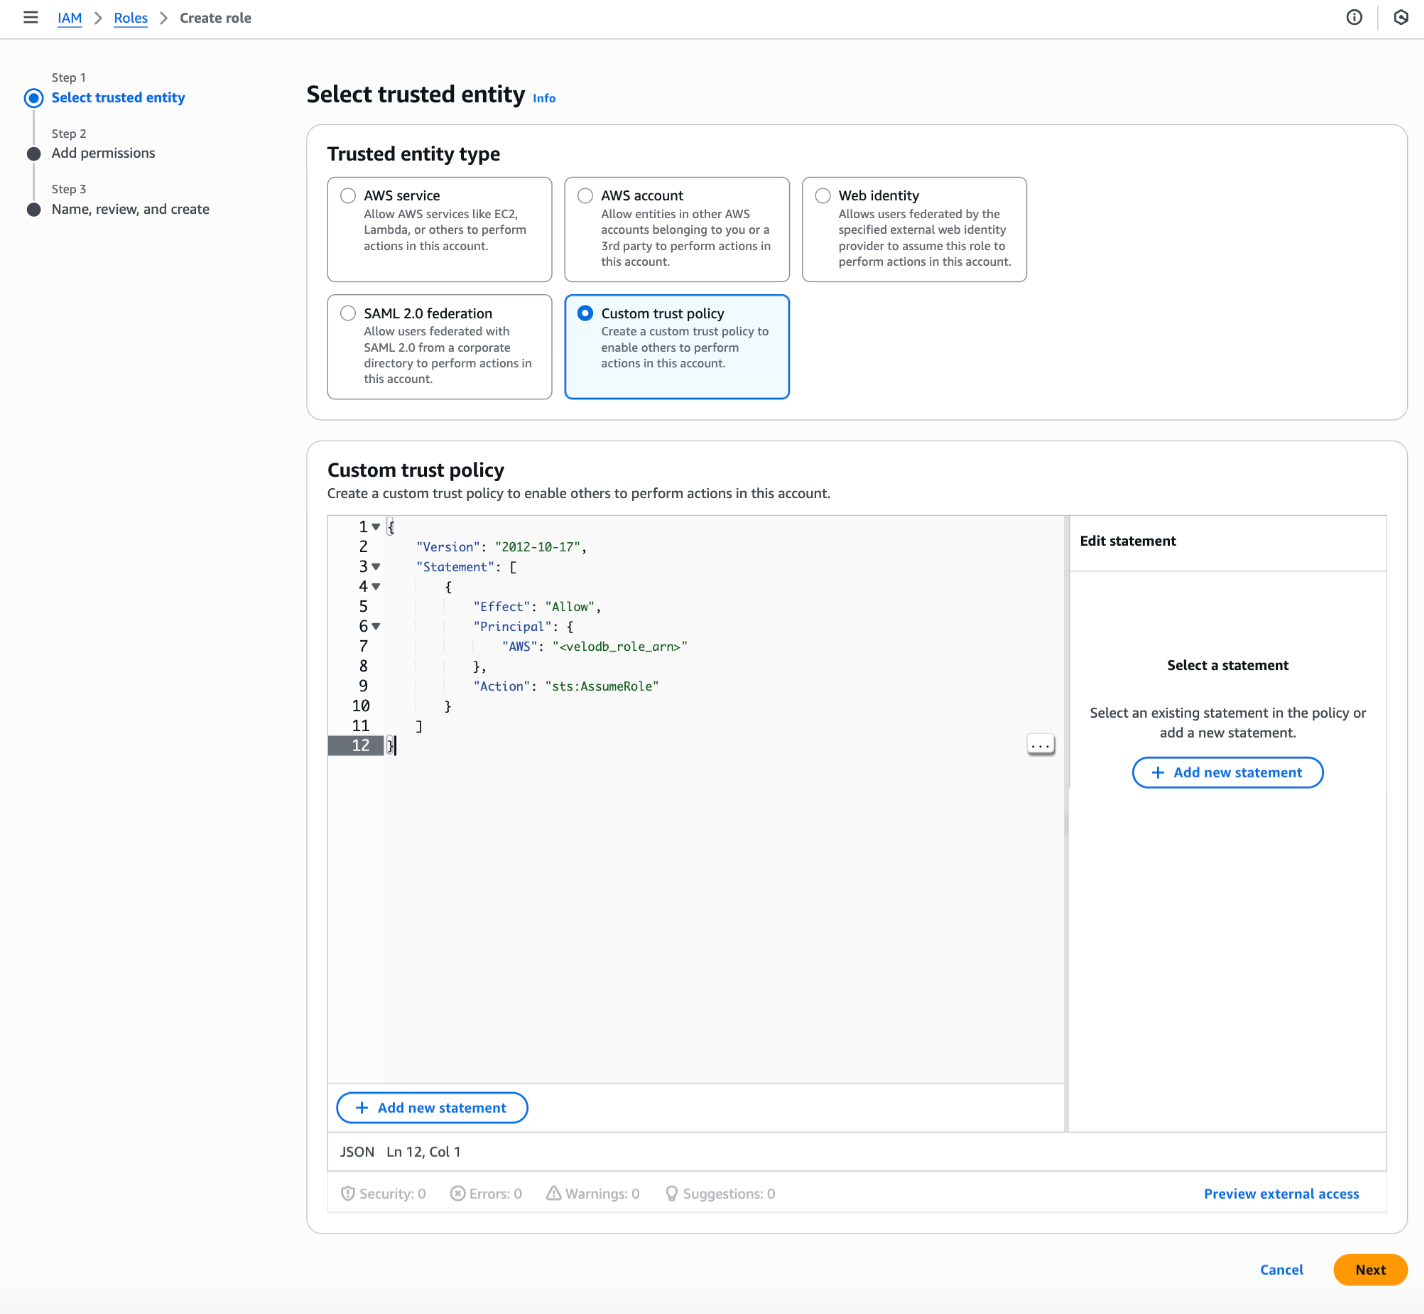
{
    "Version": "2012-10-17",
    "Statement": [
        {
            "Effect": "Allow",
            "Principal": {
                "AWS": "<velodb-role-arn>"
            },
            "Action": "sts:AssumeRole"
        }
    ]
} -
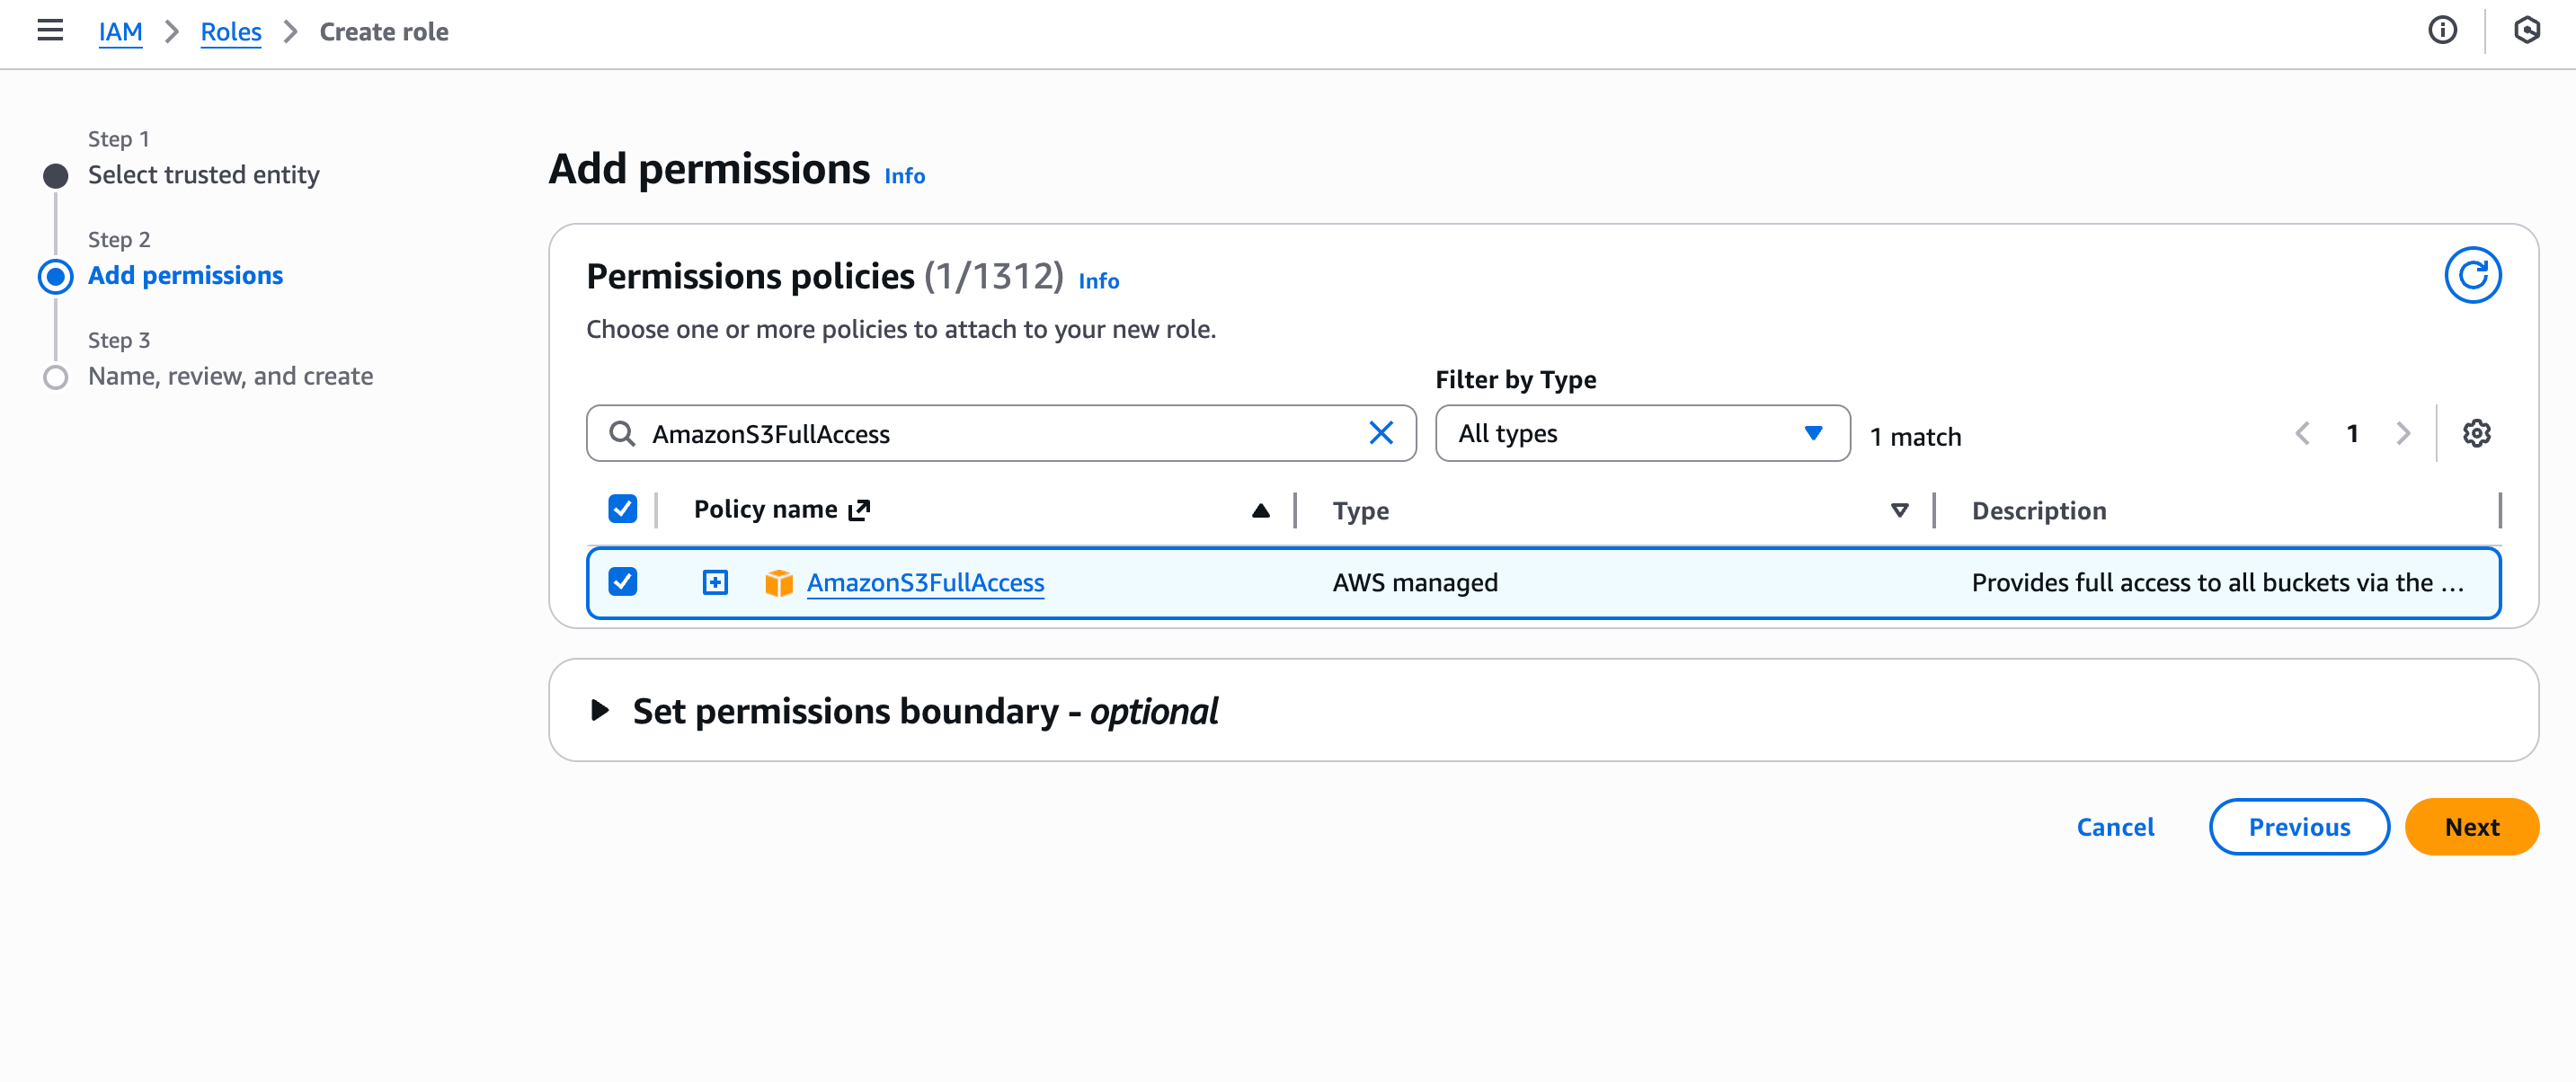
Attach the permission policies you want the role to have and click Next.
-
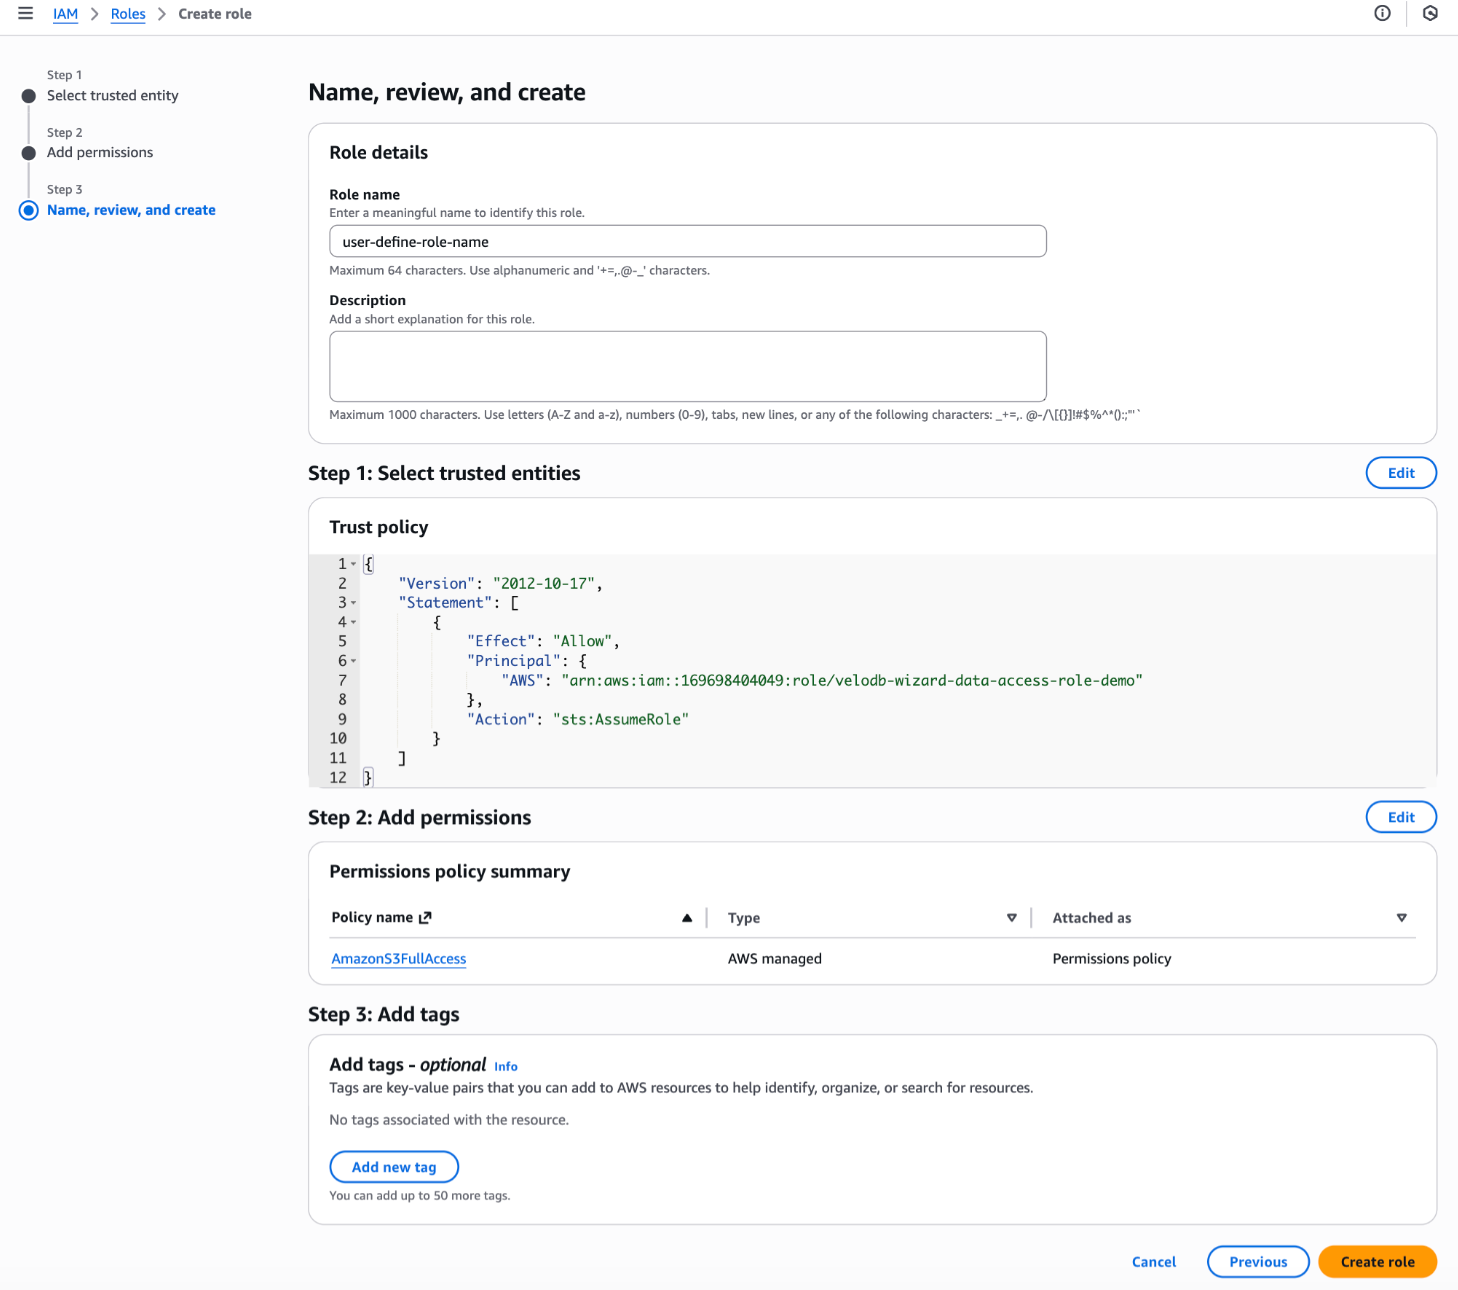
Name the role and click Create role.
-
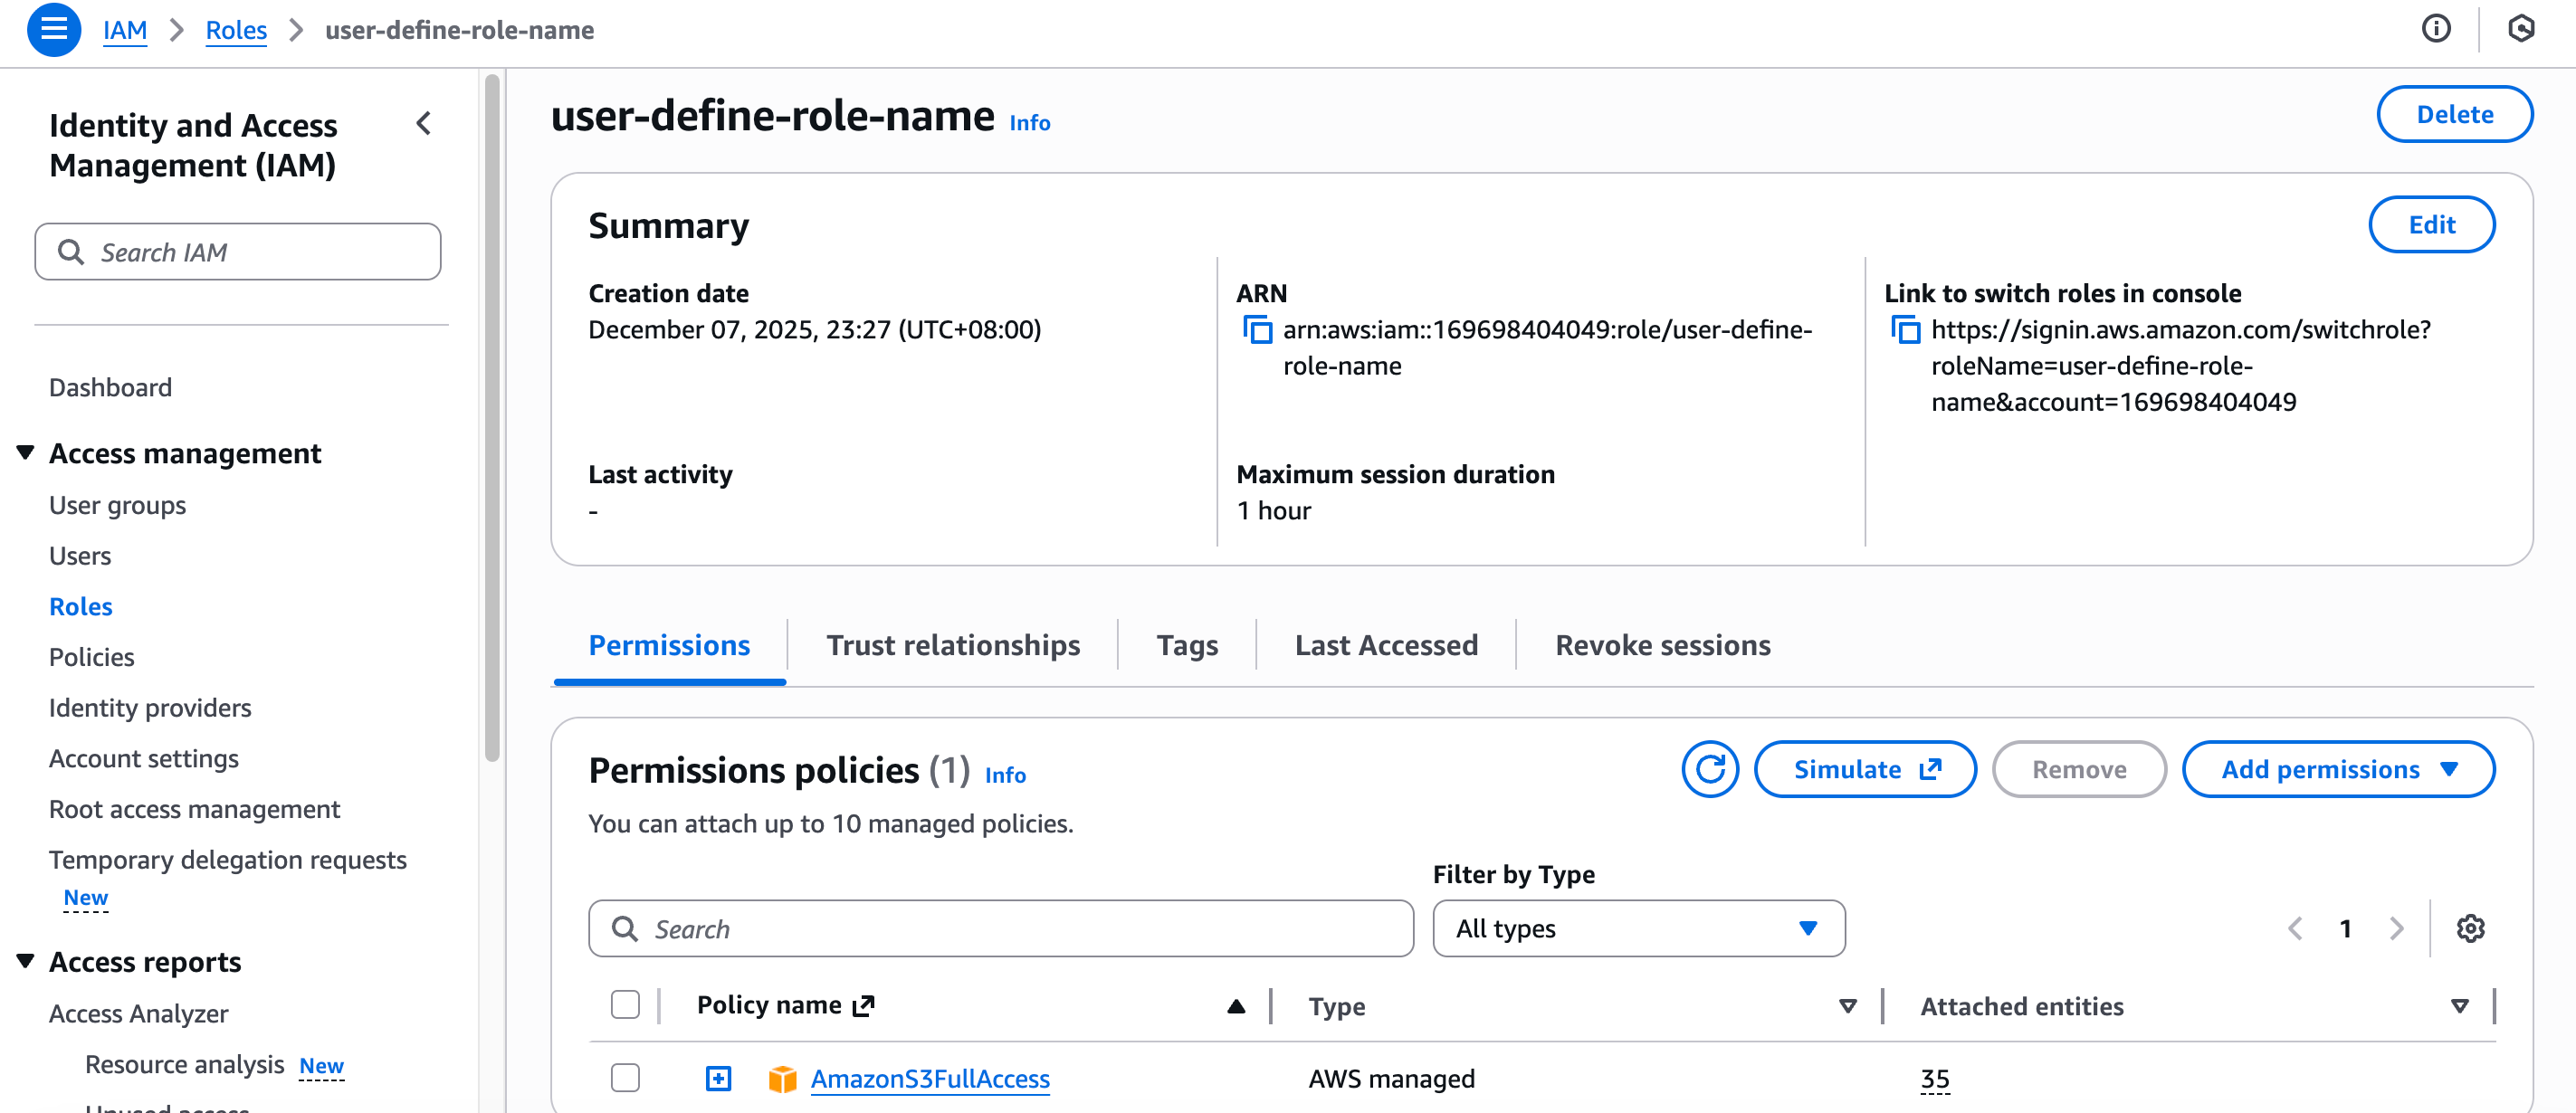
Open the role and copy the ARN from the summary, then paste it into VeloDB Cloud when configuring the integration.
Reference: IAM policies
These are the full policies for reference. In practice, copy them from the console during Create Credential, where they are pre-filled with your values.
Data-access IAM policy
{
    "Version": "2012-10-17",
    "Statement": [
        {
            "Effect": "Allow",
            "Resource": "arn:aws:s3:::<bucket-name>",
            "Action": [
                "s3:GetBucketLocation",
                "s3:GetBucketVersioning",
                "s3:PutBucketCORS",
                "s3:ListBucket",
                "s3:ListBucketVersions",
                "s3:ListBucketMultipartUploads"
            ]
        },
        {
            "Effect": "Allow",
            "Resource": "arn:aws:s3:::<bucket-name>/*",
            "Action": [
                "s3:GetObject",
                "s3:GetObjectVersion",
                "s3:PutObject",
                "s3:DeleteObject",
                "s3:DeleteObjectVersion",
                "s3:AbortMultipartUpload",
                "s3:ListMultipartUploadParts"
            ]
        },
        {
            "Effect": "Allow",
            "Action": ["sts:AssumeRole"],
            "Resource": "*"
        }
    ]
}
Deployment IAM policy
{
    "Version": "2012-10-17",
    "Statement": [
        {
            "Effect": "Allow",
            "Action": [
                "ec2:TerminateInstances",
                "ec2:StopInstances",
                "ec2:StartInstances",
                "ec2:RebootInstances",
                "ec2:ModifyInstanceAttribute",
                "ec2:ModifyVolume"
            ],
            "Resource": [
                "arn:aws:ec2:*:*:volume/*",
                "arn:aws:ec2:*:*:instance/*"
            ],
            "Condition": {
                "StringEquals": {
                    "aws:ResourceTag/resource-created-by": "velodb"
                }
            }
        },
        {
            "Effect": "Allow",
            "Action": [
                "ec2:DescribeVpcs",
                "ec2:DescribeSubnets",
                "ec2:DescribeAccountAttributes",
                "ec2:DescribeAddresses",
                "ec2:DescribeNatGateways",
                "ec2:DescribeInternetGateways",
                "ec2:DescribeInstances",
                "ec2:DescribeSecurityGroups",
                "ec2:DescribeSecurityGroupRules",
                "ec2:DescribeAvailabilityZones",
                "ec2:DescribeInstanceTypes",
                "ec2:ModifyInstanceAttribute",
                "ec2:DescribeVolumes",
                "ec2:DescribeImages",
                "ec2:DescribeVpcEndpoints",
                "ec2:DescribePrefixLists",
                "ec2:DescribeRouteTables",
                "ec2:DescribeTags",
                "elasticloadbalancing:DescribeLoadBalancers",
                "elasticloadbalancing:DescribeListeners",
                "elasticloadbalancing:DescribeLoadBalancerAttributes",
                "elasticloadbalancing:DescribeTargetGroupAttributes",
                "elasticloadbalancing:DescribeTags",
                "elasticloadbalancing:DescribeTargetHealth",
                "elasticloadbalancing:DescribeTargetGroups",
                "iam:GetPolicy",
                "iam:GetPolicyVersion"
            ],
            "Resource": ["*"]
        },
        {
            "Effect": "Allow",
            "Action": ["ec2:RunInstances", "ec2:CreateTags"],
            "Resource": [
                "arn:aws:ec2:*:*:volume/*",
                "arn:aws:ec2:*:*:instance/*",
                "arn:aws:ec2:*:*:network-interface/*"
            ],
            "Condition": {
                "StringEquals": {
                    "aws:RequestTag/resource-created-by": "velodb"
                }
            }
        },
        {
            "Effect": "Allow",
            "Action": ["ec2:RunInstances"],
            "Resource": [
                "arn:aws:ec2:*:*:image/*",
                "arn:aws:ec2:*:*:security-group/*",
                "arn:aws:ec2:*:*:subnet/*"
            ]
        },
        {
            "Effect": "Allow",
            "Action": ["ec2:CreateTags", "ec2:DeleteTags"],
            "Resource": [
                "arn:aws:ec2:*:*:instance/*",
                "arn:aws:ec2:*:*:volume/*",
                "arn:aws:ec2:*:*:network-interface/*"
            ],
            "Condition": {
                "StringEquals": {
                    "ec2:ResourceTag/resource-created-by": "velodb"
                }
            }
        },
        {
            "Effect": "Allow",
            "Action": [
                "elasticloadbalancing:CreateListener",
                "elasticloadbalancing:CreateLoadBalancer",
                "elasticloadbalancing:CreateTargetGroup"
            ],
            "Resource": [
                "arn:aws:elasticloadbalancing:*:*:targetgroup/*",
                "arn:aws:elasticloadbalancing:*:*:loadbalancer/*",
                "arn:aws:elasticloadbalancing:*:*:listener/*"
            ],
            "Condition": {
                "StringEquals": {
                    "aws:RequestTag/resource-created-by": "velodb"
                }
            }
        },
        {
            "Effect": "Allow",
            "Action": [
                "elasticloadbalancing:RegisterTargets",
                "elasticloadbalancing:DeleteLoadBalancer",
                "elasticloadbalancing:ModifyTargetGroupAttributes",
                "elasticloadbalancing:DeregisterTargets",
                "elasticloadbalancing:DeleteTargetGroup",
                "elasticloadbalancing:ModifyLoadBalancerAttributes",
                "elasticloadbalancing:DeleteListener"
            ],
            "Resource": [
                "arn:aws:elasticloadbalancing:*:*:targetgroup/*",
                "arn:aws:elasticloadbalancing:*:*:loadbalancer/*",
                "arn:aws:elasticloadbalancing:*:*:listener/*"
            ],
            "Condition": {
                "StringEquals": {
                    "elasticloadbalancing:ResourceTag/resource-created-by": "velodb"
                }
            }
        },
        {
            "Effect": "Allow",
            "Action": [
                "elasticloadbalancing:AddTags",
                "elasticloadbalancing:RemoveTags"
            ],
            "Resource": ["arn:aws:elasticloadbalancing:*:*:*"],
            "Condition": {
                "StringEquals": {
                    "elasticloadbalancing:ResourceTag/resource-created-by": "velodb"
                }
            }
        },
        {
            "Effect": "Allow",
            "Action": [
                "s3:GetBucketLocation",
                "s3:GetBucketVersioning",
                "s3:GetBucketPublicAccessBlock",
                "s3:GetLifecycleConfiguration",
                "s3:PutLifecycleConfiguration",
                "s3:ListBucket"
            ],
            "Resource": ["arn:aws:s3:::<bucket-name>"]
        },
        {
            "Effect": "Allow",
            "Action": [
                "iam:GetInstanceProfile",
                "iam:GetRole",
                "iam:GetRolePolicy",
                "iam:ListRolePolicies",
                "iam:ListAttachedRolePolicies"
            ],
            "Resource": [
                "arn:aws:iam::<aws-account-id>:instance-profile/<role-name>",
                "arn:aws:iam::<aws-account-id>:role/<role-name>"
            ]
        },
        {
            "Effect": "Allow",
            "Action": ["iam:PassRole"],
            "Resource": [
                "arn:aws:iam::<aws-account-id>:role/<role-name>"
            ],
            "Condition": {
                "StringEquals": {
                    "iam:PassedToService": "ec2.amazonaws.com"
                }
            }
        },
        {
            "Effect": "Allow",
            "Action": ["iam:CreateServiceLinkedRole"],
            "Resource": [
                "arn:aws:iam::*:role/aws-service-role/elasticloadbalancing.amazonaws.com/AWSServiceRoleForElasticLoadBalancing"
            ],
            "Condition": {
                "StringEquals": {
                    "iam:AWSServiceName": "elasticloadbalancing.amazonaws.com"
                }
            }
        }
    ]
}