BYOC on AWS — クラウドリソースの準備
この付録は、VeloDB Cloud BYOCウェアハウス用のAWSリソースを準備するクラウド管理者向けのリファレンスです。これらのリソースの大部分は、Template Modeで使用されるCloudFormationテンプレートによって作成できます。Wizard Modeを使用する場合、または個々のリソースをより厳密に制御する必要がある場合のみ、手動で作成してください。
エンドツーエンドのウェアハウス作成フローについては、Warehouse Managementを参照してください。
データクレデンシャル(S3バケット + IAMロール)
VeloDBはストレージ・コンピュート分離アーキテクチャを使用します — データはS3に保存されます。データクレデンシャルは、VeloDBウェアハウスを実行するEC2インスタンスにそのバケットへの読み書きアクセス権を付与します。
1. S3バケットの作成
注意 バケットはウェアハウスと同じAWSリージョンに配置する必要があります。
- 管理者としてAWS S3 Consoleにサインインし、Create bucketをクリックします。
- バケット名を入力し、対象リージョンを選択します。
- Bucket Versioningを有効にします(推奨)。
- Create bucketをクリックします。
- VeloDBコンソール用にバケット名をコピーします。
2. IAMポリシーの作成
-
AWS IAM Consoleを開き、Policies → Create policyに移動します。
-
JSONタブに切り替え、以下のポリシーを貼り付けます。その際、
<your-bucket-name>を前のステップで作成したバケット名に置き換えてください。{
"Version": "2012-10-17",
"Statement": [
{
"Effect": "Allow",
"Resource": "arn:aws:s3:::<your-bucket-name>",
"Action": [
"s3:GetBucketLocation",
"s3:GetBucketVersioning",
"s3:PutBucketCORS",
"s3:ListBucket",
"s3:ListBucketVersions",
"s3:ListBucketMultipartUploads"
]
},
{
"Effect": "Allow",
"Resource": "arn:aws:s3:::<your-bucket-name>/*",
"Action": [
"s3:GetObject",
"s3:GetObjectVersion",
"s3:PutObject",
"s3:DeleteObject",
"s3:DeleteObjectVersion",
"s3:AbortMultipartUpload",
"s3:ListMultipartUploadParts"
]
},
{
"Effect": "Allow",
"Action": ["sts:AssumeRole"],
"Resource": "*"
}
]
} -
Nextをクリックし、ポリシーに名前を付け(例:
VeloDBDataStorageAccess)、Create policyをクリックします。
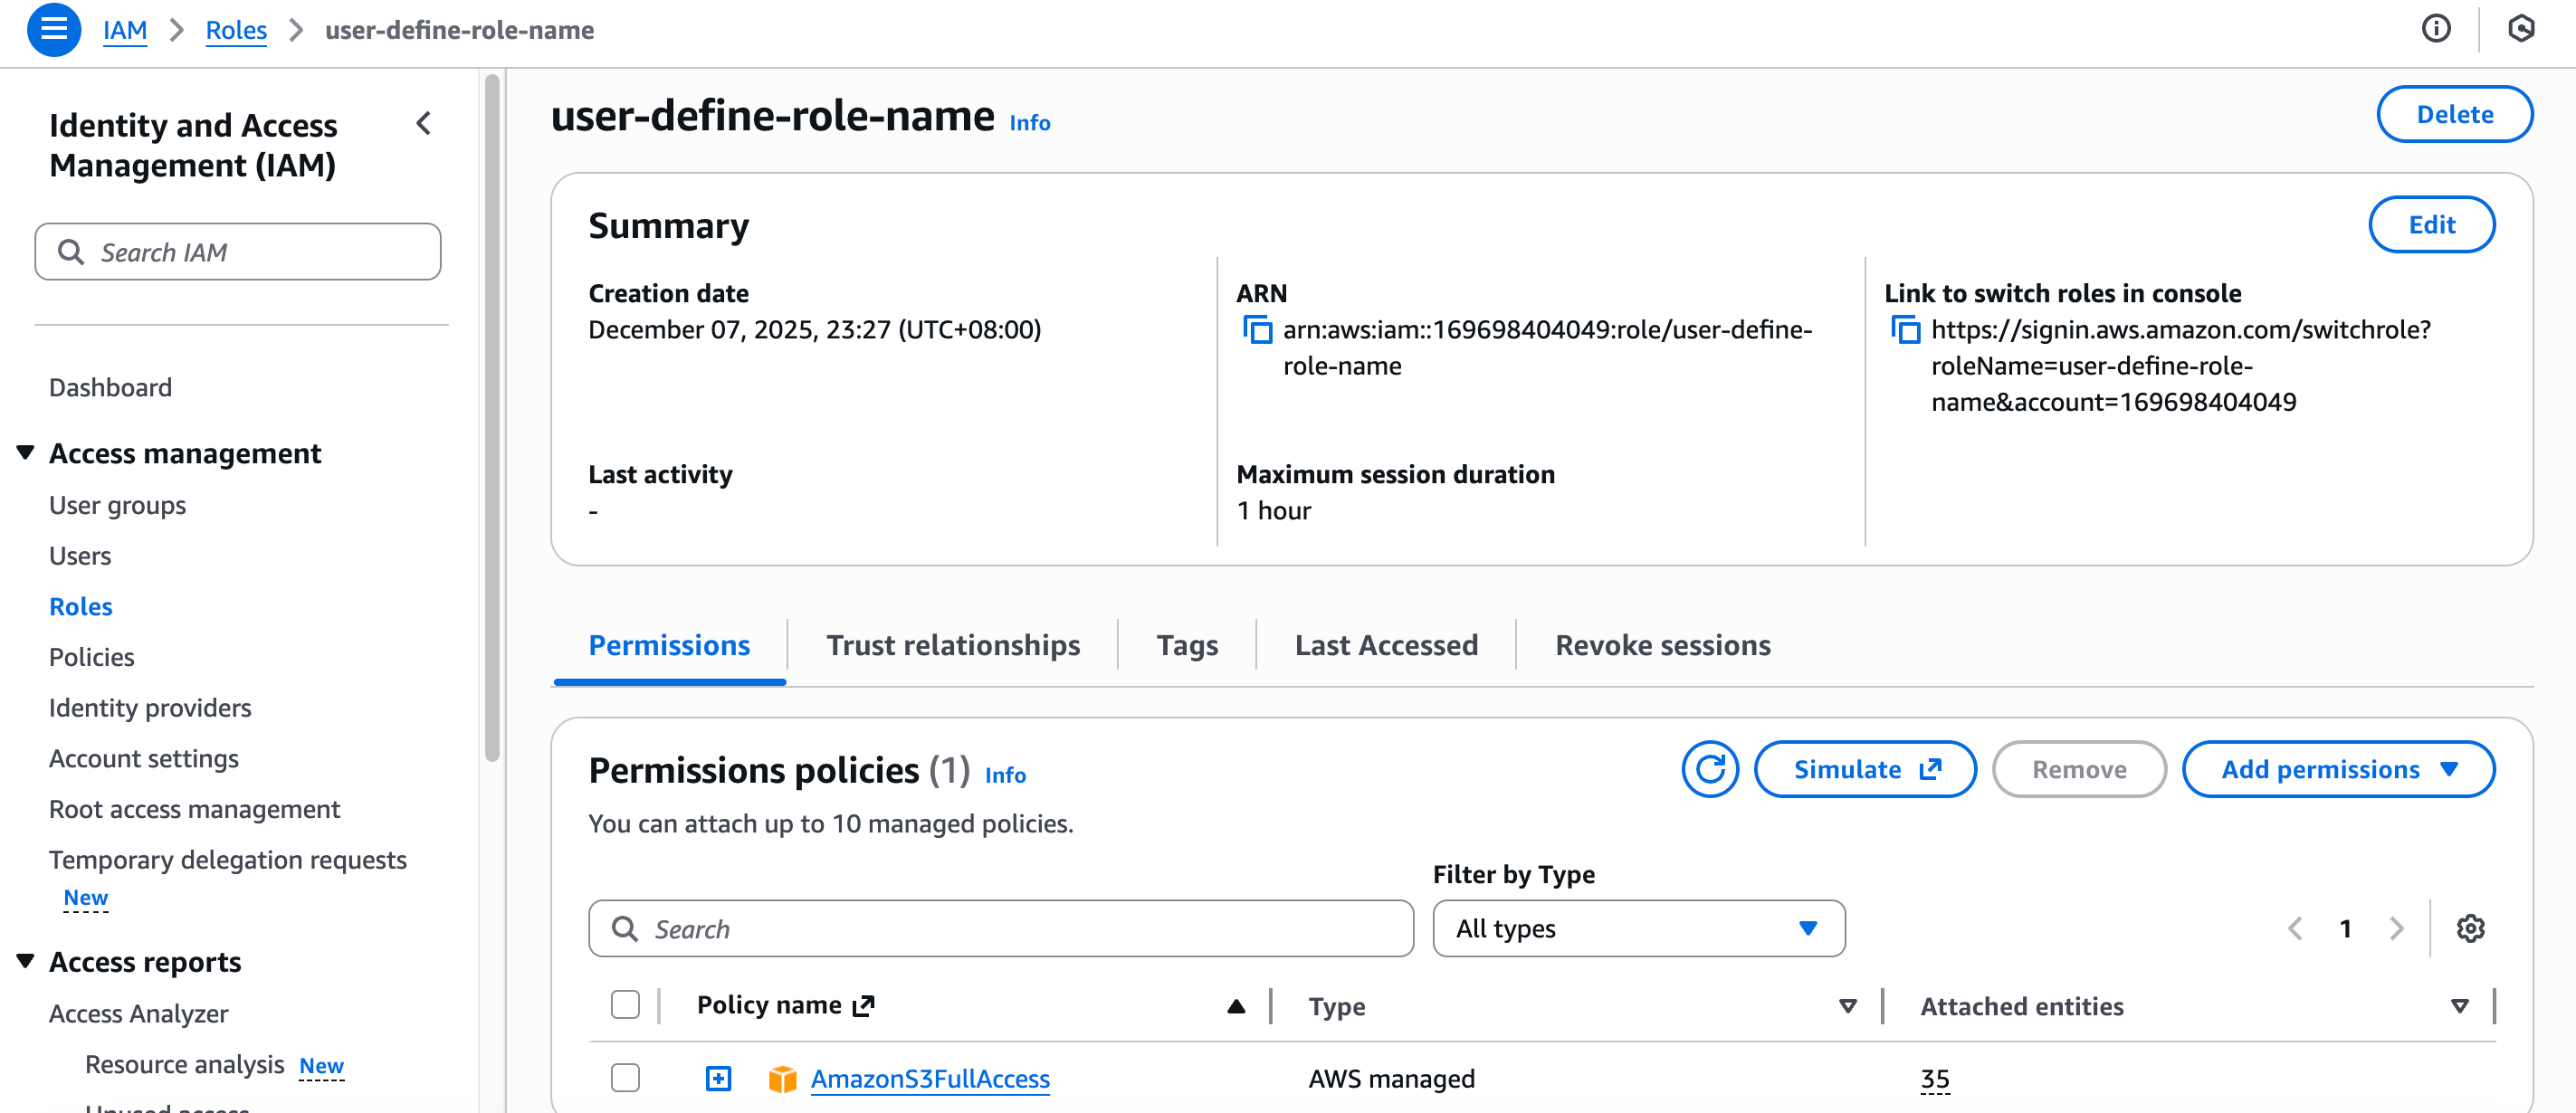
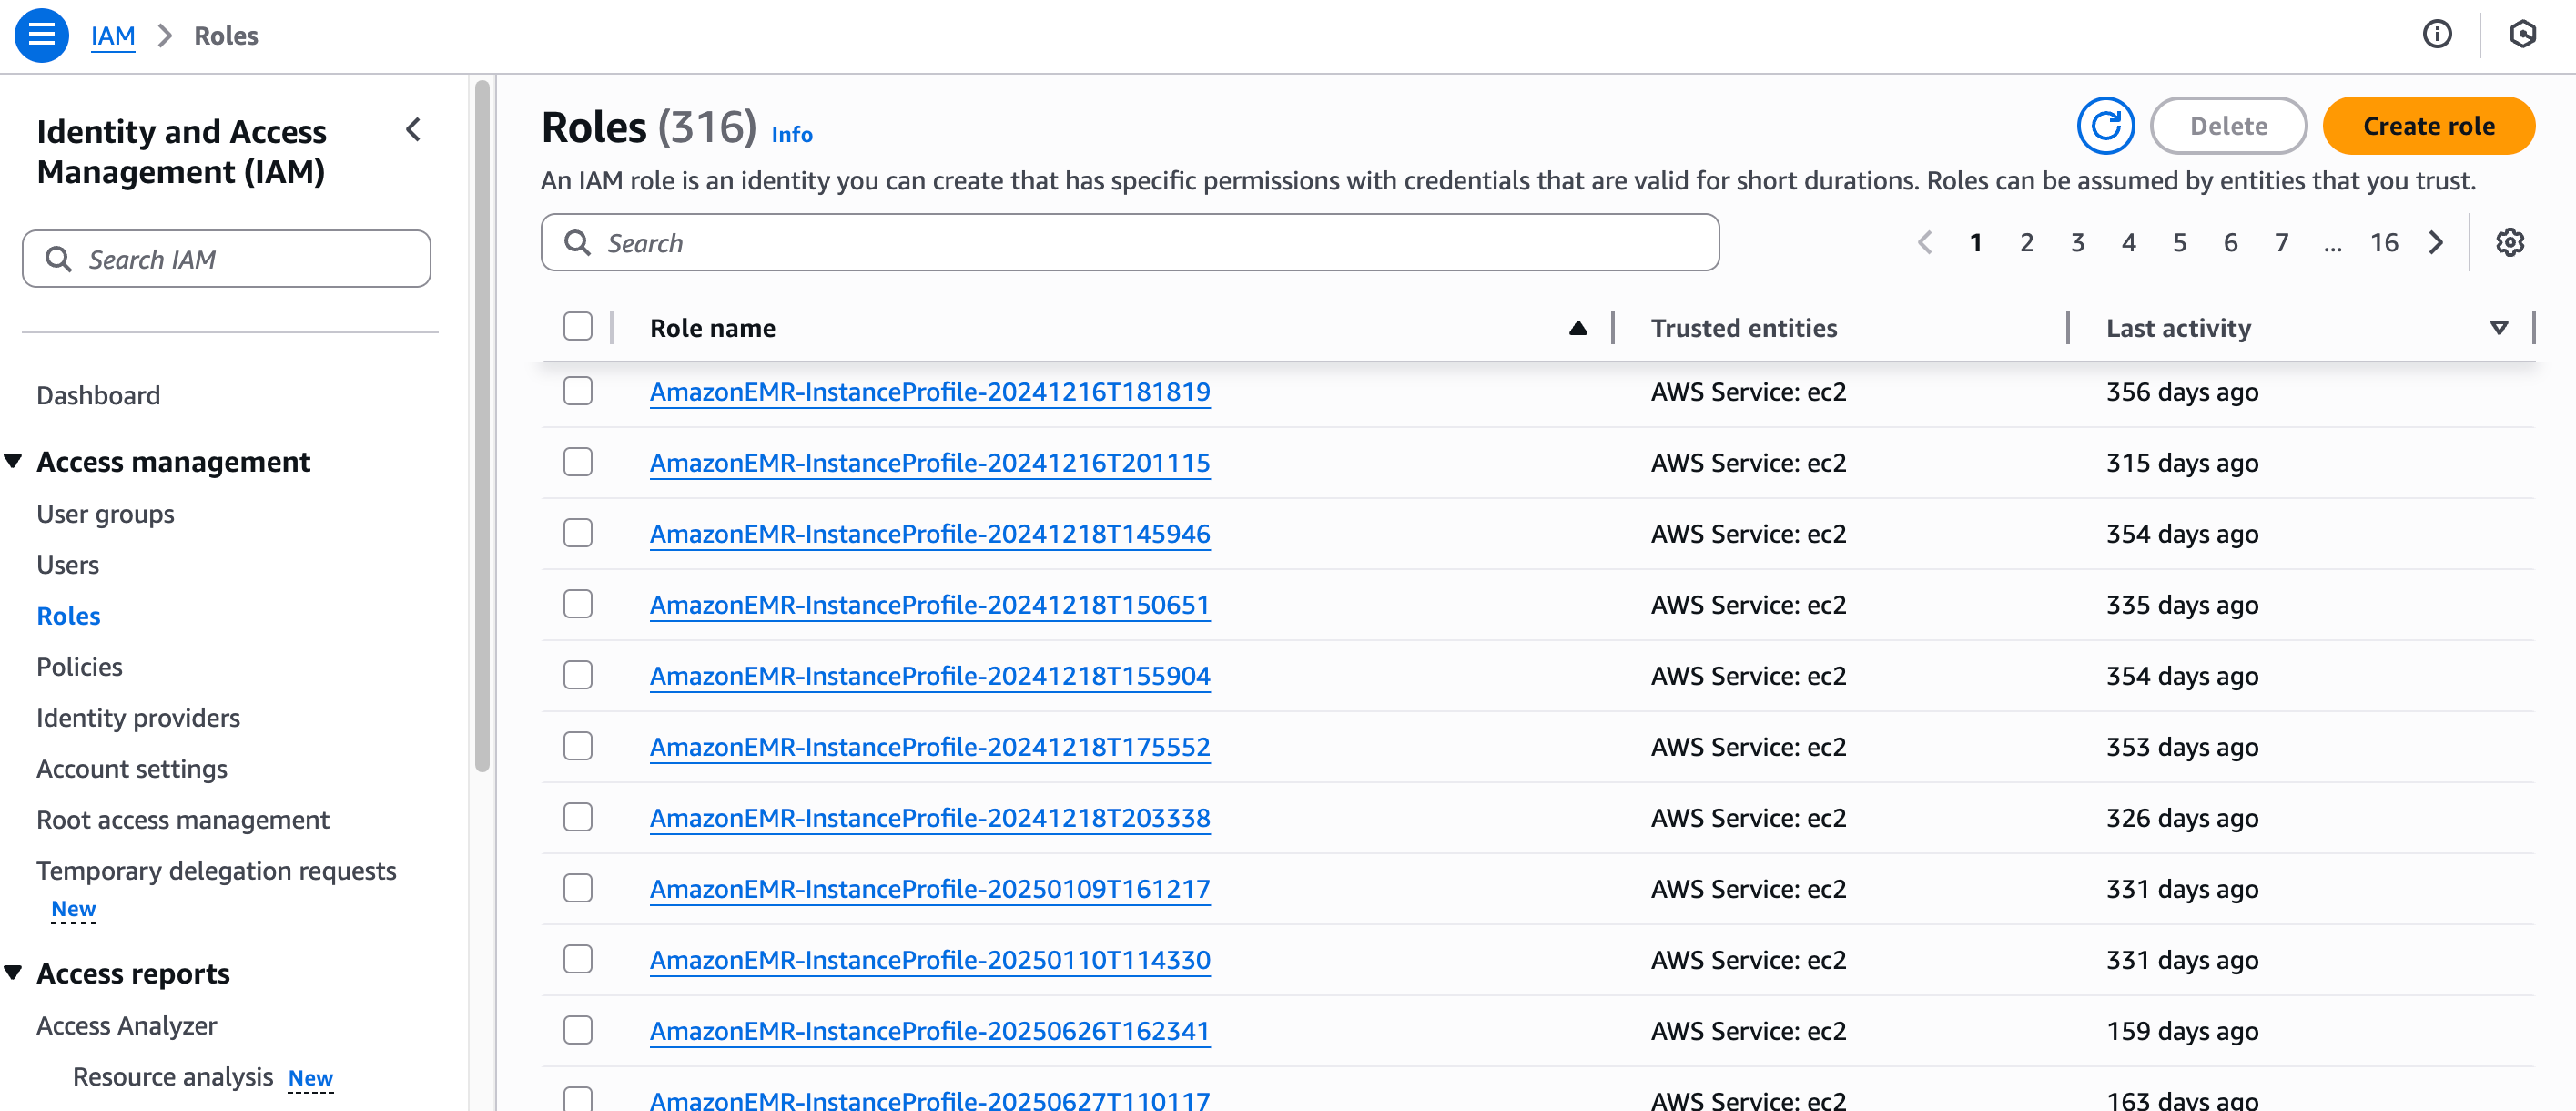
3. サービスIAMロールを作成する
-
IAMで、Roles → Create roleに移動します。
-
信頼されたエンティティタイプとしてAWS serviceを選択し、ユースケースとしてEC2を選択します。
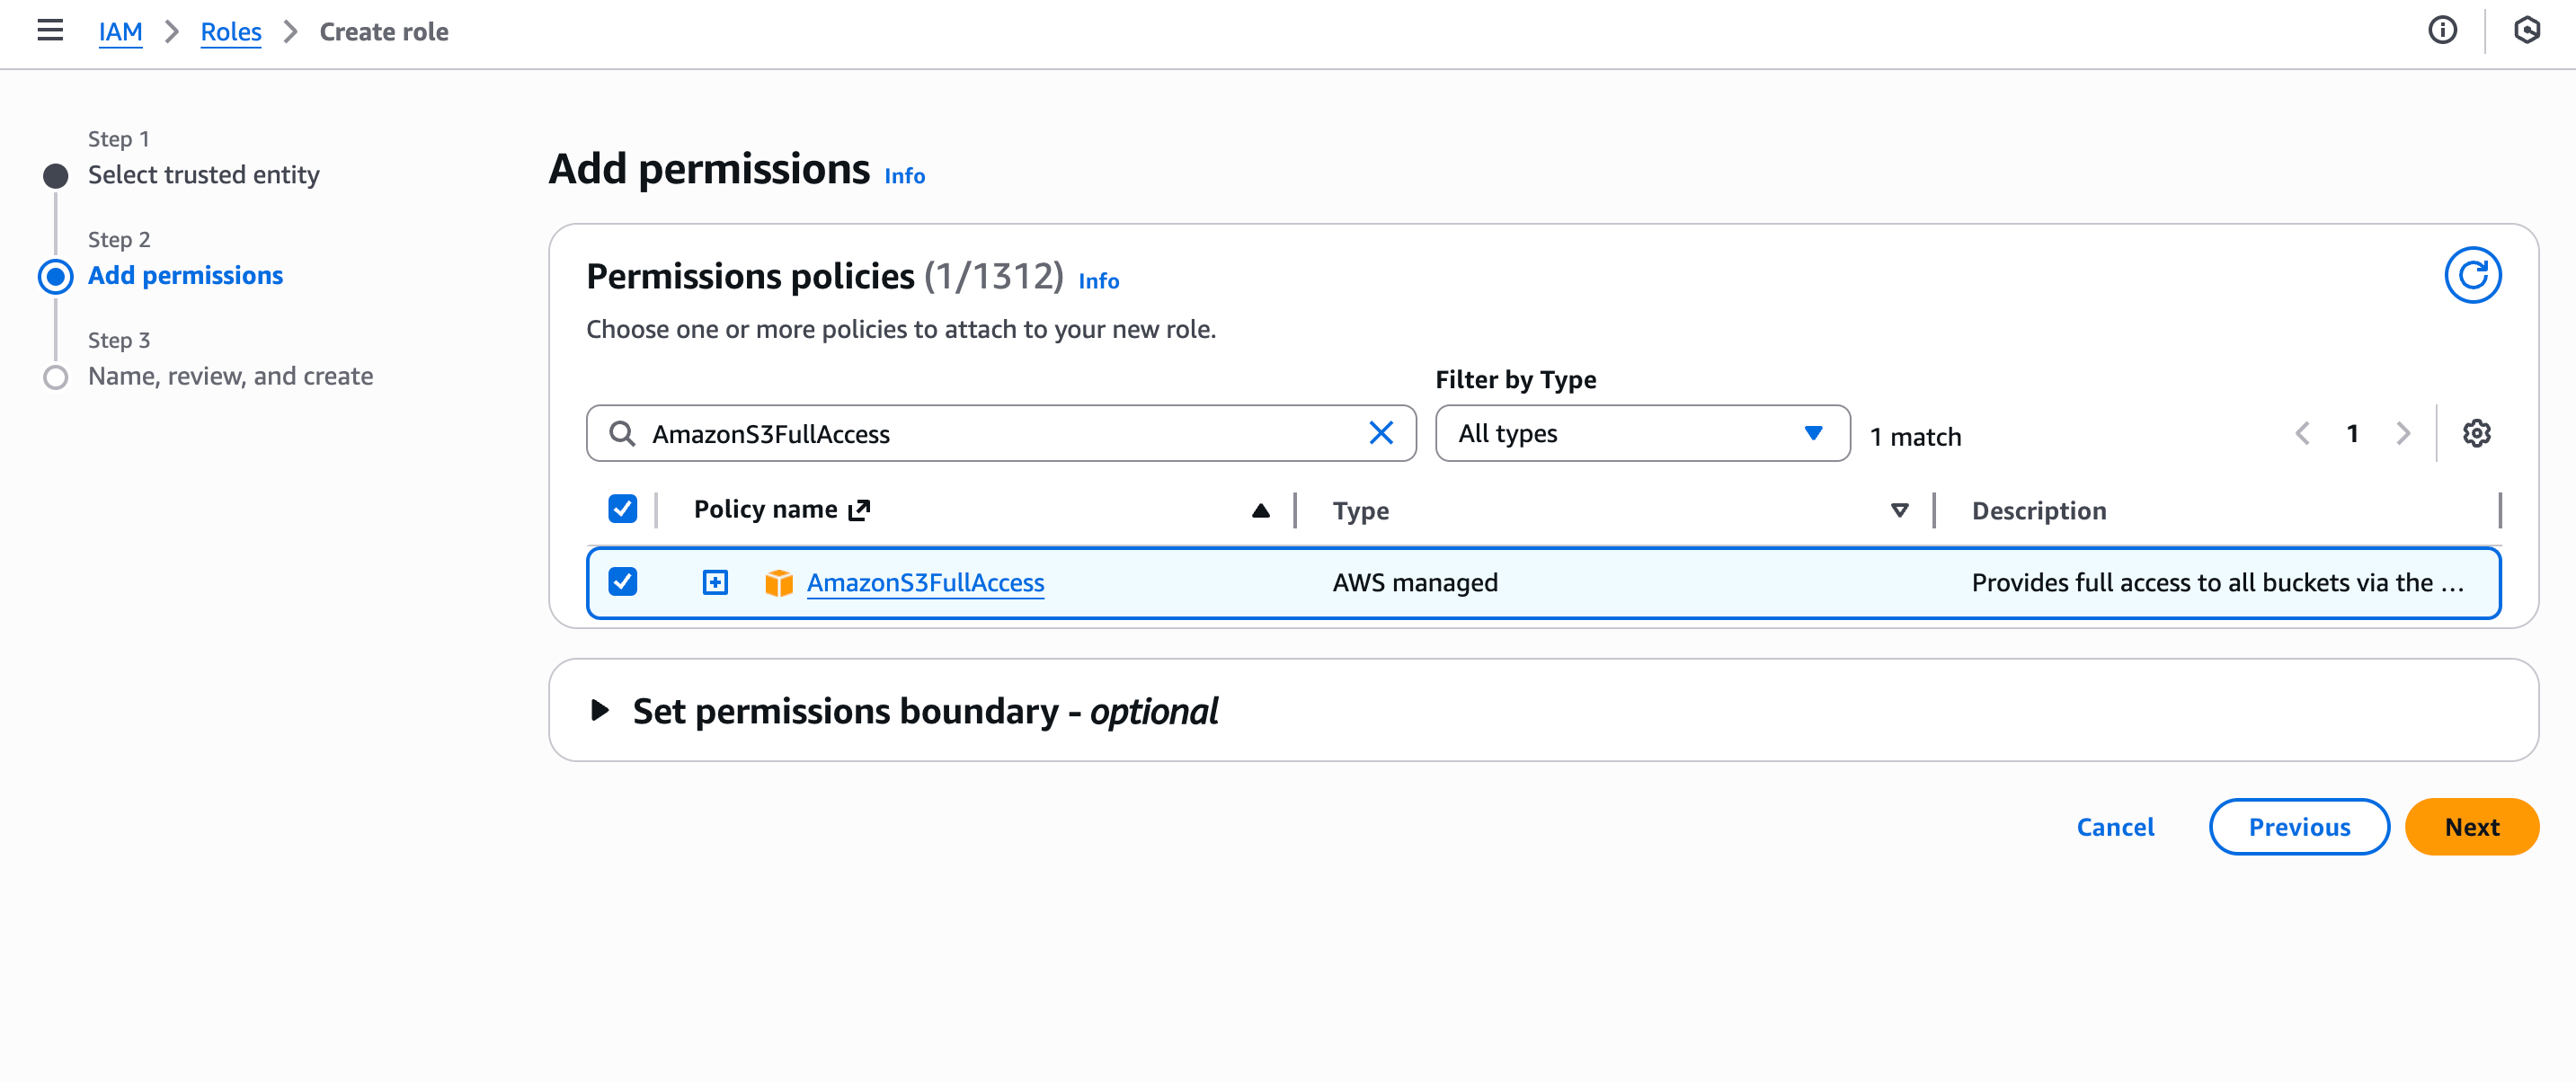
-
先ほど作成したポリシーをアタッチします。
-
ロールに名前を付け(例:
VeloDBDataStorageAccessRole)、作成します。 -
ロールのTrust Relationshipsタブで、信頼ポリシーを以下のものに置き換え、
<your-aws-account-id>と<your-role-name>を置き換えます:{
"Version": "2012-10-17",
"Statement": [
{
"Effect": "Allow",
"Principal": {
"Service": "ec2.amazonaws.com",
"AWS": "arn:aws:iam::<your-aws-account-id>:role/<your-role-name>"
},
"Action": "sts:AssumeRole"
}
]
} -
VeloDBコンソール用にInstance Profile ARN(形式:
arn:aws:iam::<your-aws-account-id>:instance-profile/<your-role-name>)をコピーします。
デプロイメント認証情報(クロスアカウントIAMロール)
デプロイメント認証情報により、VeloDBはあなたのAWSアカウント内でコンピュートリソースを起動できます。アクセスポリシーを持つクロスアカウントIAMロールを作成します。
前提条件
上記のデータ認証情報セクションを完了してください。バケット名とサービスロール名が必要になります。
1. IAMポリシーを作成する
注意 VeloDBの作成ウィザードは、データ認証情報ステップを完了した後に、すぐに使用できるポリシーを表示します。手動で置き換えることなく、直接貼り付けることができます。以下のブロックは、参照用の完全なポリシーです。
-
IAMコンソールで、Policies → Create policyに移動します。
-
JSONタブで、以下のポリシーを貼り付け、
<your-aws-account-id>、<your-bucket-name>、および<your-role-name>を置き換えます。{
"Version": "2012-10-17",
"Statement": [
{
"Effect": "Allow",
"Action": [
"ec2:TerminateInstances",
"ec2:StopInstances",
"ec2:StartInstances",
"ec2:RebootInstances",
"ec2:ModifyInstanceAttribute",
"ec2:ModifyVolume"
],
"Resource": [
"arn:aws:ec2:*:*:volume/*",
"arn:aws:ec2:*:*:instance/*"
],
"Condition": {
"StringEquals": {
"aws:ResourceTag/resource-created-by": "velodb"
}
}
},
{
"Effect": "Allow",
"Action": [
"ec2:DescribeVpcs",
"ec2:DescribeSubnets",
"ec2:DescribeAccountAttributes",
"ec2:DescribeAddresses",
"ec2:DescribeNatGateways",
"ec2:DescribeInternetGateways",
"ec2:DescribeInstances",
"ec2:DescribeSecurityGroups",
"ec2:DescribeSecurityGroupRules",
"ec2:DescribeAvailabilityZones",
"ec2:DescribeInstanceTypes",
"ec2:ModifyInstanceAttribute",
"ec2:DescribeVolumes",
"ec2:DescribeImages",
"ec2:DescribeVpcEndpoints",
"ec2:DescribePrefixLists",
"ec2:DescribeRouteTables",
"ec2:DescribeTags",
"elasticloadbalancing:DescribeLoadBalancers",
"elasticloadbalancing:DescribeListeners",
"elasticloadbalancing:DescribeLoadBalancerAttributes",
"elasticloadbalancing:DescribeTargetGroupAttributes",
"elasticloadbalancing:DescribeTags",
"elasticloadbalancing:DescribeTargetHealth",
"elasticloadbalancing:DescribeTargetGroups",
"iam:GetPolicy",
"iam:GetPolicyVersion"
],
"Resource": ["*"]
},
{
"Effect": "Allow",
"Action": ["ec2:RunInstances", "ec2:CreateTags"],
"Resource": [
"arn:aws:ec2:*:*:volume/*",
"arn:aws:ec2:*:*:instance/*",
"arn:aws:ec2:*:*:network-interface/*"
],
"Condition": {
"StringEquals": {
"aws:RequestTag/resource-created-by": "velodb"
}
}
},
{
"Effect": "Allow",
"Action": ["ec2:RunInstances"],
"Resource": [
"arn:aws:ec2:*:*:image/*",
"arn:aws:ec2:*:*:security-group/*",
"arn:aws:ec2:*:*:subnet/*"
]
},
{
"Effect": "Allow",
"Action": ["ec2:CreateTags", "ec2:DeleteTags"],
"Resource": [
"arn:aws:ec2:*:*:instance/*",
"arn:aws:ec2:*:*:volume/*",
"arn:aws:ec2:*:*:network-interface/*"
],
"Condition": {
"StringEquals": {
"ec2:ResourceTag/resource-created-by": "velodb"
}
}
},
{
"Effect": "Allow",
"Action": [
"elasticloadbalancing:CreateListener",
"elasticloadbalancing:CreateLoadBalancer",
"elasticloadbalancing:CreateTargetGroup"
],
"Resource": [
"arn:aws:elasticloadbalancing:*:*:targetgroup/*",
"arn:aws:elasticloadbalancing:*:*:loadbalancer/*",
"arn:aws:elasticloadbalancing:*:*:listener/*"
],
"Condition": {
"StringEquals": {
"aws:RequestTag/resource-created-by": "velodb"
}
}
},
{
"Effect": "Allow",
"Action": [
"elasticloadbalancing:RegisterTargets",
"elasticloadbalancing:DeleteLoadBalancer",
"elasticloadbalancing:ModifyTargetGroupAttributes",
"elasticloadbalancing:DeregisterTargets",
"elasticloadbalancing:DeleteTargetGroup",
"elasticloadbalancing:ModifyLoadBalancerAttributes",
"elasticloadbalancing:DeleteListener"
],
"Resource": [
"arn:aws:elasticloadbalancing:*:*:targetgroup/*",
"arn:aws:elasticloadbalancing:*:*:loadbalancer/*",
"arn:aws:elasticloadbalancing:*:*:listener/*"
],
"Condition": {
"StringEquals": {
"elasticloadbalancing:ResourceTag/resource-created-by": "velodb"
}
}
},
{
"Effect": "Allow",
"Action": [
"elasticloadbalancing:AddTags",
"elasticloadbalancing:RemoveTags"
],
"Resource": ["arn:aws:elasticloadbalancing:*:*:*"],
"Condition": {
"StringEquals": {
"elasticloadbalancing:ResourceTag/resource-created-by": "velodb"
}
}
},
{
"Effect": "Allow",
"Action": [
"s3:GetBucketLocation",
"s3:GetBucketVersioning",
"s3:GetBucketPublicAccessBlock",
"s3:GetLifecycleConfiguration",
"s3:PutLifecycleConfiguration",
"s3:ListBucket"
],
"Resource": ["arn:aws:s3:::<your-bucket-name>"]
},
{
"Effect": "Allow",
"Action": [
"iam:GetInstanceProfile",
"iam:GetRole",
"iam:GetRolePolicy",
"iam:ListRolePolicies",
"iam:ListAttachedRolePolicies"
],
"Resource": [
"arn:aws:iam::<your-aws-account-id>:instance-profile/<your-role-name>",
"arn:aws:iam::<your-aws-account-id>:role/<your-role-name>"
]
},
{
"Effect": "Allow",
"Action": ["iam:PassRole"],
"Resource": [
"arn:aws:iam::<your-aws-account-id>:role/<your-role-name>"
],
"Condition": {
"StringEquals": {
"iam:PassedToService": "ec2.amazonaws.com"
}
}
},
{
"Effect": "Allow",
"Action": ["iam:CreateServiceLinkedRole"],
"Resource": [
"arn:aws:iam::*:role/aws-service-role/elasticloadbalancing.amazonaws.com/AWSServiceRoleForElasticLoadBalancing"
],
"Condition": {
"StringEquals": {
"iam:AWSServiceName": "elasticloadbalancing.amazonaws.com"
}
}
}
]
} -
次へをクリックし、ポリシーに名前を付け(例:
AllowVeloDBCrossAccountAccess)、ポリシーの作成をクリックします。
2. クロスアカウントIAMロールの作成
- IAMで、ロール → ロールを作成に移動します。
- 信頼されたエンティティタイプ:AWSアカウント。
- 別のAWSアカウントを選択します。
- アカウントID:VeloDBアカウントID
757278738533を入力します。 - 外部ID:VeloDBコンソールから外部IDを貼り付けます。
- 作成したポリシーをアタッチします。
- ロールに名前を付け(例:
AllowVeloDBCrossAccountAccess)、作成します。 - VeloDBコンソール用にロールARNをコピーします。
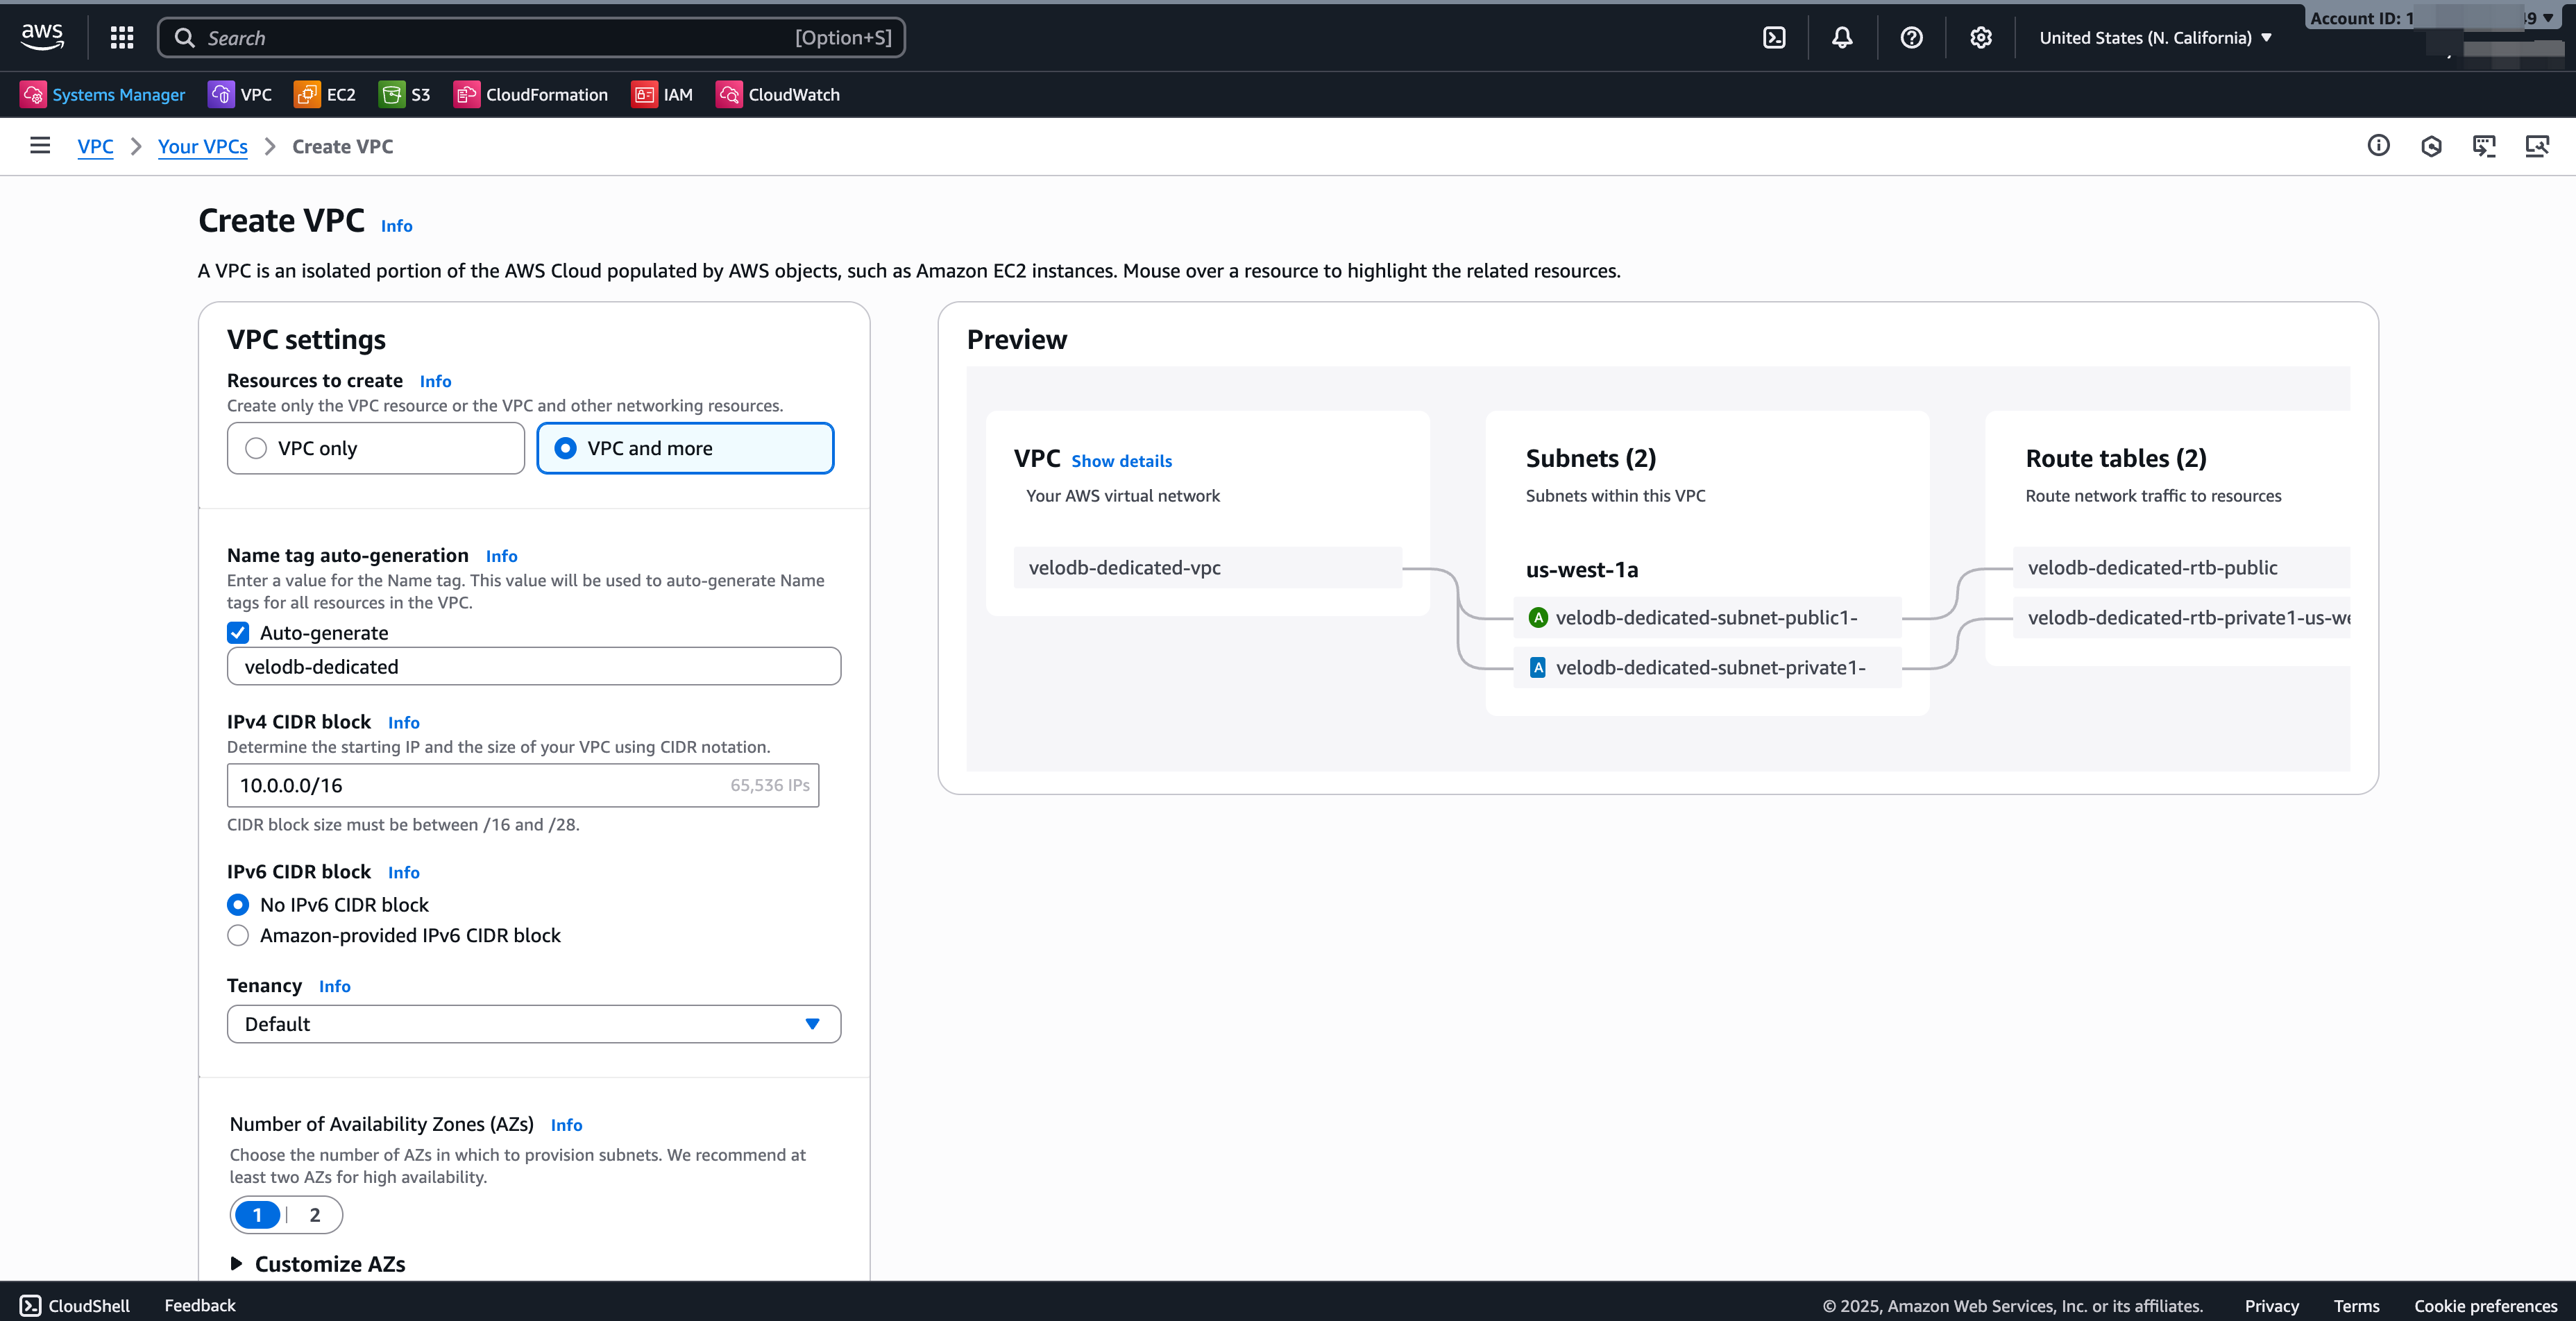
VPCとサブネット
VeloDBのネットワーク要件に適合するVPCは、BYOCウェアハウスの前提条件です。
注意 VeloDBウェアハウスは現在、シングルAZデプロイメントをサポートしています。2つのサブネット(1つはパブリック、1つはプライベート)を推奨します。VeloDBはプライベートサブネットにデプロイされます。
-
管理者としてAWS VPCコンソールにサインインします。
-
対象リージョンを選択し、VPCを作成をクリックします。
-
作成するリソース:VPCなど。
-
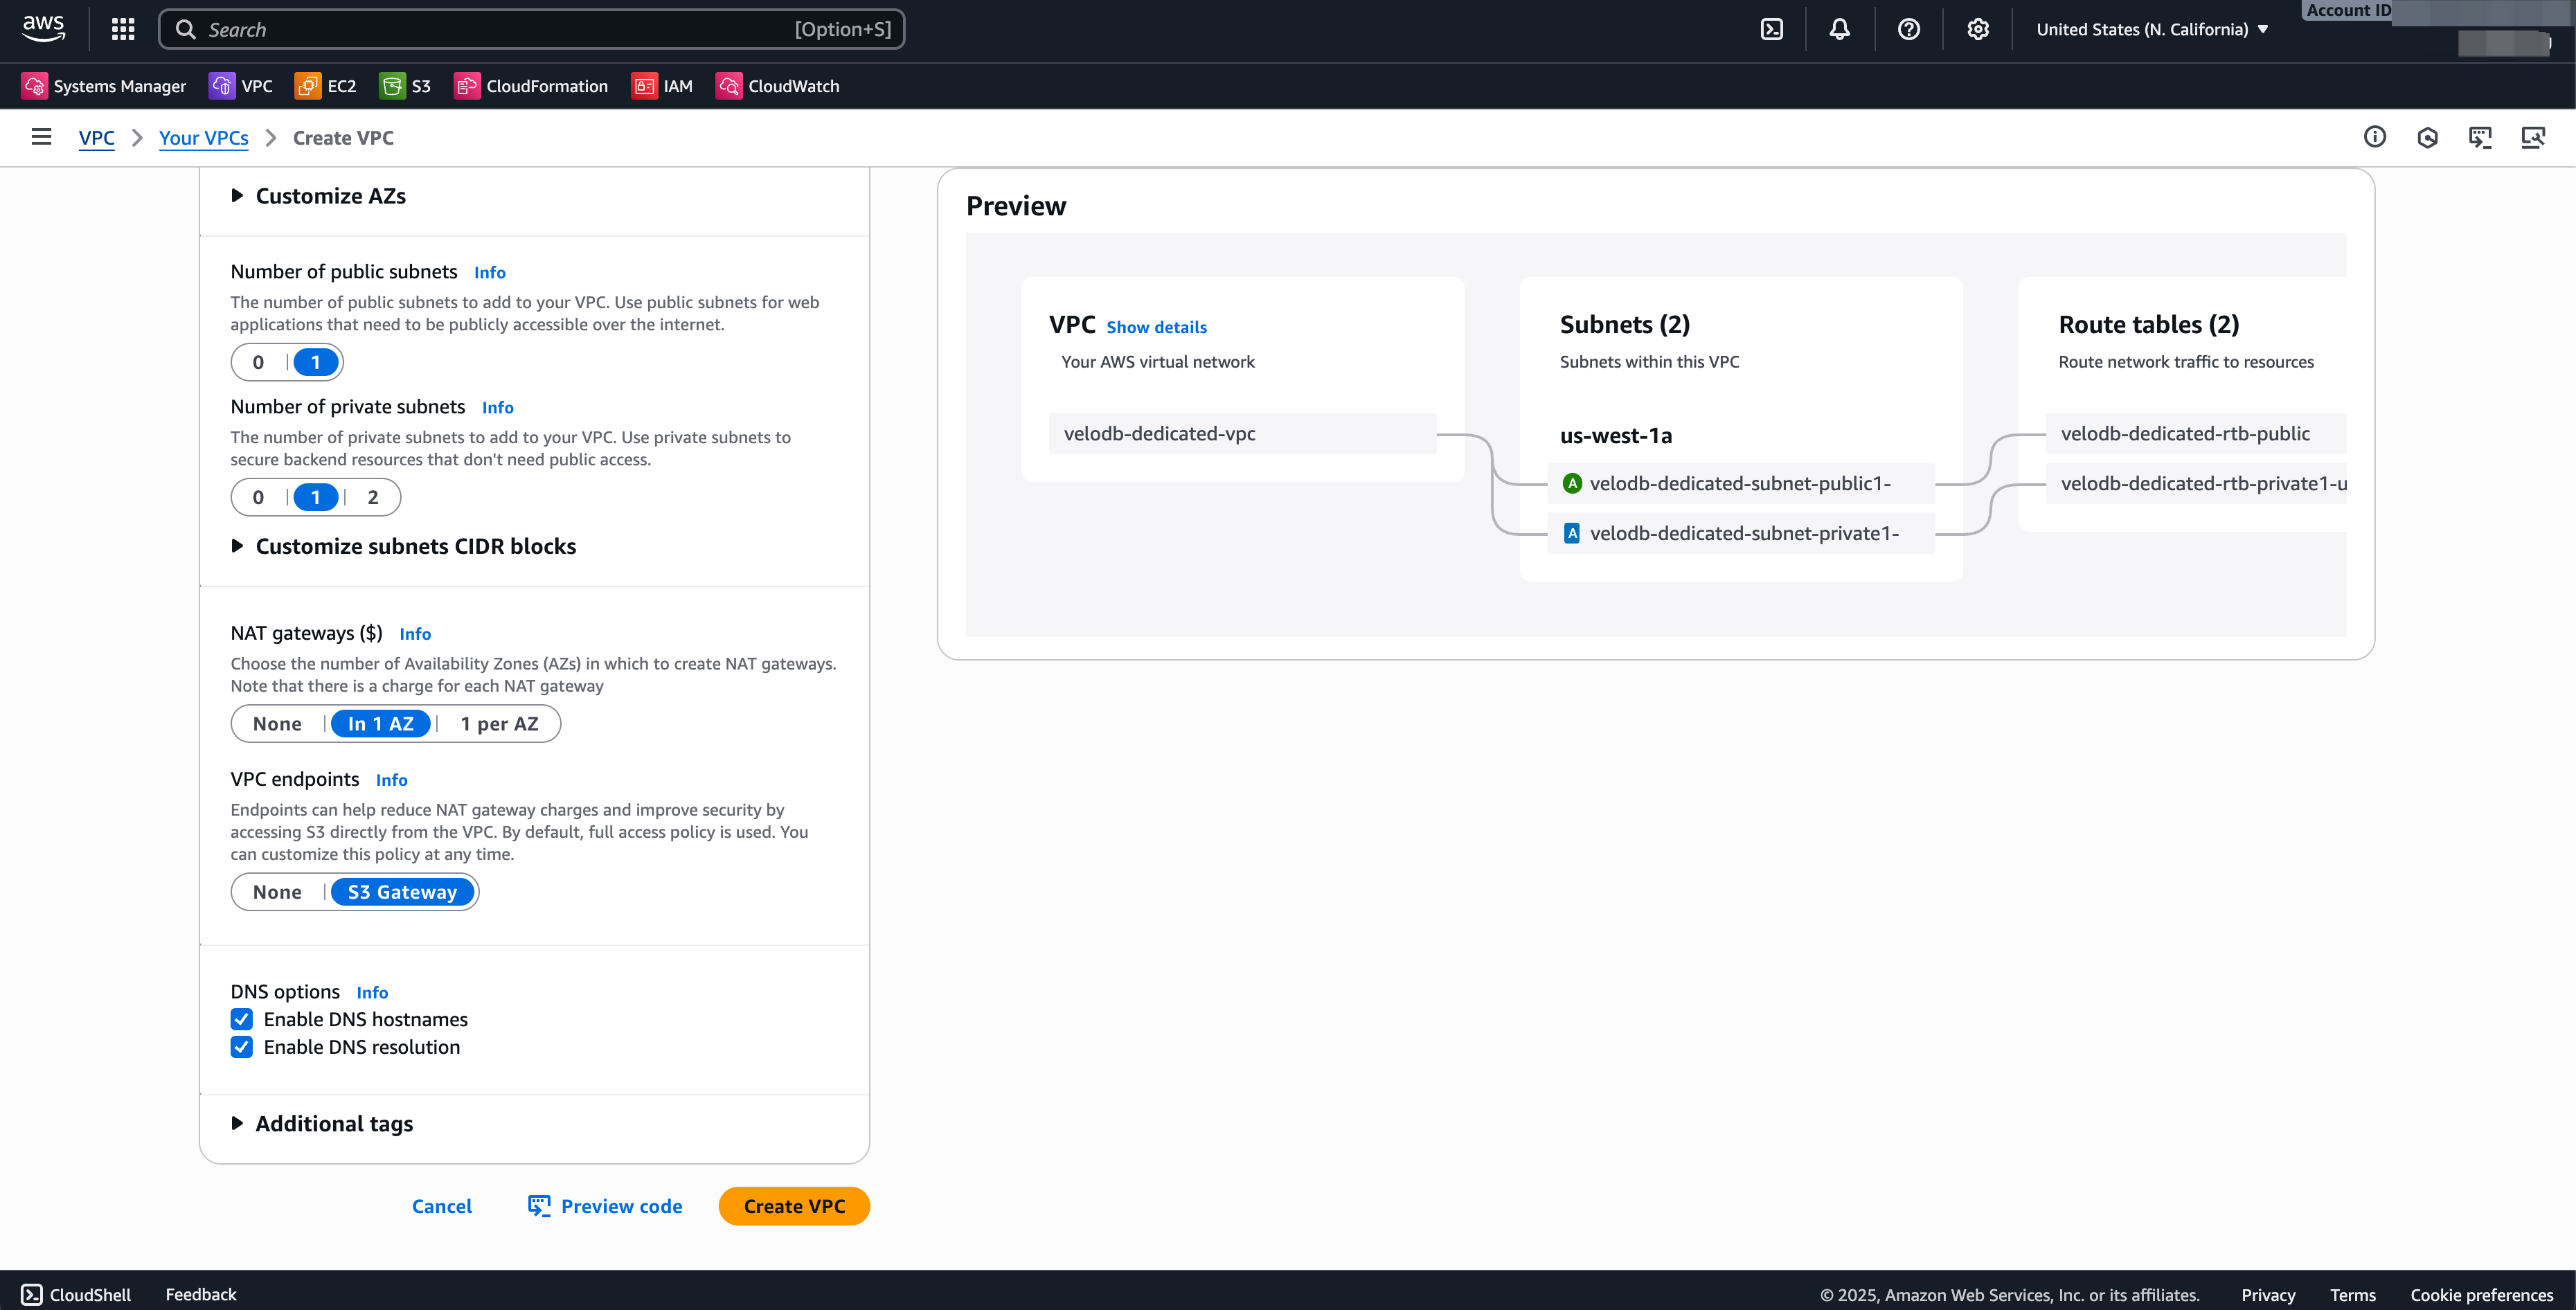
これらのフィールドを調整します(他のデフォルト値は保持):
フィールド 値 名前タグ 例: velodb-projectIPv4 CIDRブロック お好みの開始IPとサイズ。 アベイラビリティーゾーン数 1 パブリックサブネット数 1 プライベートサブネット数 1 NATゲートウェイ 1 AZに配置 VPCエンドポイント S3 Gateway(NAT料金を削減し、S3にプライベートアクセス) -
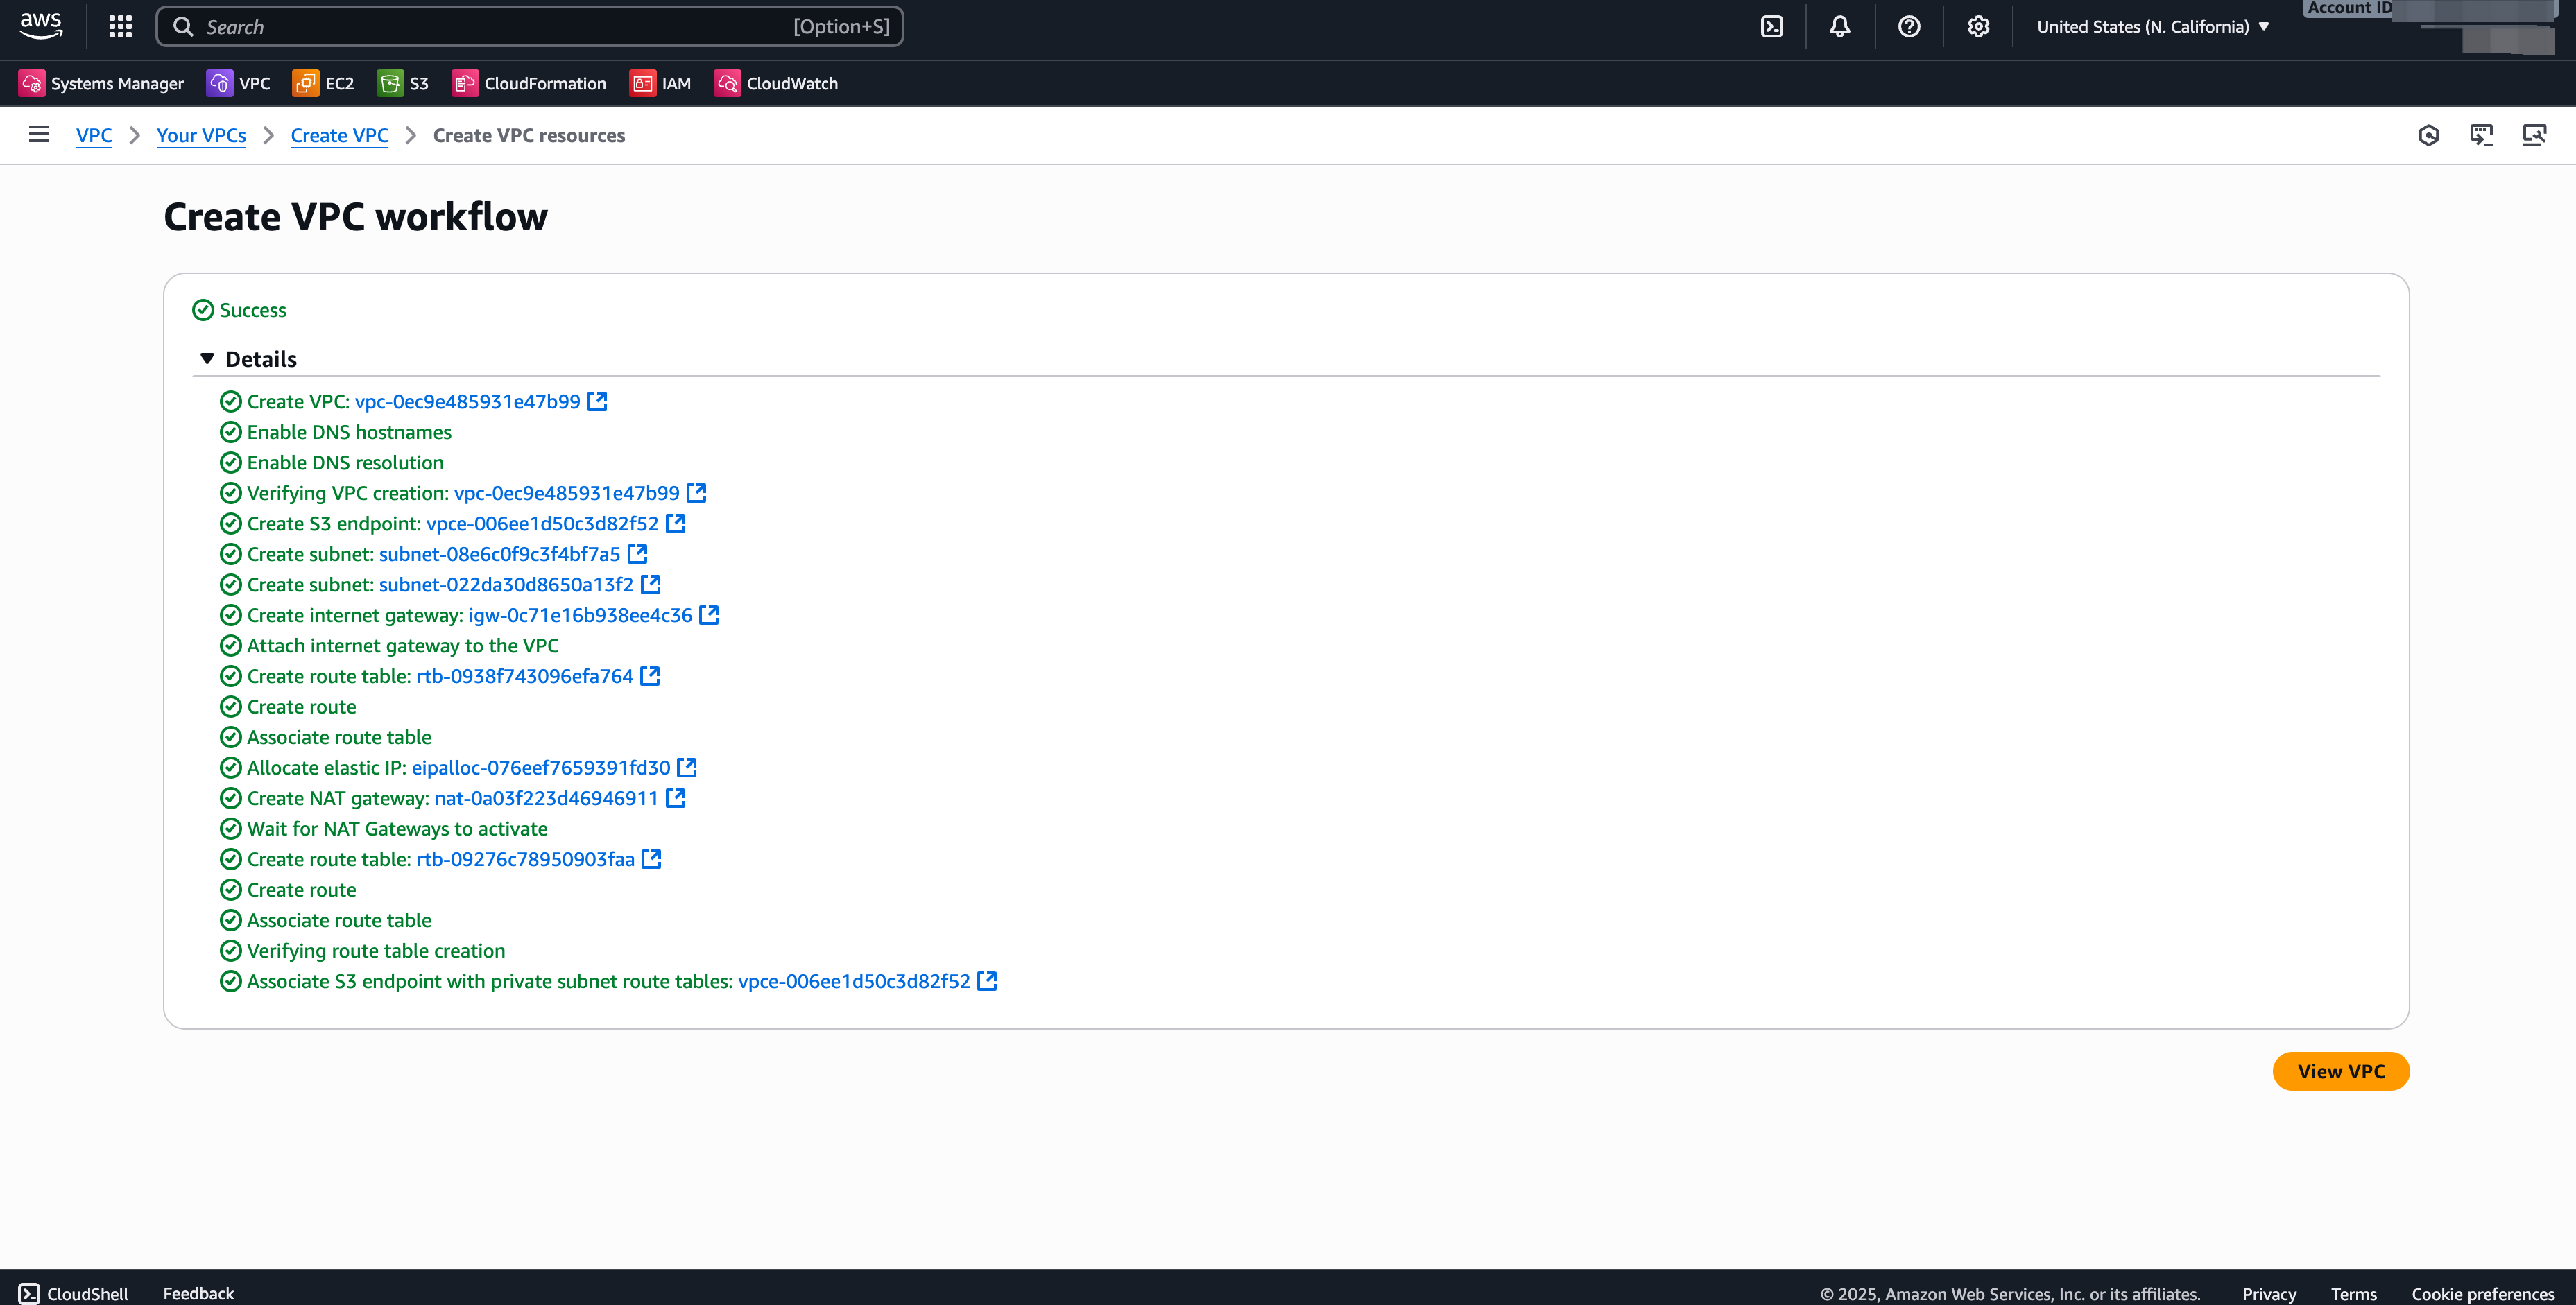
VPCを作成をクリックし、ワークフローが完了したらVPCを表示をクリックします。
セキュリティグループ
セキュリティグループは、関連付けられたAWSリソースへのトラフィックを制御する仮想ファイアウォールです。通常、BYOCには2つのセキュリティグループが必要です。1つはVeloDB EC2インスタンス用、もう1つはVPCインターフェースエンドポイント用です。
EC2用
- VPCコンソールで、セキュリティグループ → セキュリティグループを作成に移動します。
- 名前を付け(例:
velodb-server-sg)、VPCを選択します。 - インバウンドルールを追加します:
- ルール1:タイプ すべてのTCP、ソース このセキュリティグループ。
- ルール2:タイプ カスタムTCP、ポート範囲 8000–10000、ソース ウェアハウスにアクセスする必要があるVPCのCIDR。
- アウトバウンドルールはデフォルトのままにします(すべてのアウトバウンドを許可)。
- ルールを保存をクリックし、VeloDBコンソール用にセキュリティグループIDをコピーします。
VPCエンドポイント用
- VPCコンソールで、セキュリティグループ → セキュリティグループを作成に移動します。
- 名前を付け(例:
vpce-sg-for-velodb)、VPCを選択します。 - 上記と同じインバウンドルールを追加します:
- ルール1:タイプ すべてのTCP、ソース このセキュリティグループ。
- ルール2:タイプ カスタムTCP、ポート範囲 8000–10000、ソース ウェアハウスにアクセスする必要があるVPCのCIDR。
- アウトバウンドルールはデフォルトのままにします。
- ルールを保存をクリックします。
VeloDBへのプライベートエンドポイント
BYOCトラフィックをAWSバックボーン上に保持するため、ウェアハウスがパブリックインターネットではなくPrivateLink経由でVeloDB Cloudサービスと通信できるよう、プライベートエンドポイントを作成します。
-
VPCコンソールで、エンドポイント → エンドポイントを作成に移動します。
-
以下を入力します:
フィールド 値 名前 例: vpce-for-velodbサービスカテゴリ PrivateLink Ready partner services サービス名 以下のリージョン表から選択。サービスを検証をクリック — "Service name verified"と表示されるはずです。 VPC エンドポイントを作成するVPC。 サブネット エンドポイントENIが配置されるプライベートサブネット。 セキュリティグループ 上記で作成したVPCエンドポイントセキュリティグループ(例: vpce-sg-for-velodb)。ポリシー フルアクセス(一般的)。 -
エンドポイントを作成をクリックします。
VeloDBプライベートエンドポイントサービス名
| AWSリージョン | サービス名 |
|---|---|
| us-east-1 | com.amazonaws.vpce.us-east-1.vpce-svc-0fb96af7d8cd84d4d |
| us-west-2 | com.amazonaws.vpce.us-west-2.vpce-svc-0709eceab1c84431a |
| eu-west-1 | com.amazonaws.vpce.eu-west-1.vpce-svc-027fb01a146da1e29 |
| ap-southeast-1 | com.amazonaws.vpce.ap-southeast-1.vpce-svc-06e619c006c767a35 |
| ap-east-1 | com.amazonaws.vpce.ap-east-1.vpce-svc-07c3dac48f26cc10a |
| me-south-1 | com.amazonaws.vpce.me-south-1.vpce-svc-0f51549e7949898ca |
| eu-central-1 | com.amazonaws.vpce.eu-central-1.vpce-svc-0b44881fddef6b599 |
| ap-southeast-7 | com.amazonaws.vpce.ap-southeast-7.vpce-svc-0378cb9082f6839fd |
| me-central-1 | com.amazonaws.vpce.me-central-1.vpce-svc-01bb92d635d16039f |
S3ゲートウェイエンドポイント
S3ゲートウェイエンドポイントは、VPC内のインスタンスにS3へのプライベート接続を提供し、パブリックインターネットを回避してNATゲートウェイ料金を削減します。
-
VPCコンソールで、エンドポイント → エンドポイントを作成に移動します。
-
以下を入力します:
フィールド 値 名前 例: vpce-for-s3-gatewayサービスカテゴリ AWSサービス サービス S3を検索し、タイプがGatewayのcom.amazonaws.{region}.s3を選択。VPC エンドポイントを作成するVPC。 ルートテーブル プライベートサブネットに関連付けられたルートテーブル。 ポリシー フルアクセスまたはカスタム。 -
エンドポイントを作成をクリックします。
クロスアカウントS3アクセス用IAMロール(Catalogs統合)
異なるアカウントのS3バケットから読み取るためのCatalogs統合を使用する予定がある場合は、対象アカウントでIAMロールを作成し、VeloDBにそのロールを引き受ける権限を付与します。
-
対象AWSアカウントで、IAM → ロール → ロールを作成を開きます。
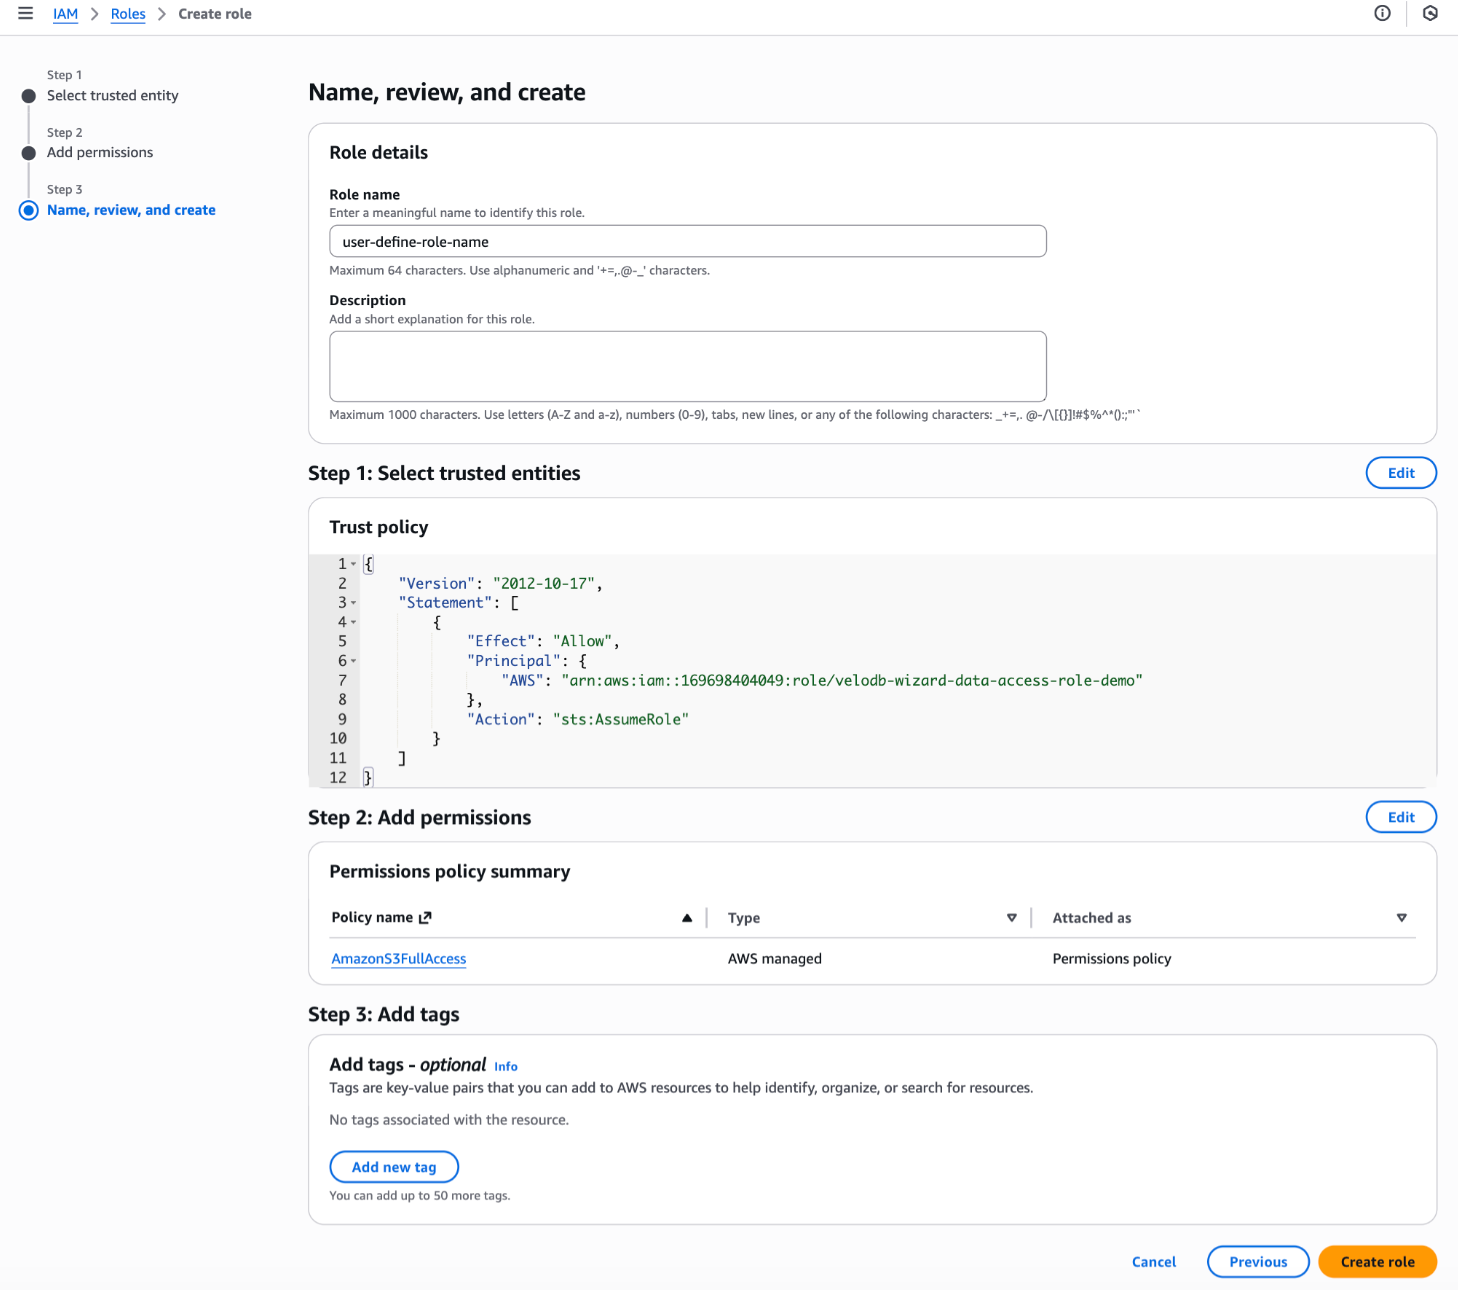
-
カスタム信頼ポリシーを選択し、
<velodb-role-arn>をVeloDBウェアハウスのIAMロールARNに置き換えます:
{
    "Version": "2012-10-17",
    "Statement": [
        {
            "Effect": "Allow",
            "Principal": {
                "AWS": "<velodb-role-arn>"
            },
            "Action": "sts:AssumeRole"
        }
    ]
} -
ロールに付与したい権限ポリシーをアタッチし、Nextをクリックします。
-
ロールに名前を付け、Create roleをクリックします。
-
ロールを開き、サマリーからARNをコピーします。統合を設定する際にVeloDB Cloudに貼り付けてください。