Use Manual
Change the Default User Password
After successfully logging in, the user can click admin in the upper right corner of the main interface to change the password.
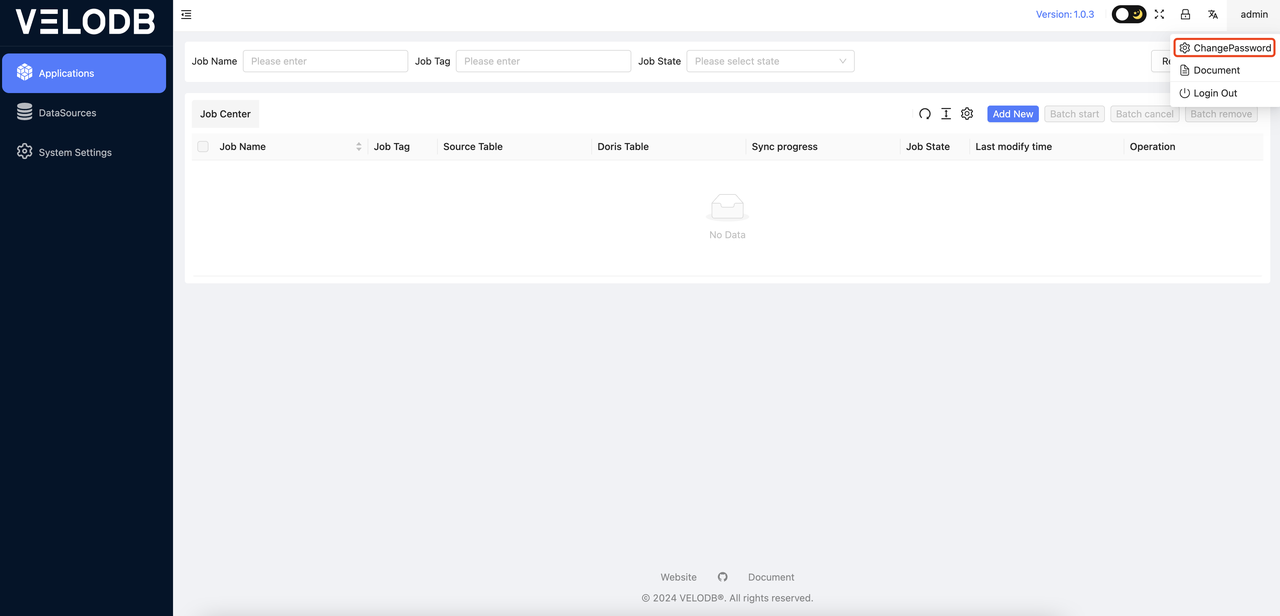
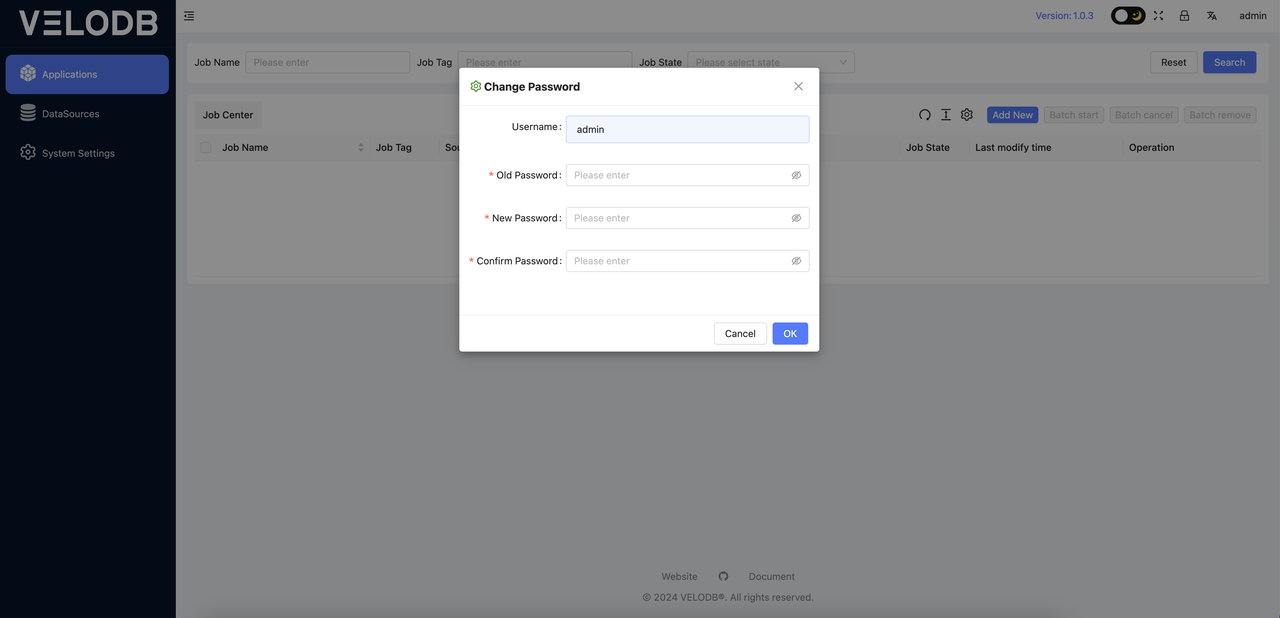
Click the ChangePassword button, and the following interface will pop up. You can change the password by filling in the relevant information according to the interface prompts.
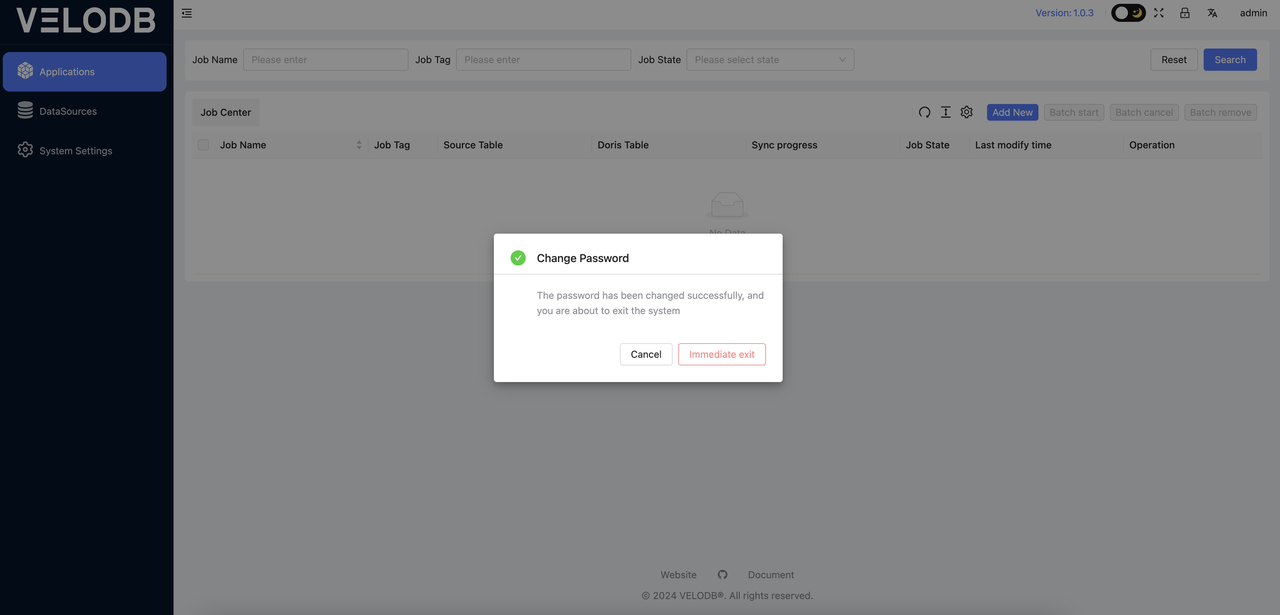
After changing the password, you will be prompted that the password has been changed successfully, and you can choose to exit immediately or cancel.
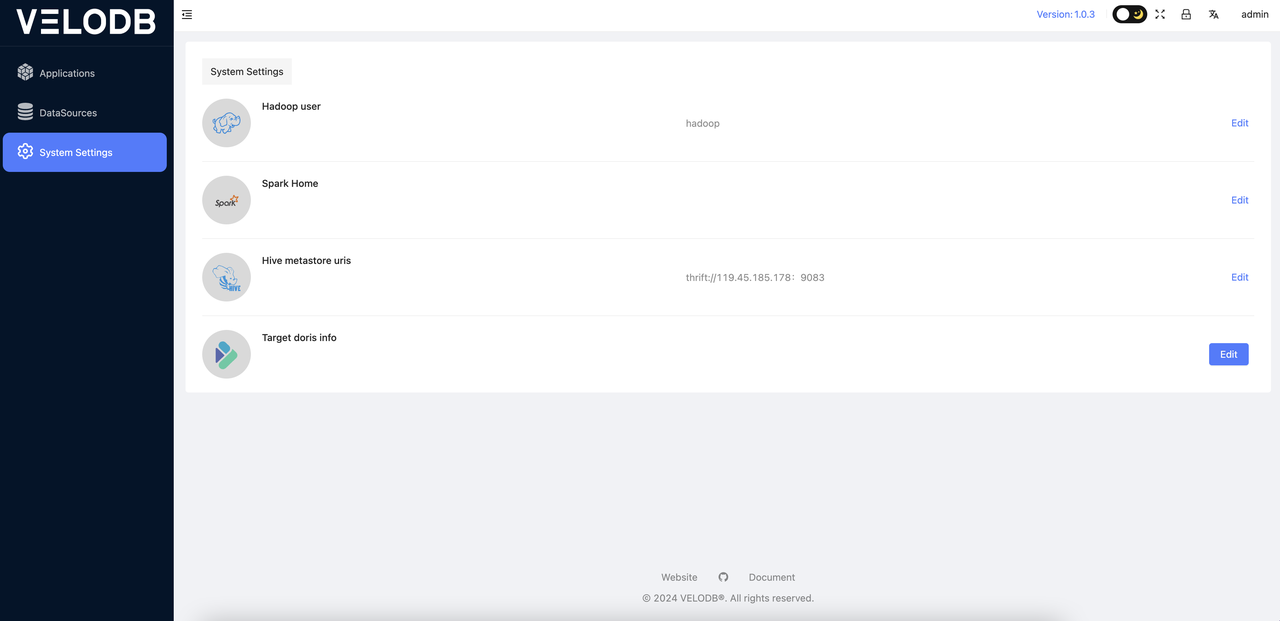
System Settings
The first thing to do before using the platform is to enter the System Settings and configure the system parameters. These parameters are all mandatory and must be set. The specific details are as follows:
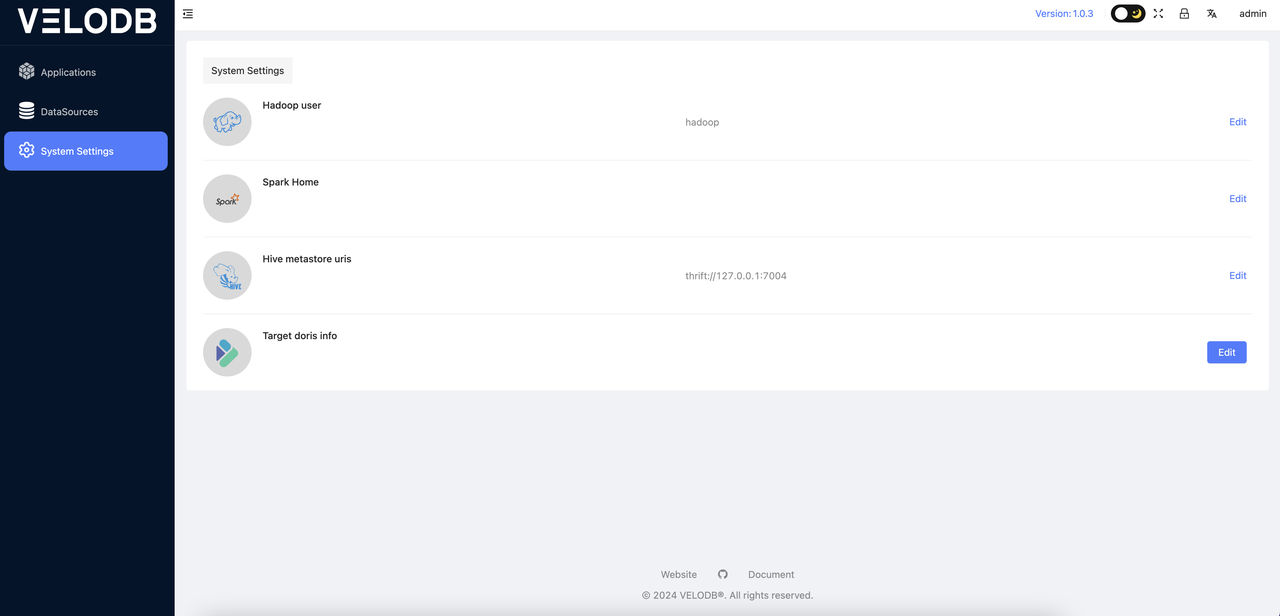
- Hadoop user: Specify the user for submitting jobs to YARN (skip if there is no Hadoop environment).
- Spark Home: Specify the Spark Home directory of your cluster. (skip if there is no Spark environment).
- Hive metastore uris: If migrating data from Hive to Doris, you need to know the Hive metastore URIS (skip if not using Hive as a data source).
- Target Doris (VeloDB Cloud): Set the connection information for the target Doris database or VeloDB Cloud for data migration.
Click the target Doris(VeloDB Cloud) button, and you will be presented with a popup window where you can enter the relevant information directly, as follows:
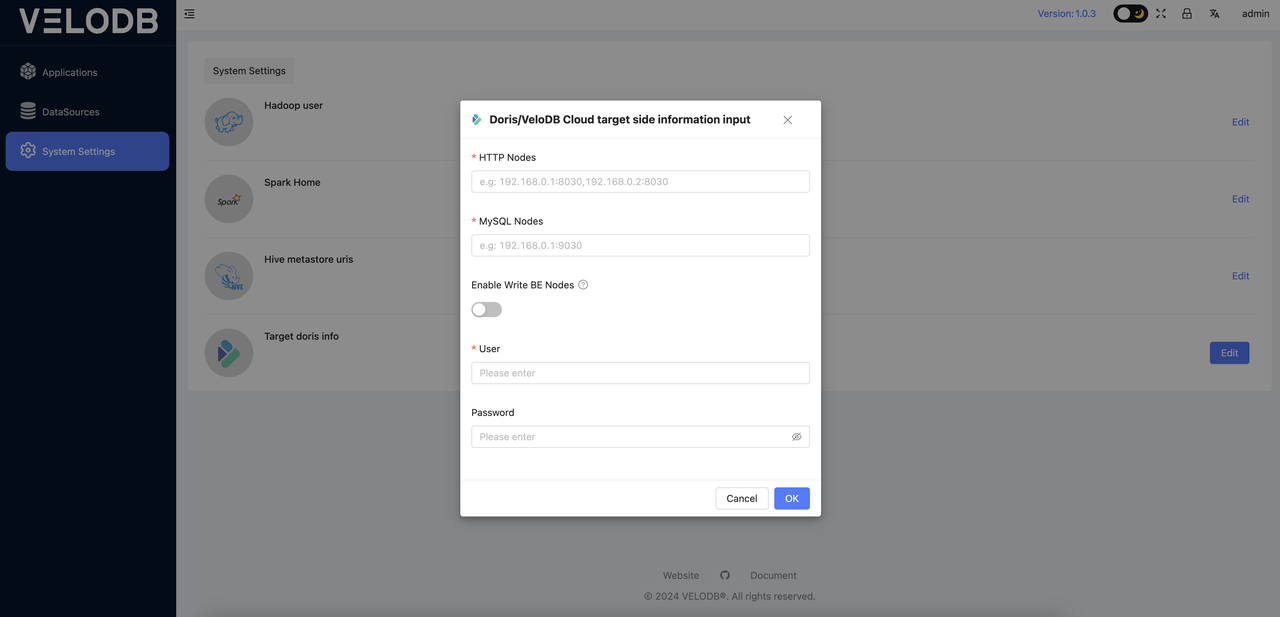
HTTP Nodes:
Host and port for HTTP connections, multiple nodes should be connected using ",". For example: 192.168.0.1:8030,192.168.0.1:8030
MySQL Nodes:
Host and port for MySQL JDBC connections, multiple nodes should be connected using ",", For example: 192.168.0.1:9030,192.168.0.1:9030
Note: If the target is VeloDB Cloud, then go to the VeloDB Cloud connection information and check the host and port of the connection
Hive to Doris
1 Precondition
-
The machine where X2Doris is deployed must be able to connect to the Hadoop cluster, either as a node in the Hadoop cluster or at least have a Hadoop gateway environment (capable of executing Hadoop and Hive commands, and accessing the Hadoop and Hive clusters).
-
The machine where X2Doris is deployed must have Hadoop environment variables configured, including
HADOOP_HOME,HADOOP_CONF_DIR, andHIVE_CONF_DIR. For example:
export HADOOP_HOME=/opt/hadoop #hadoop installation directory

export HADOOP_CONF_DIR=/etc/hadoop/conf

export HIVE_HOME=$HADOOP_HOME/../hive

export HIVE_CONF_DIR=$HADOOP_HOME/conf

export HBASE_HOME=$HADOOP_HOME/../hbase

export HADOOP_HDFS_HOME=$HADOOP_HOME/../hadoop-hdfs

export HADOOP_MAPRED_HOME=$HADOOP_HOME/../hadoop-mapreduce

export HADOOP_YARN_HOME=$HADOOP_HOME/../hadoop-yarn
Note: There must be a hive-site.xml file in either the HADOOP_CONF_DIR or HIVE_CONF_DIR.
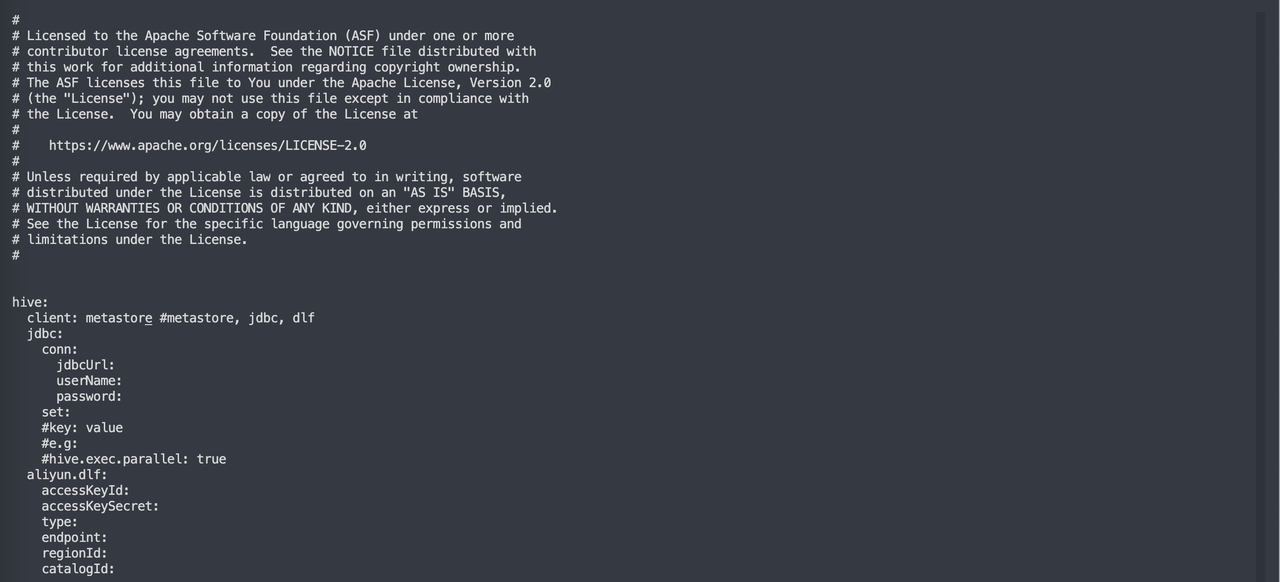
2 Configure Metadata Retrieval
Modify the configuration file conf/application-hive.yaml to set the method of retrieving Hive metadata. Currently, three methods are supported: JDBC, Alibaba Cloud DLF, and Metastore.
1. Metastore
This is the recommended default method for retrieving Hive metadata. If Hive is standard Apache Hive, it is recommended to set client as metastore.
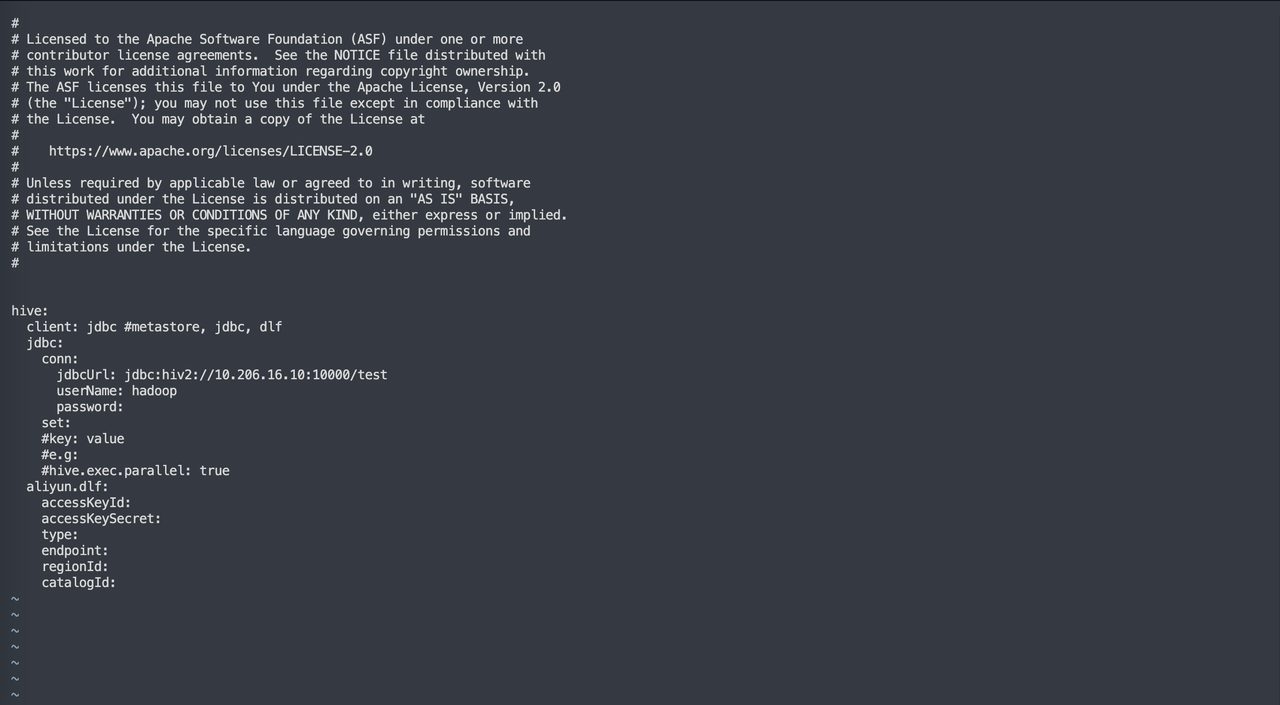
2. JDBC Method
If you cannot use the metastore method due to issues like permissions, you can try using the JDBC method. Set the client as JDBC and provide the corresponding jdbcUrl, username, and password. Additionally, you can set connection parameters by adding configurations after the set command.
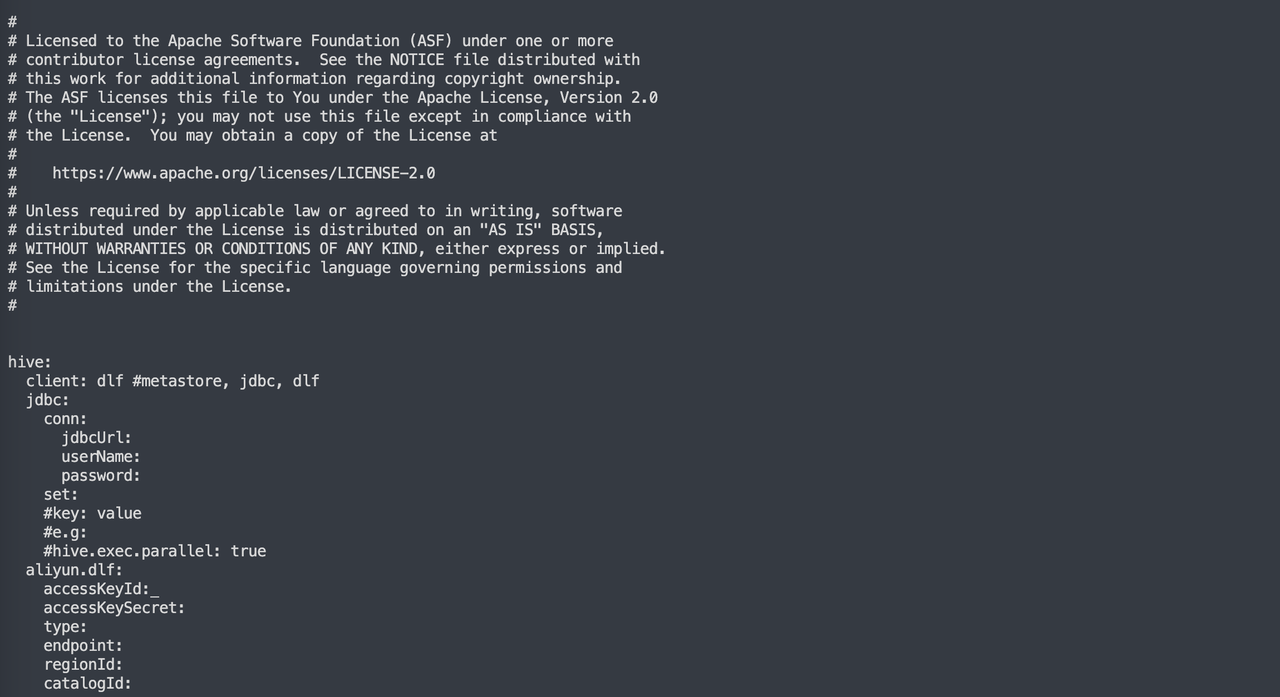
3. Alibaba Cloud DLF
If Hive is on Alibaba Cloud, set the client to dlf and provide the valid access key (ak), secret key (sk), authentication type, endpoint, regionId, and catalogId for the Alibaba Cloud DLF service.
Configure the thrift connection address for the Metastore in the System Settings.
After configuring, click on submit to submit the settings.
The successful update message indicates that the connection is established properly.
3 Set System Information
The hive requires the following information to be set, all of which are mandatory parameters, as follows:
-
Hadoop user: This job will access Hive data, and the Hadoop user is the user who operates Hive tables (typically the user for daily Hive jobs). -
Spark Home: Specify the path where Spark is installed on the deployment machine. -
Hive metastore Uris: The metastore URIS of Hive, which can be found in the configuration of hive-site.xml under$HADOOP_CONF_DIR. -
Target Doris (VeloDB Cloud): Information about the target Doris (VeloDB Cloud) where the data will be written into.
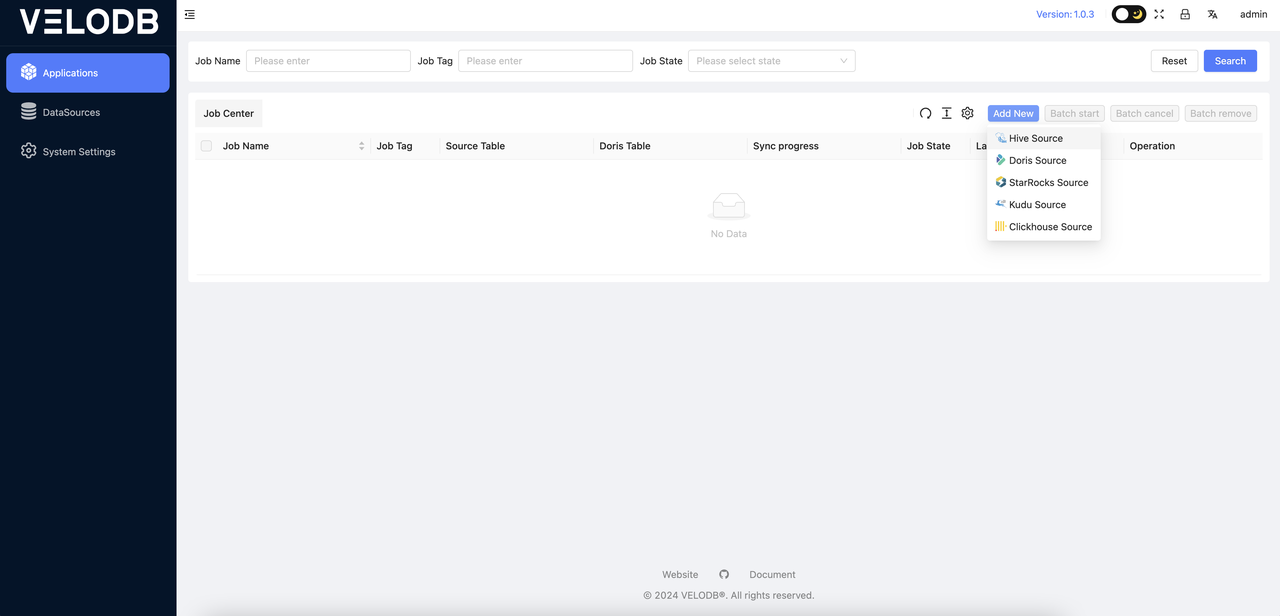
4 Create Synchronization Job
After completing the System Settings, you can proceed to the Applications, where you can click on Add New to create a new job.
It will automatically check for a Hive connection when you add it, and will alert if the Hive connection fails:

At this point, you need to verify that the communication between the Hive metastore uris in the System Settings and the current deployment machine is functioning properly. This step must be successfully completed before proceeding with the migration work. If the connection is established, you can proceed directly with creating new jobs.
5 Field Type Mapping
If the connection with Hive is successful, all databases and tables in the Hive data warehouse will be automatically listed. You can then click on the tree directory on the left, select the target table for operation, and once a table is selected, the right side will automatically list the mapping relationship between that table and Doris, allowing for easy mapping of field types for the target Doris table. Follow the prompts to complete the field mapping. DUPLICATE KEY and DISTRIBUTED KEY are parameters that must be specified in the Doris Duplicate model.
Note: The partition fields in the Hive table have been automatically identified, and they have been automatically set as DUPLICATE KEY fields.
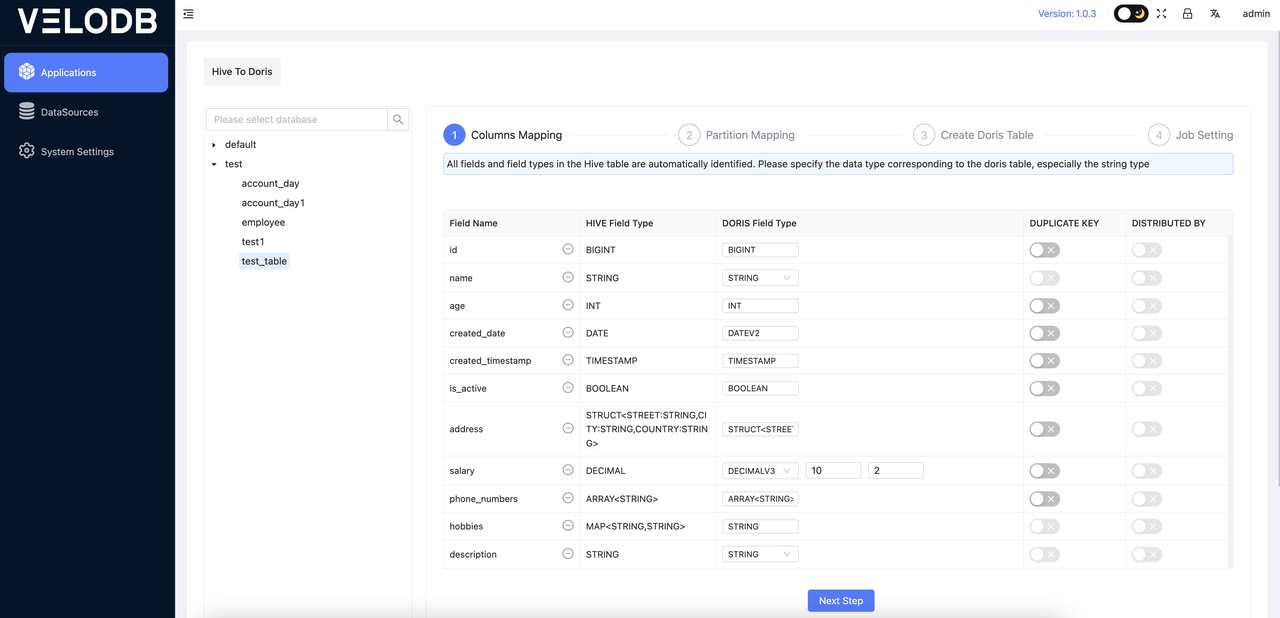
Note:
-
The automatically generated Doris DDL create table statement is based on the Duplicate model and can be manually modified according to the actual situation.
-
STRINGtype cannot be set asDUPLICATE KEY, it needs to be changed toVARCHARtype.
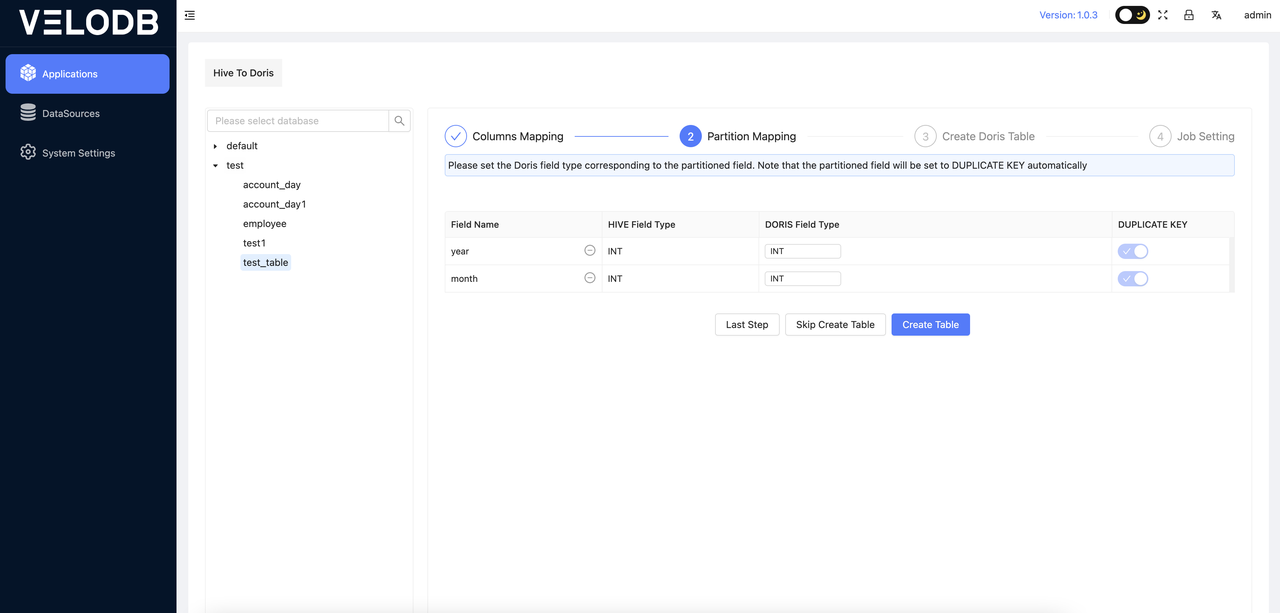
6 Partition Mapping
If the partition field type in the original Hive table is STRING, you can determine based on the actual data whether the corresponding field type in the Doris table needs to be converted to a time type. If it is converted to a time type, the partition interval needs to be set.
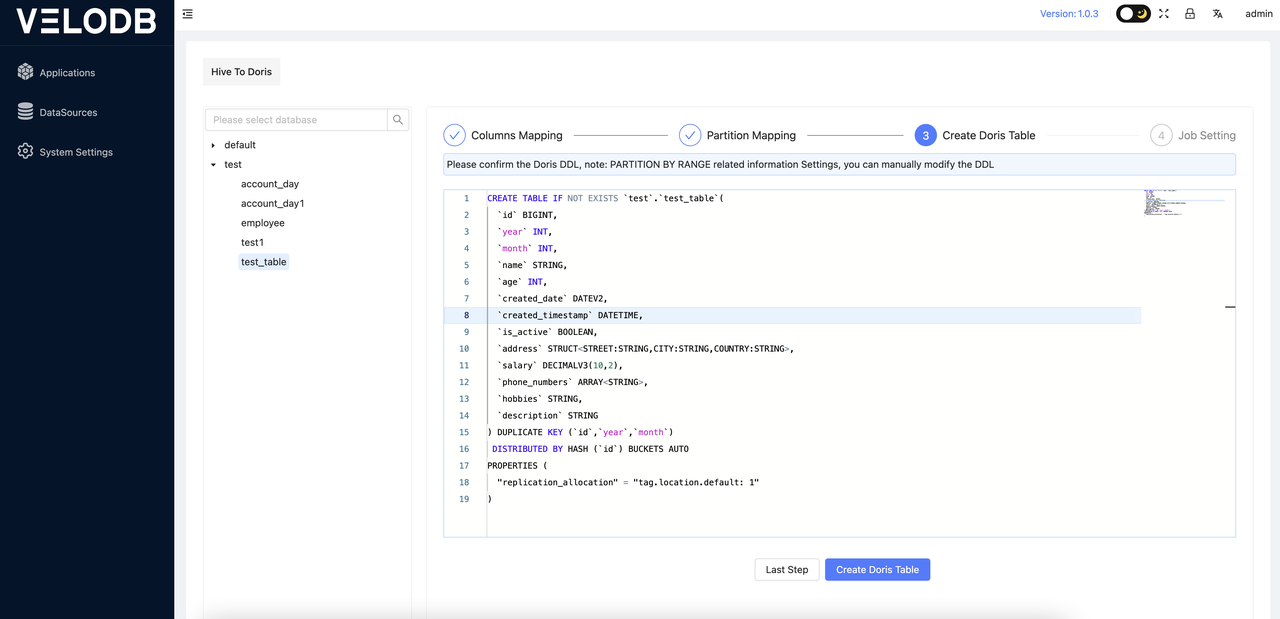
7 Create Doris Table
Once the first two steps are completed, you can proceed to the confirmation phase of the Doris table DDL. At this stage, the corresponding Doris table create table DDL statement has been automatically generated, and you can review and manually modify the DDL.
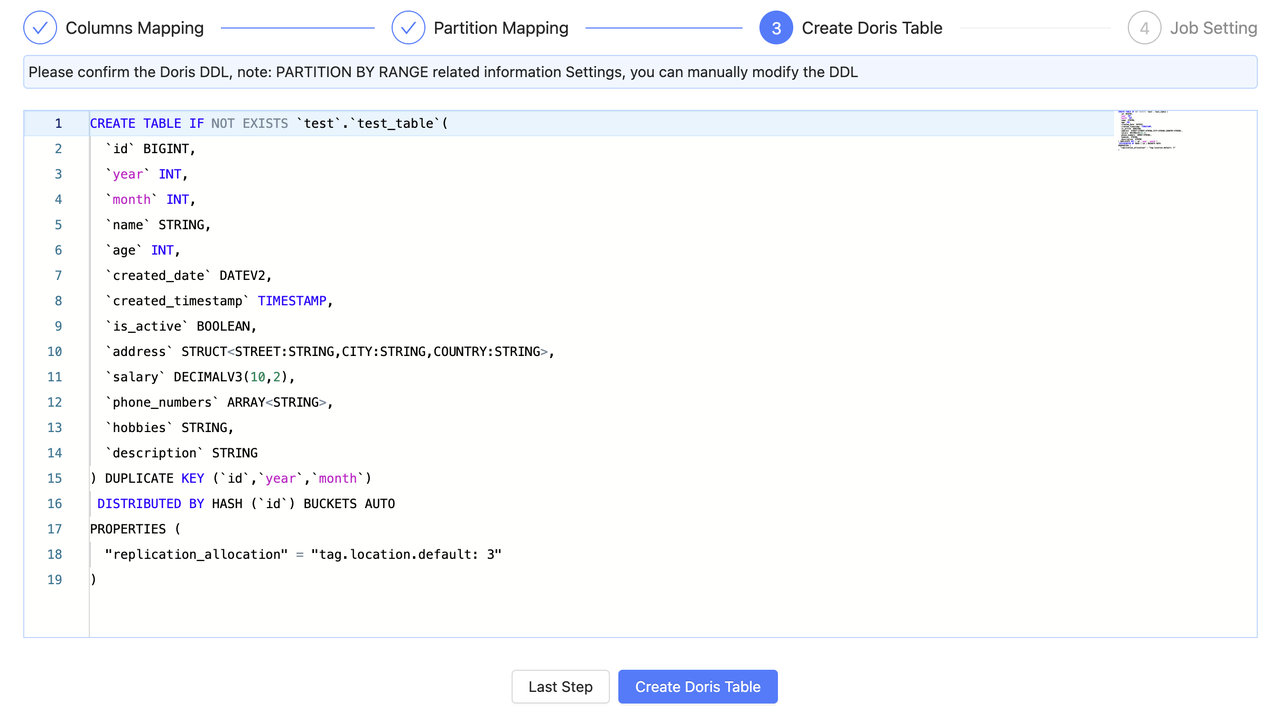
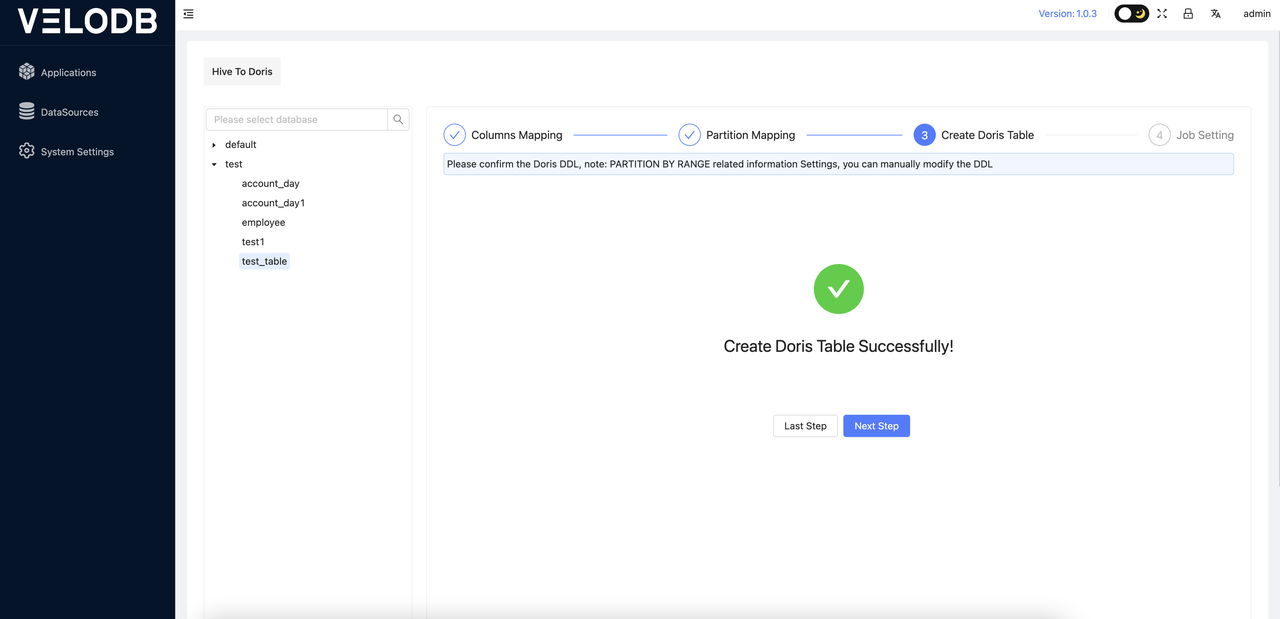
After confirming that everything is correct, you can click on Create Doris Table.
Note: Ensure that the corresponding Doris database exists, as the database needs to be created manually by the user.
8 Job Configuration
After clicking on create job, a task configuration interface will pop up, where users need to configure the parameters required for the task migration. An example of the specific settings is as follows:
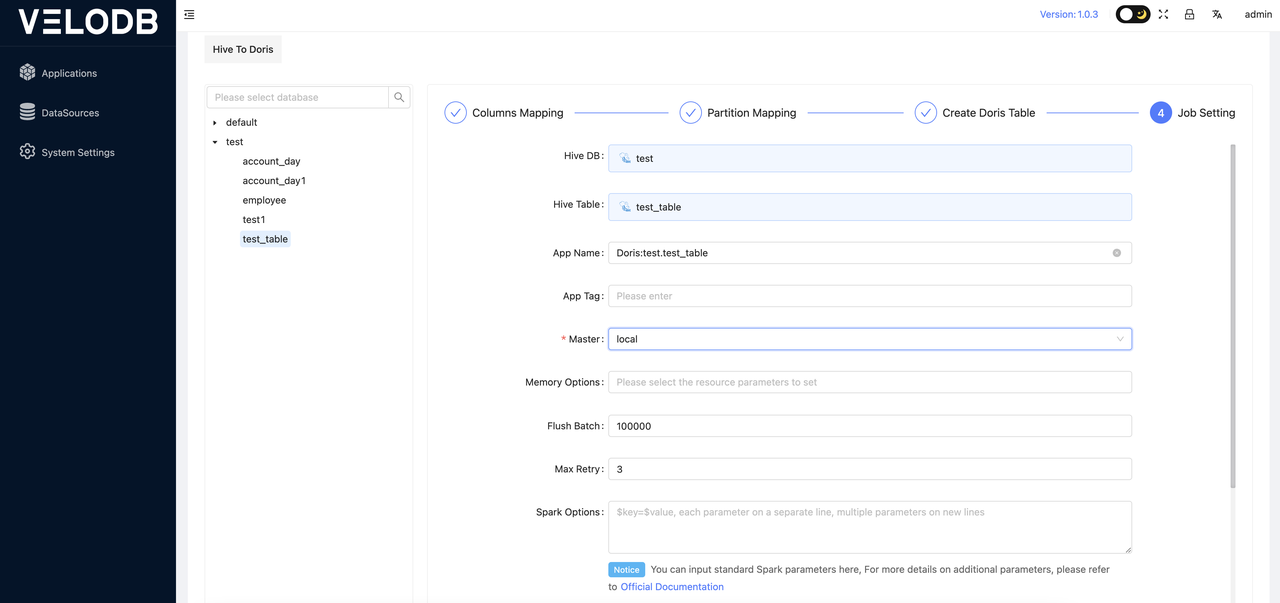
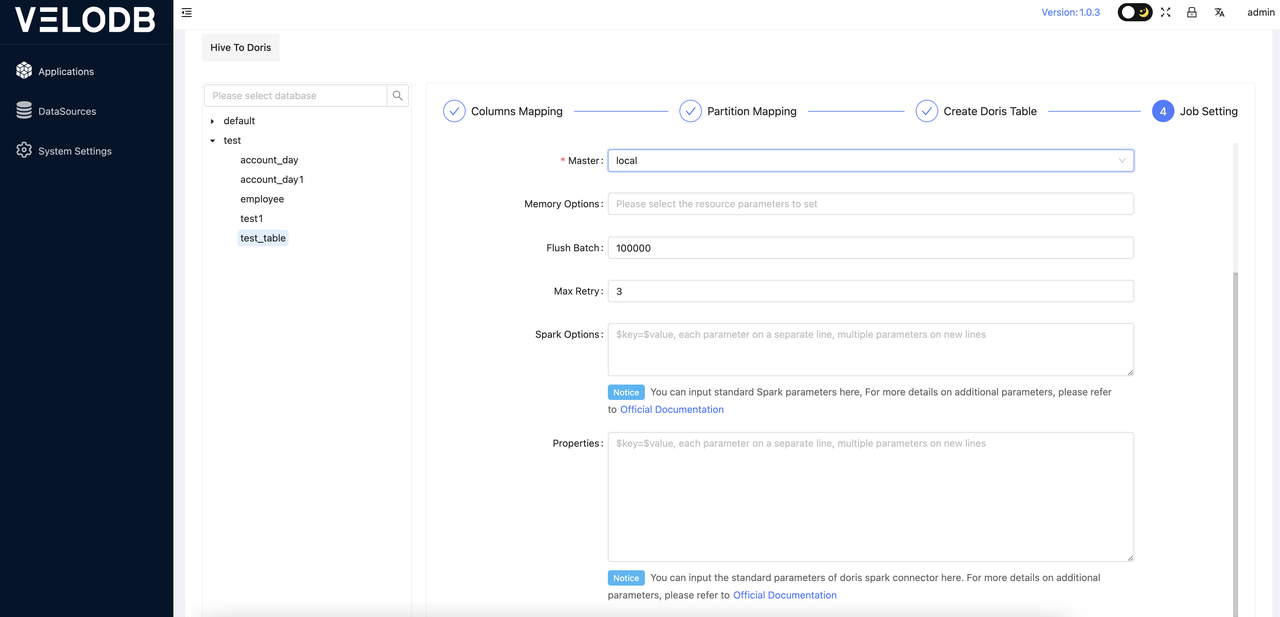
Explanation of Specific Parameters (Important parameters are in bold):
-
Hive DB: Automatically generated, the database name of the data source.
-
Hive Table: Automatically generated, the name of the table is migrated from the data source.
-
App Name: Automatically generated, the name of the data migration task.
-
App Tag: Automatically generated, the tag of the data migration task.
-
Master: Choose between local mode or yarn mode, referring to the way the X2Doris task runs. Adjust this based on the actual situation.
-
DeployMode: Choose between client or cluster, based on the actual situation.
-
Yarn Queue: Resources queue used for running Spark tasks.
-
Memory Options: Select memory parameters for Spark tasks, such as the number of cores and memory size for executors and drivers. Adjust this according to actual requirements.
-
Write Batch: Batch size for data flushing. Adjust this based on the actual data volume. If the amount of data being migrated is large, it is recommended to adjust this value to 500,000 or above.
-
Max retry: Number of retries for failed tasks. Increase this parameter if the network conditions are not ideal.
-
Spark option: Custom Spark parameters. Add additional Spark task parameters here in the format
key=value. -
Properties: For data migration, if there are optimization parameters for reading from the data source or writing data to Doris, you can specify them here. Refer to the official documentation of the corresponding Spark connector for specific parameter descriptions.
After creating the data migration task in the previous step, you can view the newly created data migration task in the task details interface, as shown in the following image:

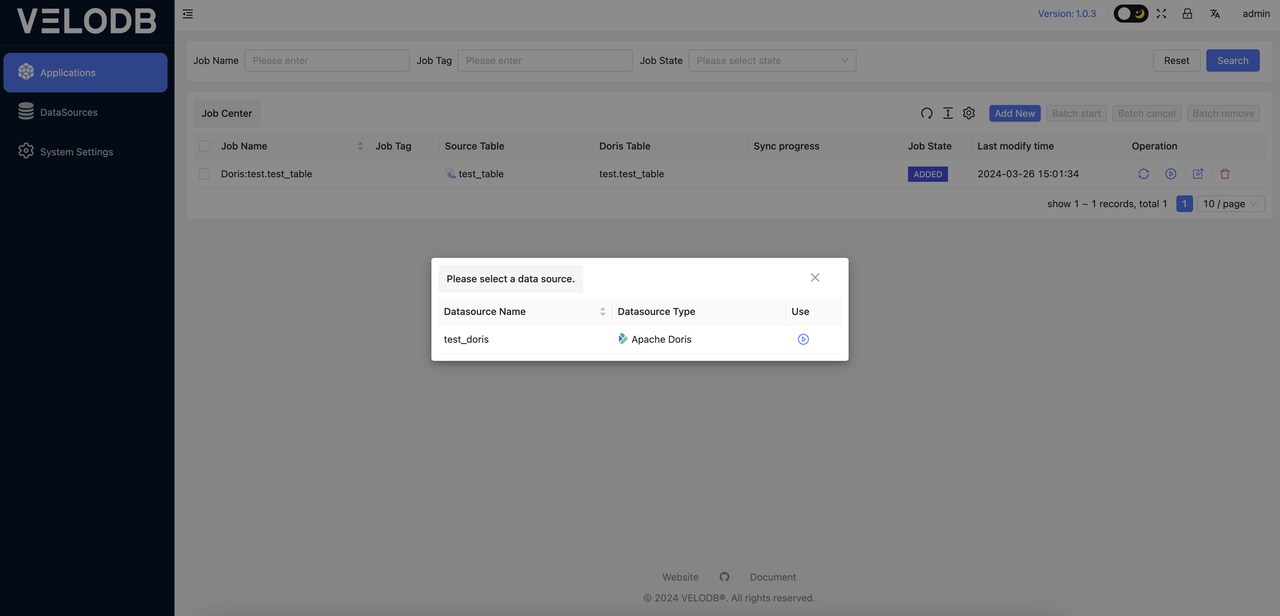
Doris to Doris
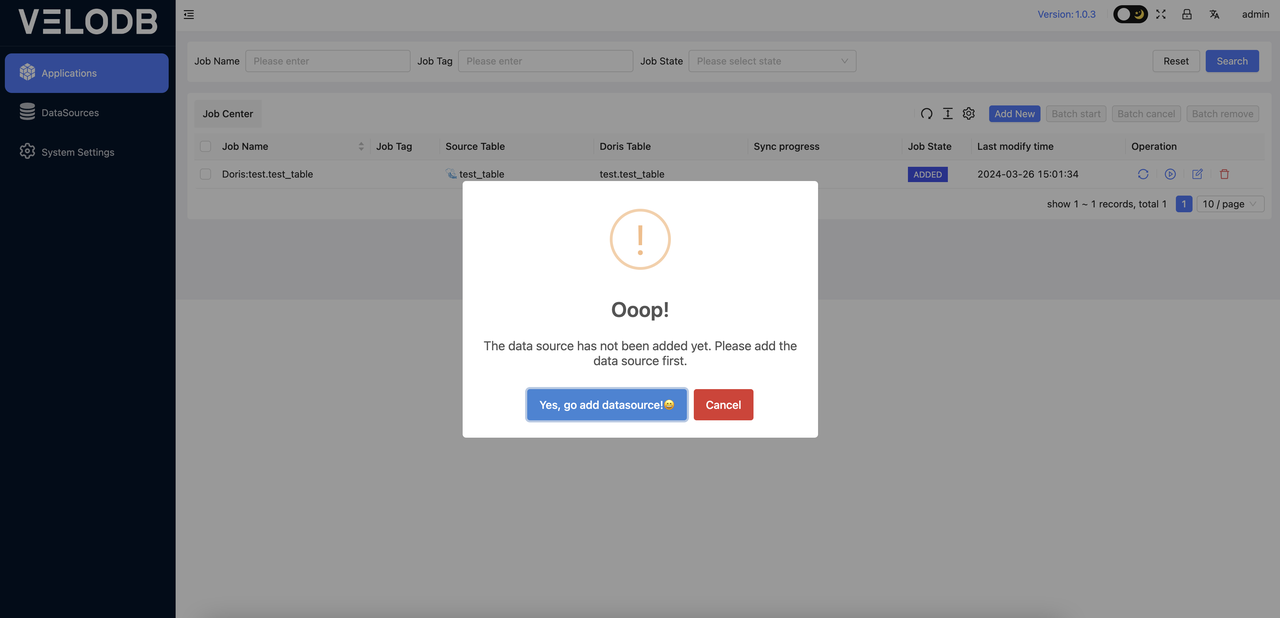
Click on Add New in the Applications, select Doris, and a pop-up window will appear prompting you to choose a data source.
If no data sources have been added previously, you will need to add a data source first.
1 Add Data Source**
Click on the DataSources menu on the left side. Here, you can see a list of all data sources and choose to add a new data source. In this case, you can add a new Doris data source.

A pop-up window will appear, prompting you to enter the connection information for Doris.
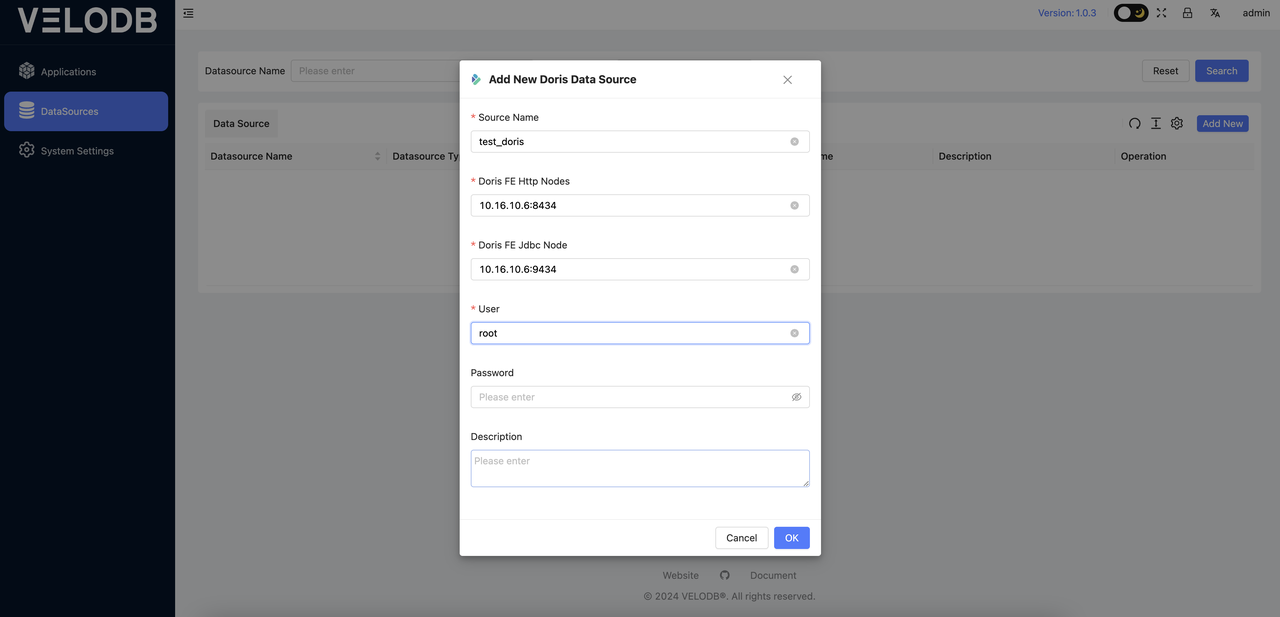
Set the HTTP node, JDBC node information, username, and password for Doris, then click OK to submit. You can also set multiple nodes in the format ip1:port1,ip2:port2,ip3:port3, with commas separating multiple nodes.
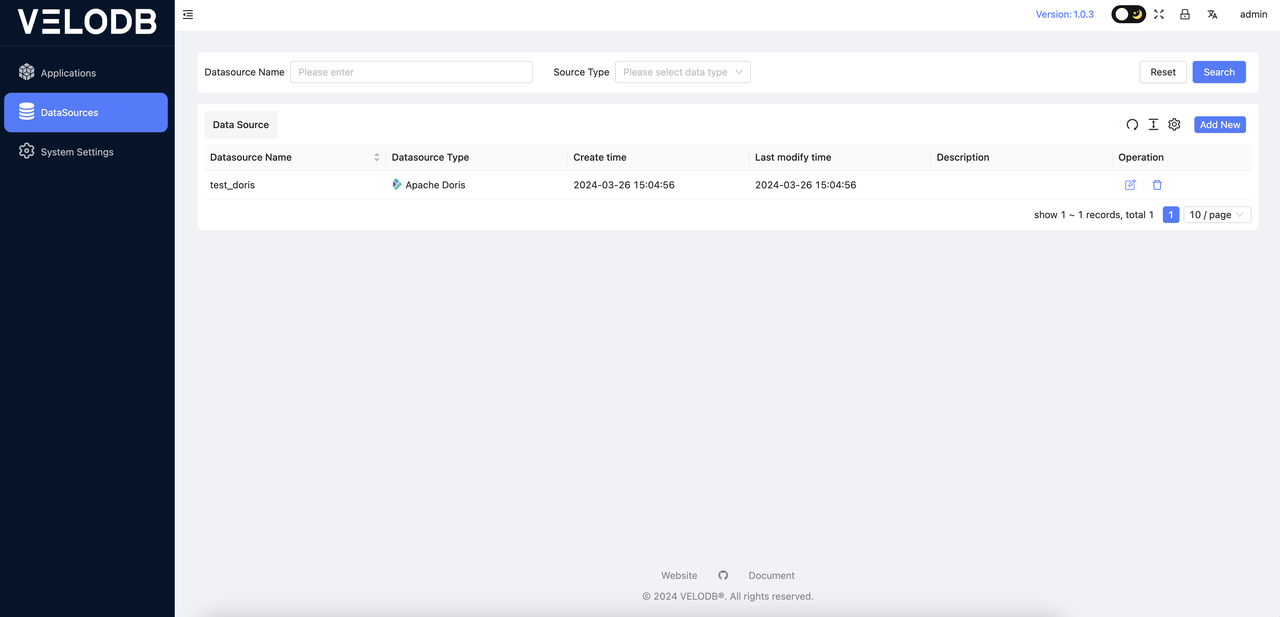
During this step, the entered connection information will be automatically validated. If the host, username, and password are correct, the validation will succeed, and the page will automatically redirect to the DataSources page where you can see the newly added data source, as shown below:
2 Create Synchronization Job
After adding the DataSource, return to the Applications page. You can click on Add New again, select Doris Source and a pop-up window will appear prompting you to choose a data source.
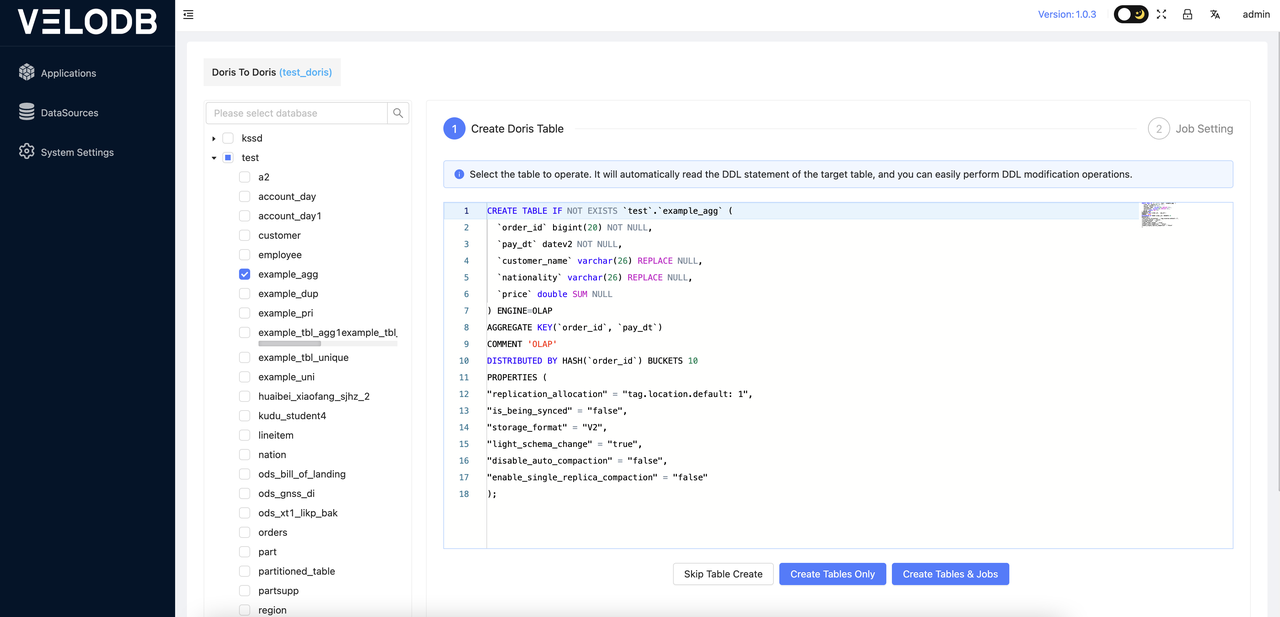
At this point, you will be redirected to the following page for the job: Doris databases and tables will be presented in a tree-like structure. You can select individual tables, multiple tables, or entire databases for migration. If you choose a single table, you will see that the DDL statement has been automatically generated. You can review and confirm this DDL statement.
Note: DDL statements are only visible when selecting a single table. If multiple tables are selected, default generated DDLs will be used.
After confirming the DDL, you can proceed based on your actual needs by performing the following actions:
-
Skip Table Creation: Use this option if the table(s) you want to migrate already exist in the target Doris (VeloDB Cloud) database.
-
Create Table Only: This option is for creating tables without creating migration jobs.
-
Create Table & Job: Use this option to simultaneously create tables and migration jobs.
During this step, field recognition will be automatic. If the target Doris is identified as VeloDB Cloud, the parameters in Properties will be handled automatically.
3 Job Configuration
The final step in job configuration involves setting specific parameters, which are consistent with the Hive to Doris operation.
The migration process for StarRocks, Kudu, and Doris follows the same procedure. Therefore, it will not be elaborated further here.
Start Synchronization Job
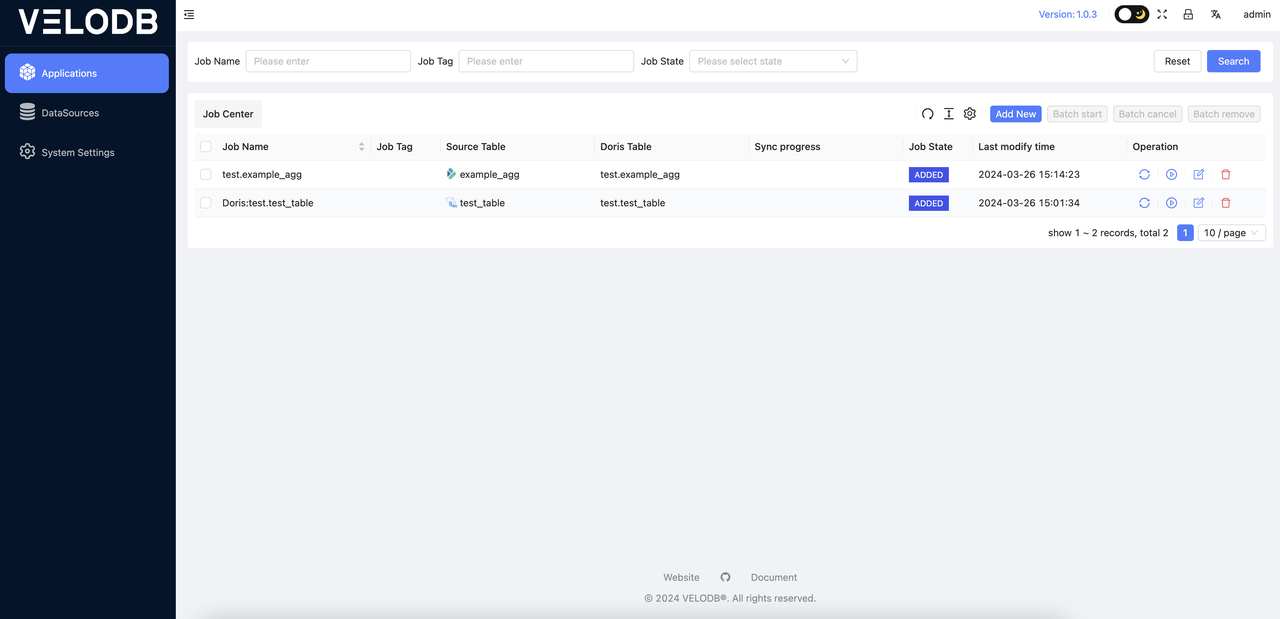
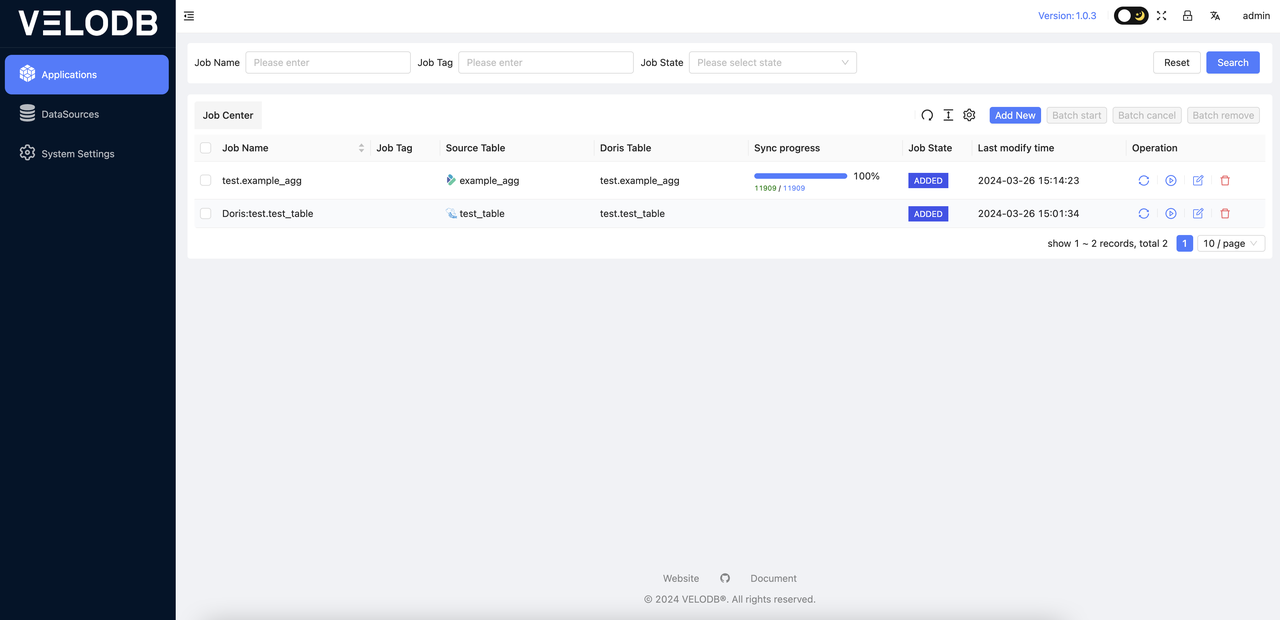
In the Applications, you can view all the created jobs as shown below:
Clicking the Start button in the operation will pop up the corresponding window as follows:
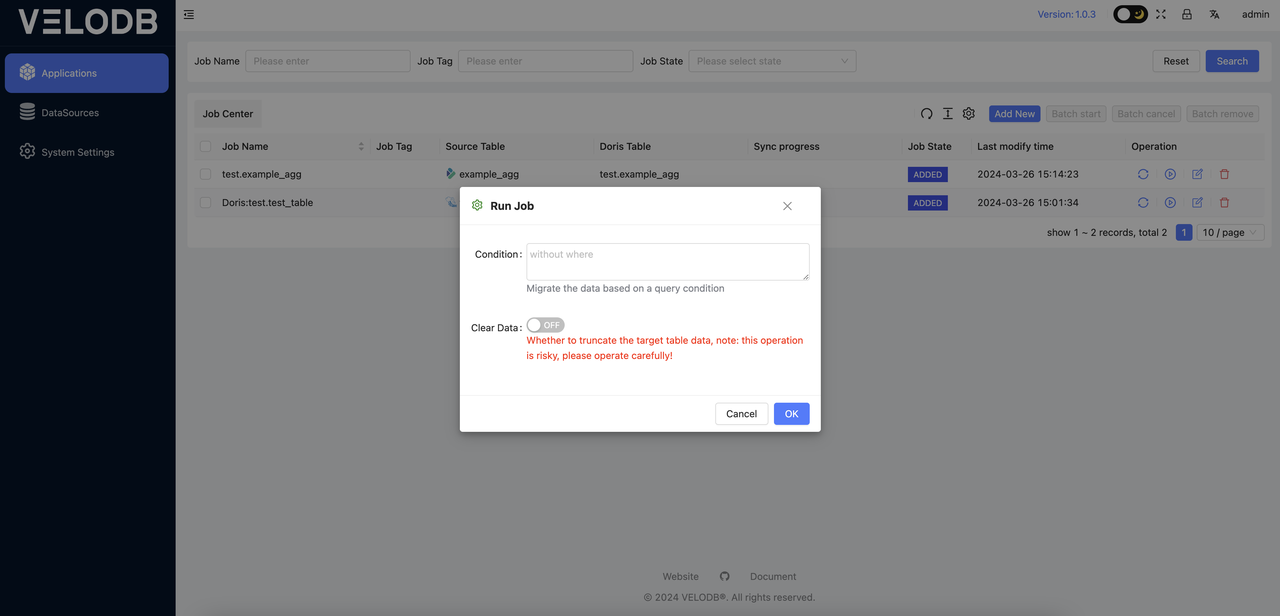
Condition: This parameter allows you to input filtering conditions during the data migration process to perform ETL operations on the data source. When specifying the condition, there is no need to include the WHERE keyword and only the filter condition is required.
Clear Data: By default, this button is in the OFF state. When switching to the ON state, it will perform a data clearing operation on our target database before each migration task runs. This is an extremely dangerous operation, so exercise caution when performing data migration on production data.
If there are no additional ETL or data clearing requirements, simply click OK to start the data migration task.
Note: Before running the task, make sure to configure SPARK_HOME in the system settings. Without the Spark client environment, it will not be possible to submit Spark tasks.
Updating Job Migration Progress
After starting the job, the job status will refresh automatically in the frontend. The migration progress needs to be manually refreshed by clicking the update button to view the data migration status. Do not refresh the progress update button frequently. At this point, the migration progress will be displayed as shown in the following image:
Parameter Optimization Guide
In the scenario of Doris/StarRocks to Doris(VeloDB Cloud) migration, if your Doris and YARN resources are relatively idle, you can further optimize the speed by setting the following parameters in the Properties:
doris.request.tablet.size=1 # if the data source is Doris
starrocks.request.tablet.size=1 # if the data source is StarRocks
The purpose of this parameter is to specify the number of Doris tablets corresponding to one RDD partition. A smaller value will generate more partitions, thereby improving the parallelism on the Spark side, but it will also put greater pressure on Doris.
How to Troubleshoot Task Failures
When our data migration task fails, prioritize checking the running logs of the X2Doris program installed in the log directory under the X2Doris installation directory. You can observe and locate the program's execution situation by viewing velodb.out.
If the issue is not resolved after reviewing the above-mentioned logs, please provide the logs and the contextual background of the migration task's execution to seek assistance from the official personnel of VeloDB.