Connections
Private Link
Private Link can help you securely and stably access services deployed in other VPCs through a private network in VPC environments, greatly simplifying network architecture and avoiding security risks associated with accessing services through the public network.
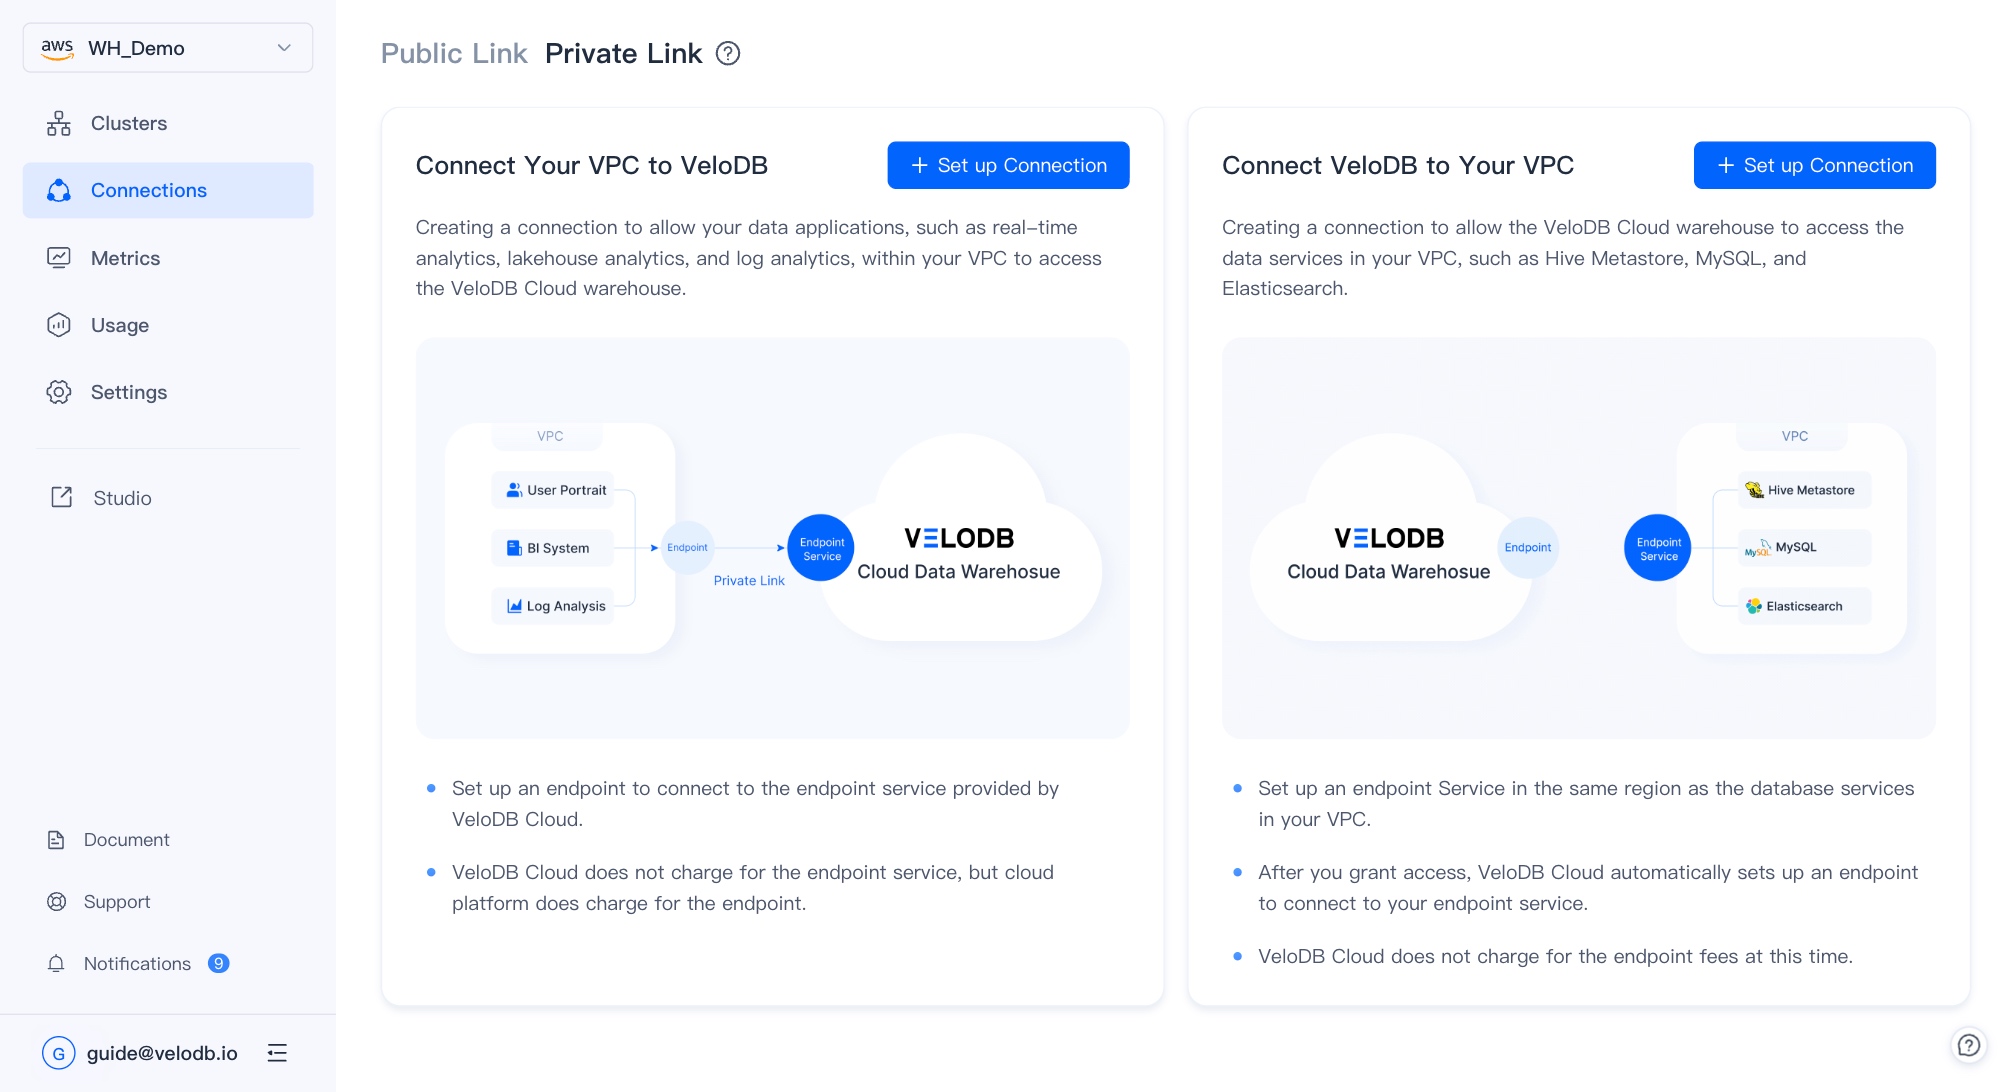
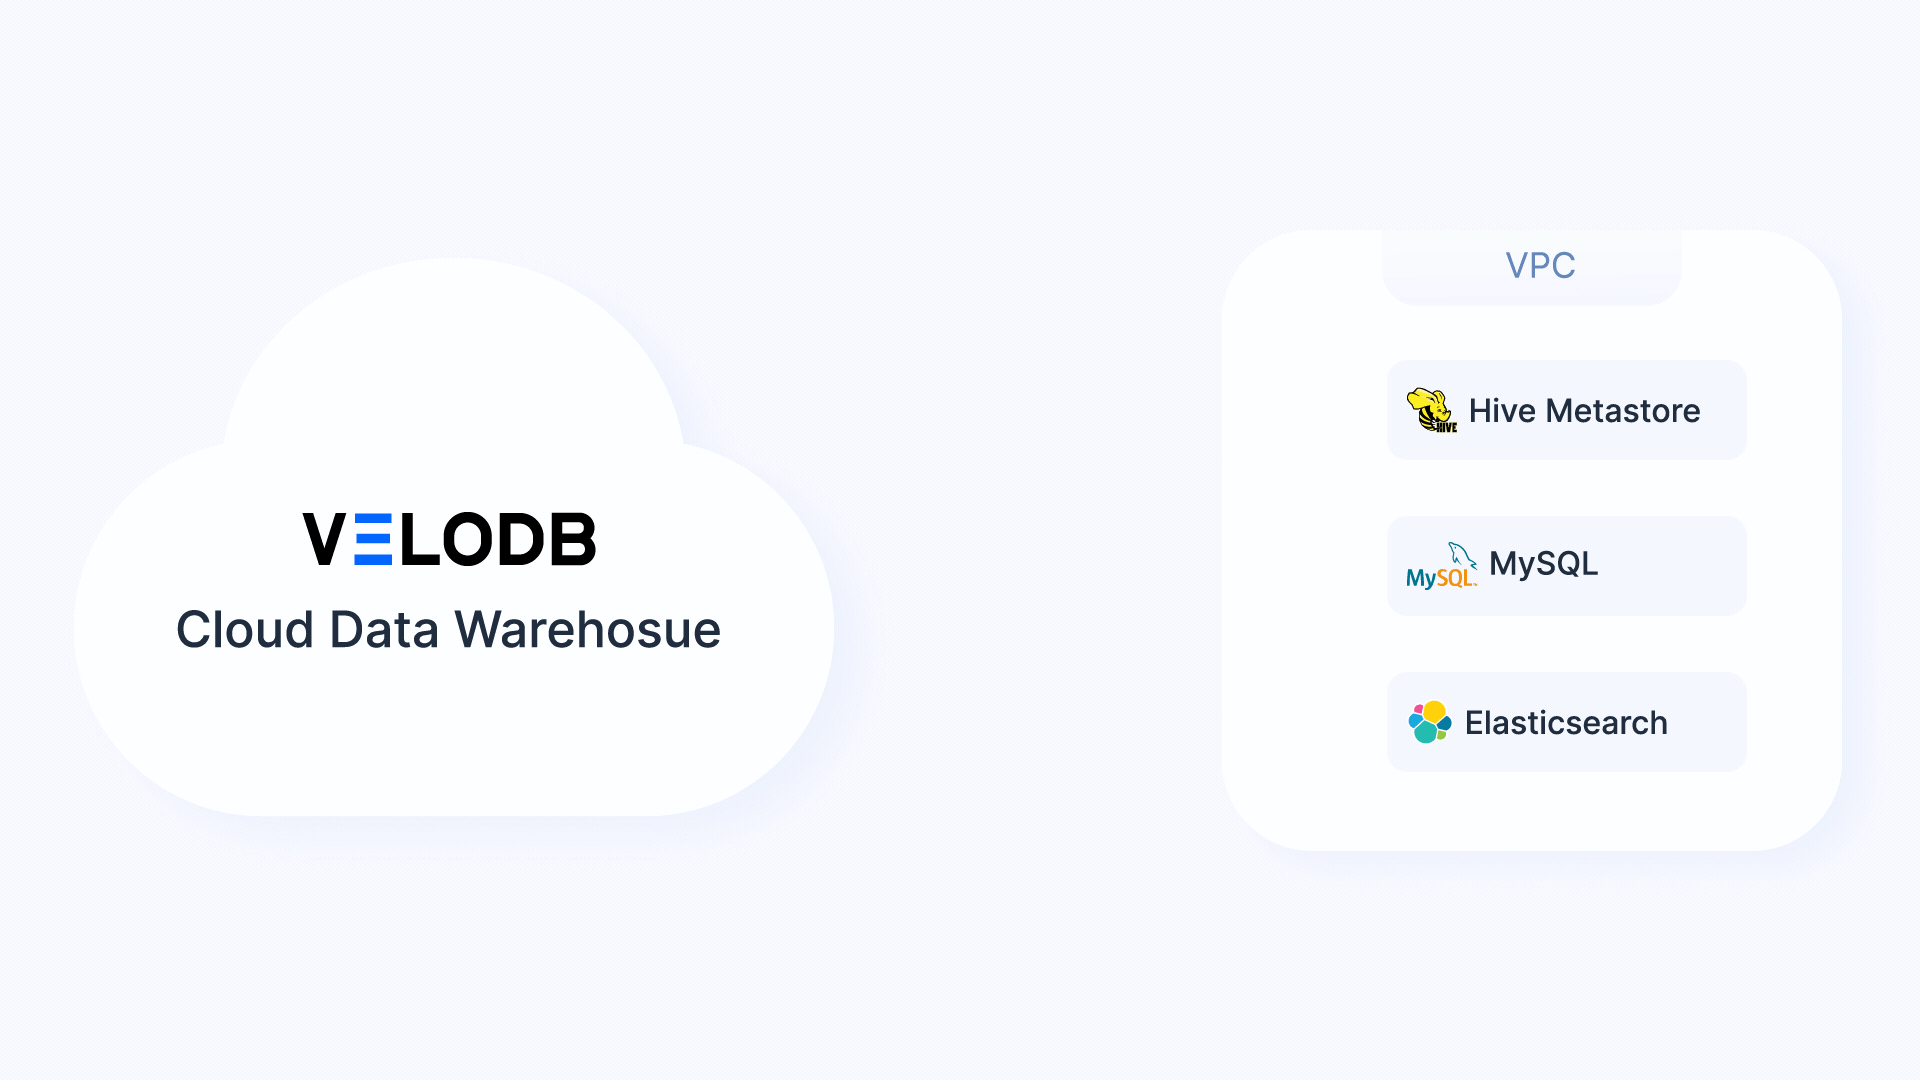
The VeloDB Cloud warehouse is created and run in the VeloDB VPC, and application systems or clients within the user's VPC can access the VeloDB Cloud warehouse across VPC via Private Link. Private Link includes two parts: endpoint service and endpoint.
When the user needs to access VeloDB in their own private network, VeloDB Cloud will create and manage the endpoint service, and the user creates and manages the endpoint.
When the user needs to use VeloDB to access their own private network, they need to create an endpoint service and register it in VeloDB Cloud. Subsequently, VeloDB Cloud will create an endpoint to connect to the user's endpoint service.
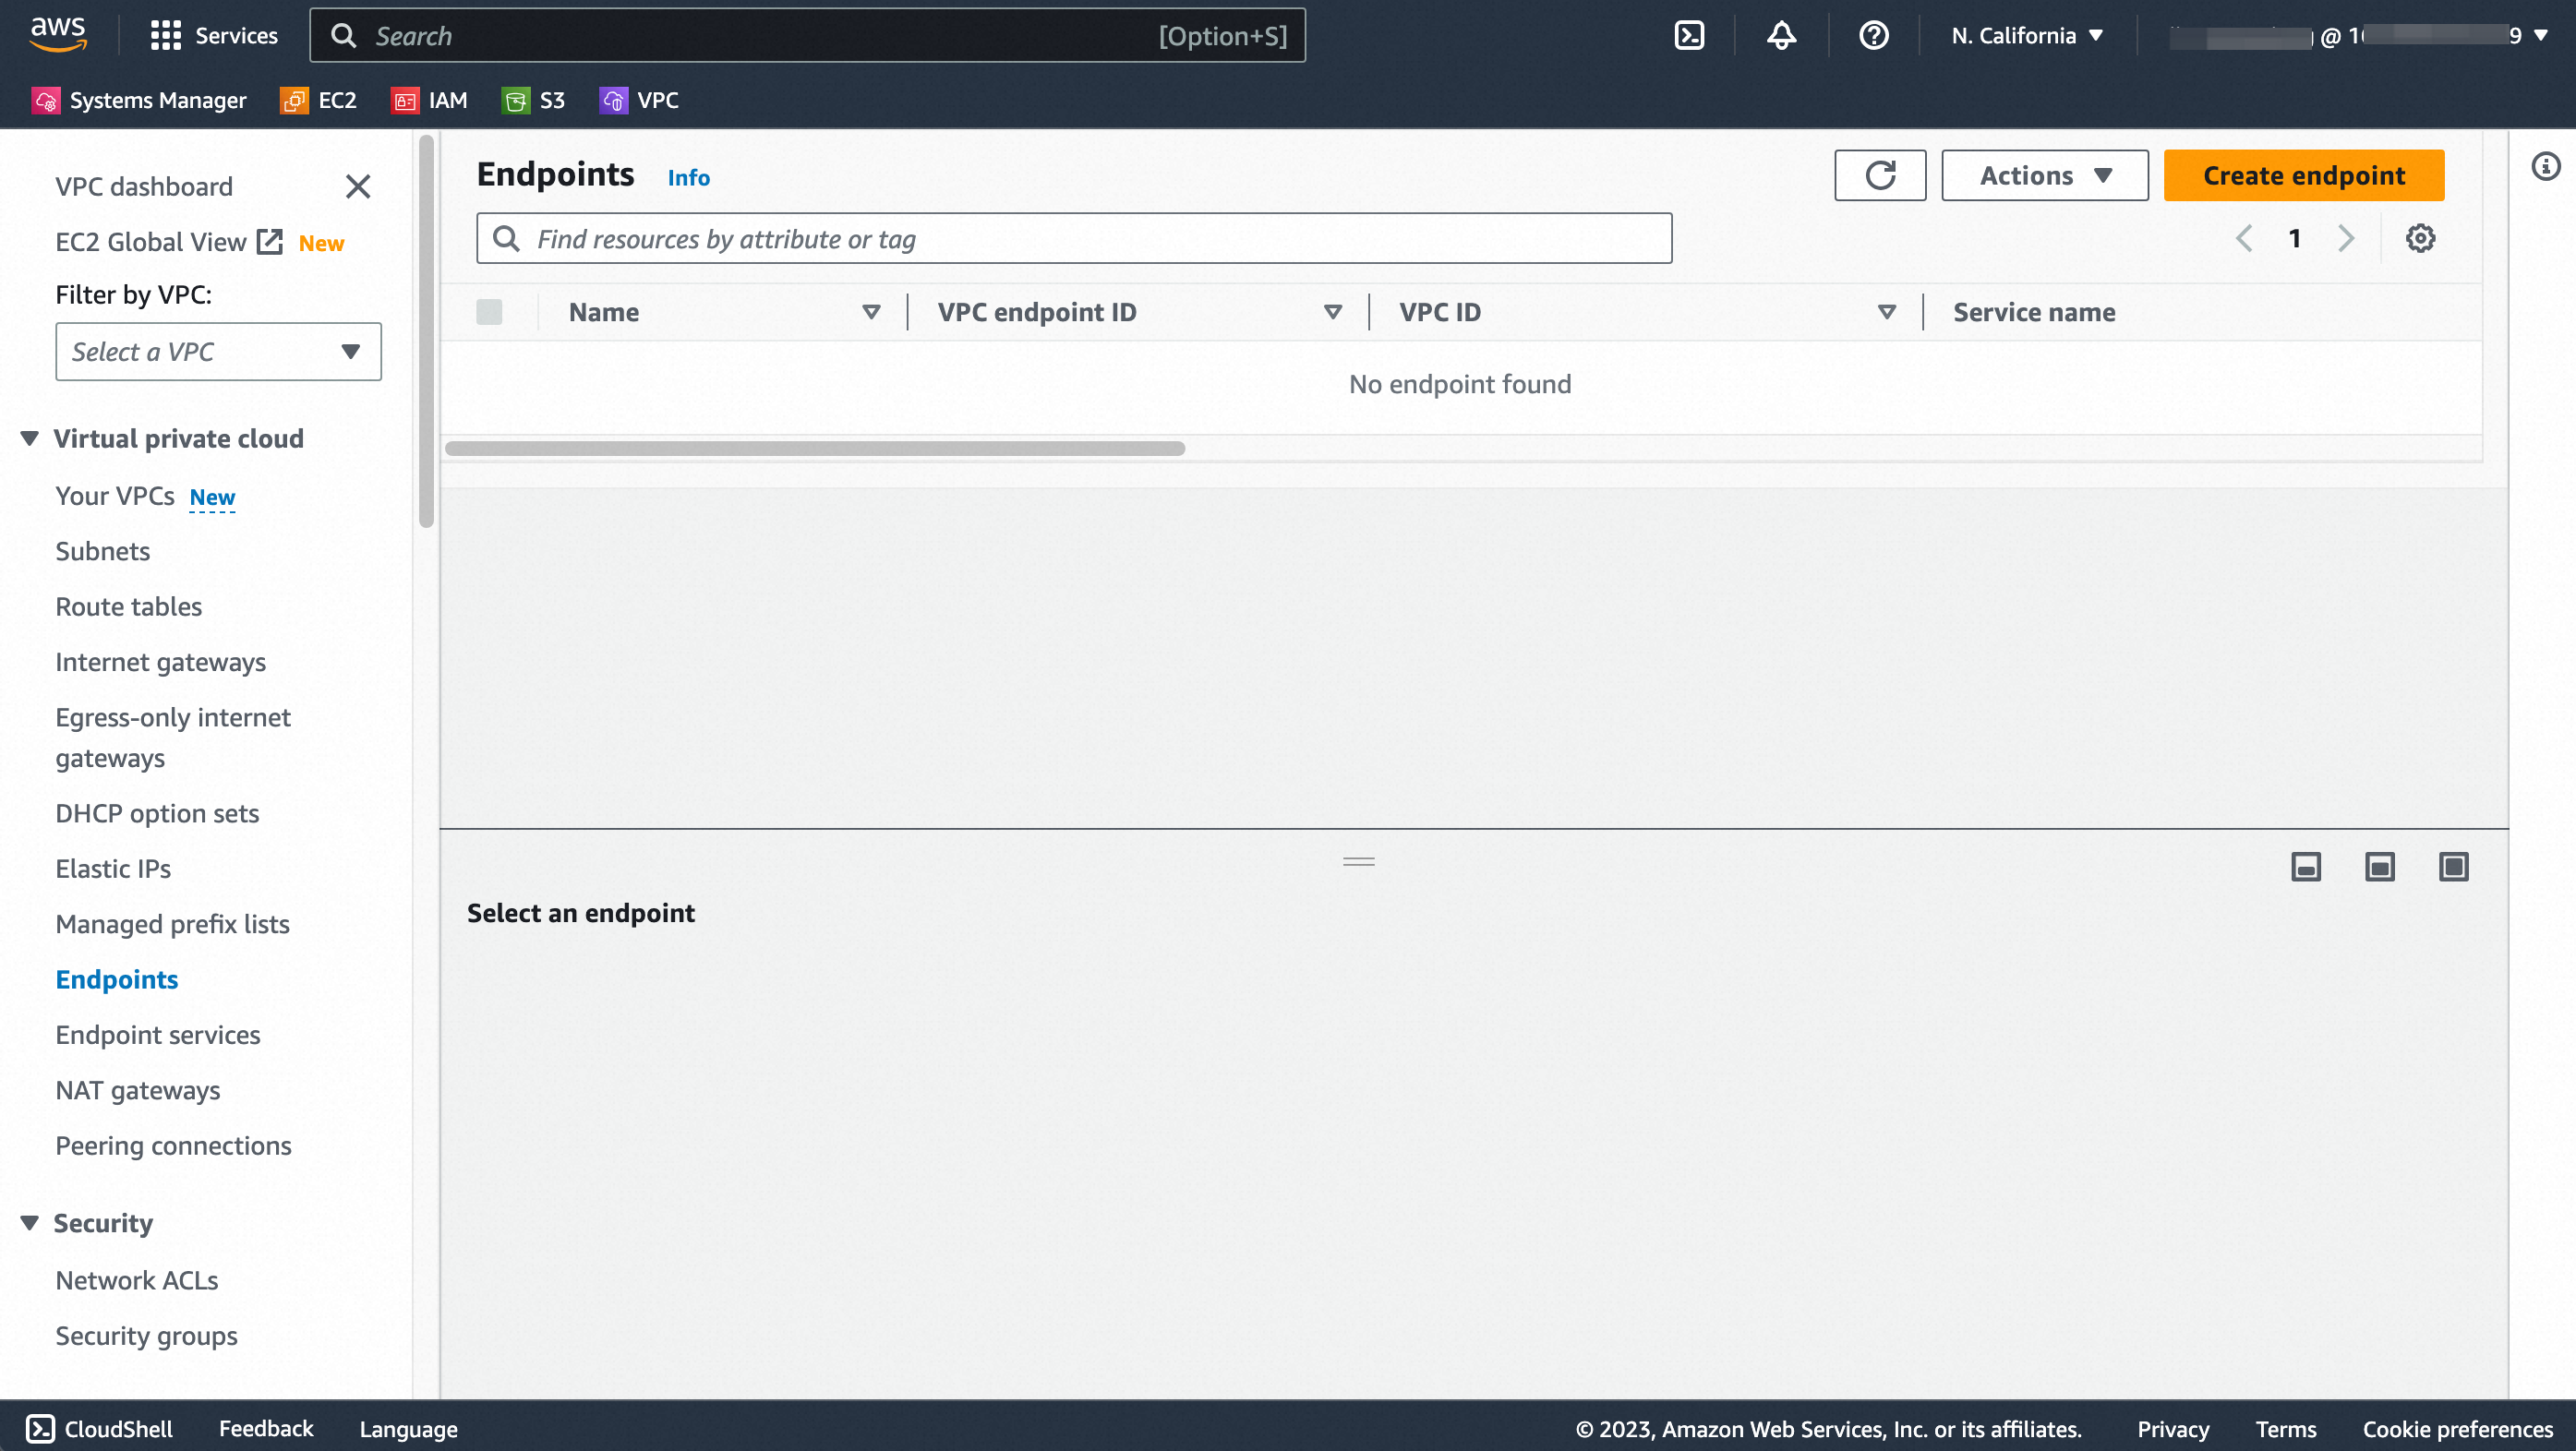
Access VeloDB from Your VPC
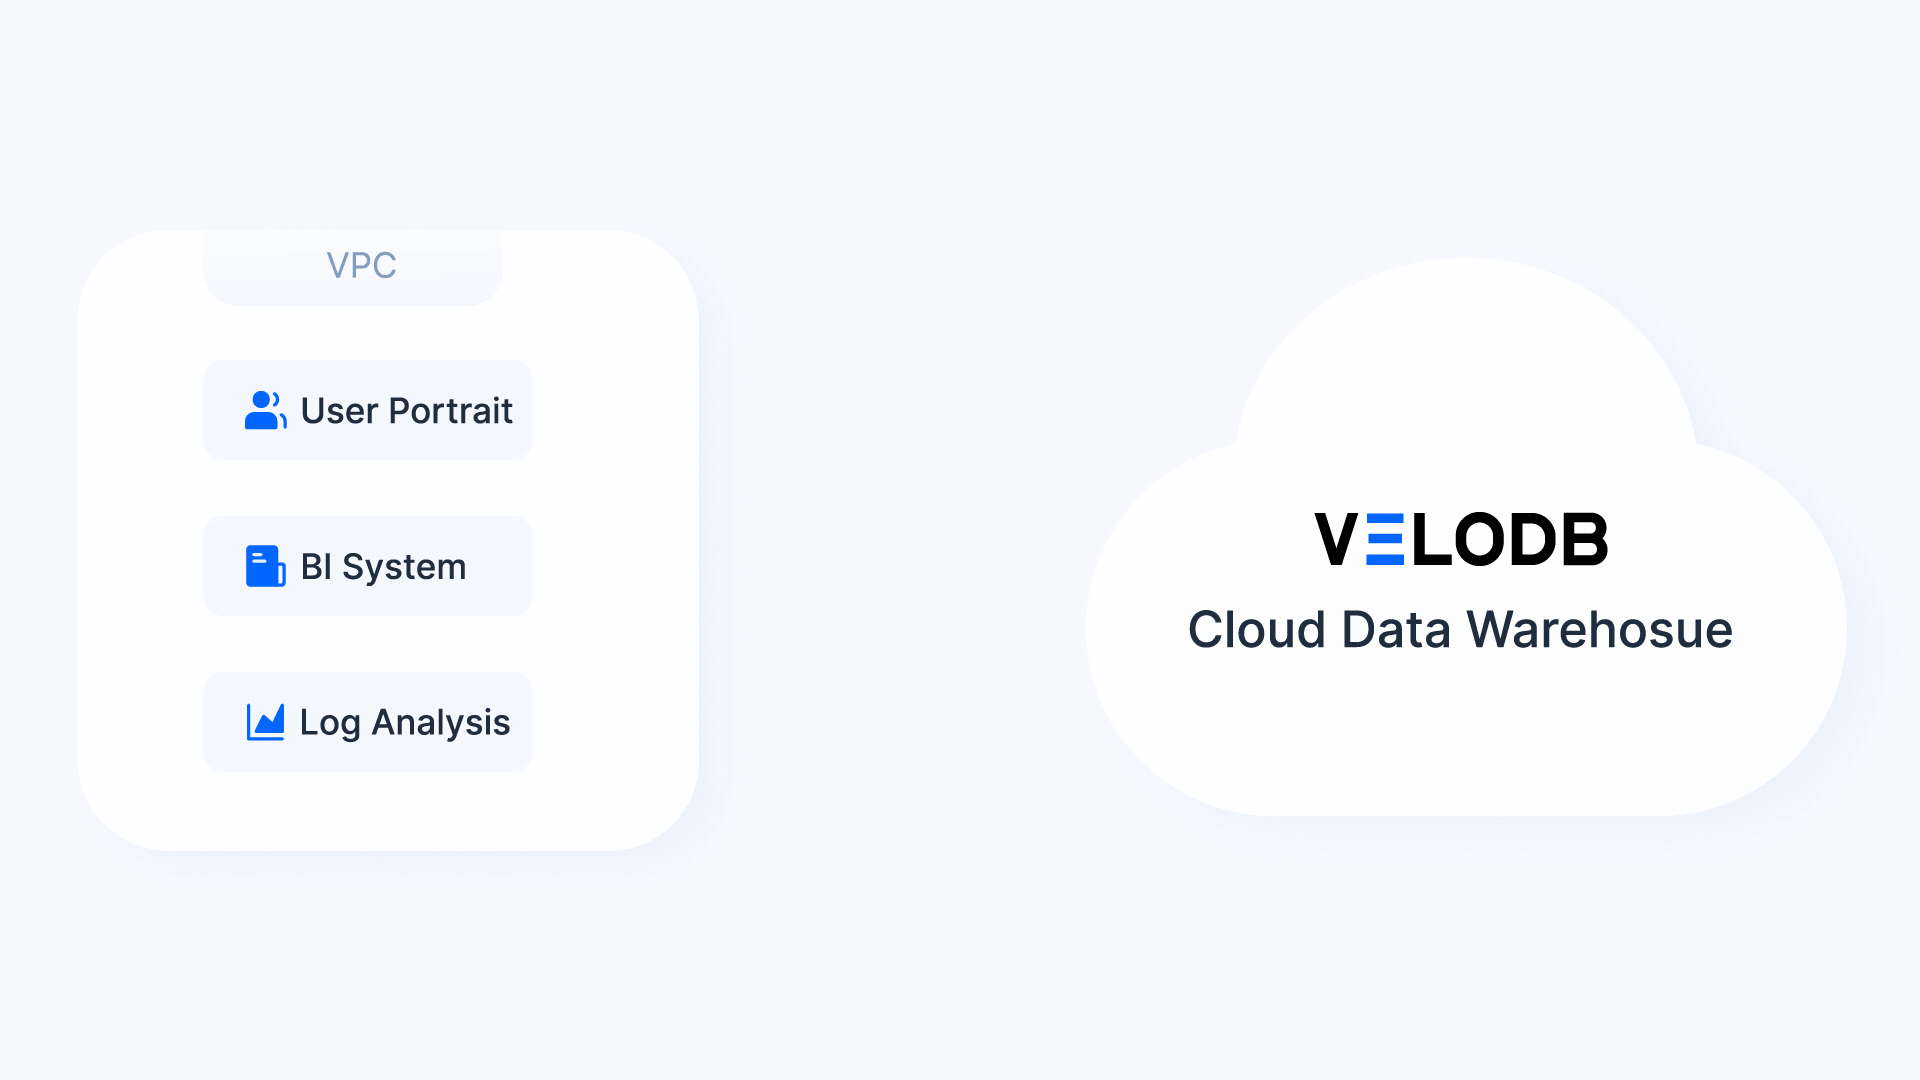
Creating a connection to allow your data applications, such as reporting, profiling, and log analytics, within your private network to access the VeloDB Cloud warehouse.
Note There is no additional fee on the VeloDB Cloud service side, but users need to pay the cloud platform for endpoint instances and traffic fees.
AWS
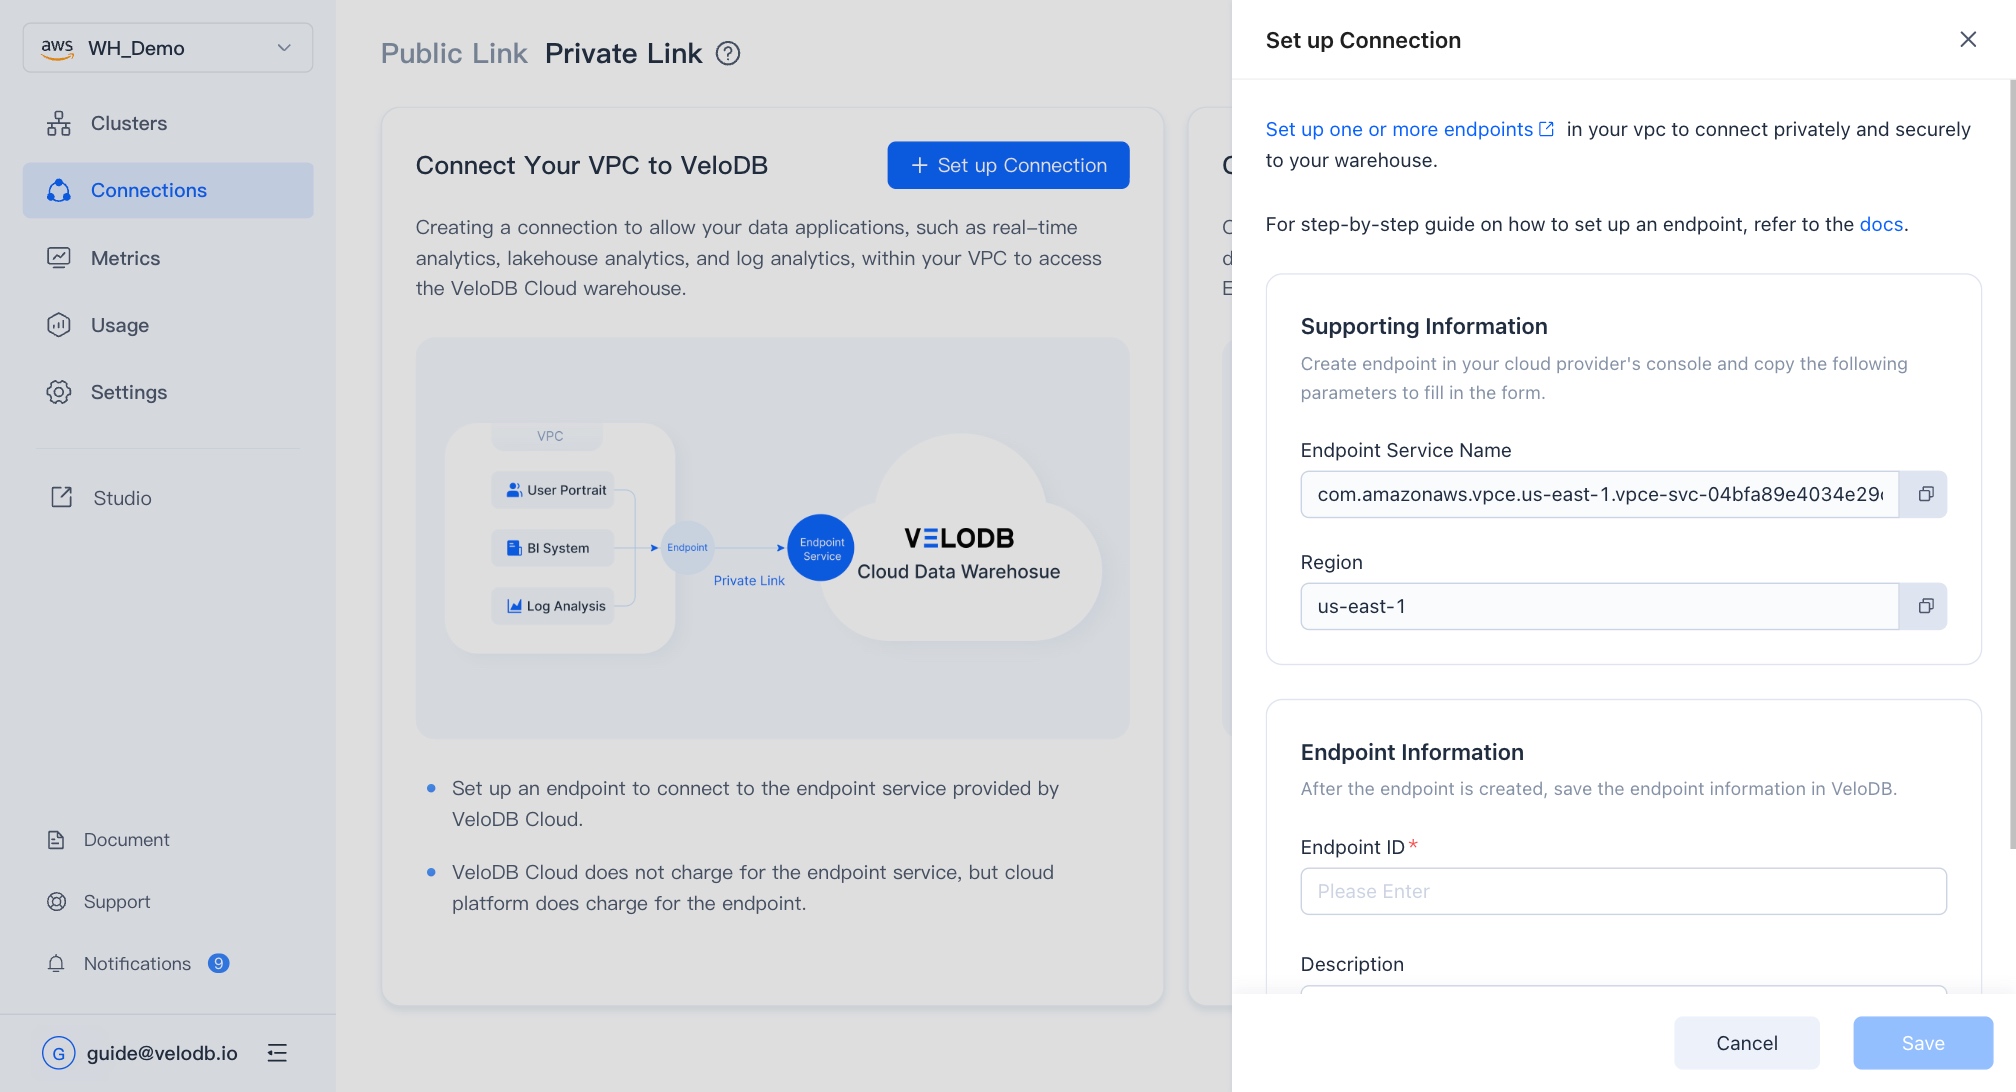
- Switch to the target warehouse, click Connections on the navigation bar, and click Set up Connection to Connect Your VPC to VeloDB on the Private Link tab to create an endpoint.
- The page displays the Endpoint Service information required for creating an endpoint. You can click Set up one or more endpoints to go to the cloud platform's Private Link product console and create an endpoint.
- On the cloud platform's Private Link product console, you need to confirm that the current region is the same as the warehouse's endpoint service (limited by the cloud platform's Private Link product) and click Create endpoint.
Note You need to sign in to AWS with the principal that has been allowed to access the endpoint service of VeloDB Cloud, so that you can successfully pass the service name verification when creating the endpoint.
- Follow the wizard prompts to fill in the form as follows:
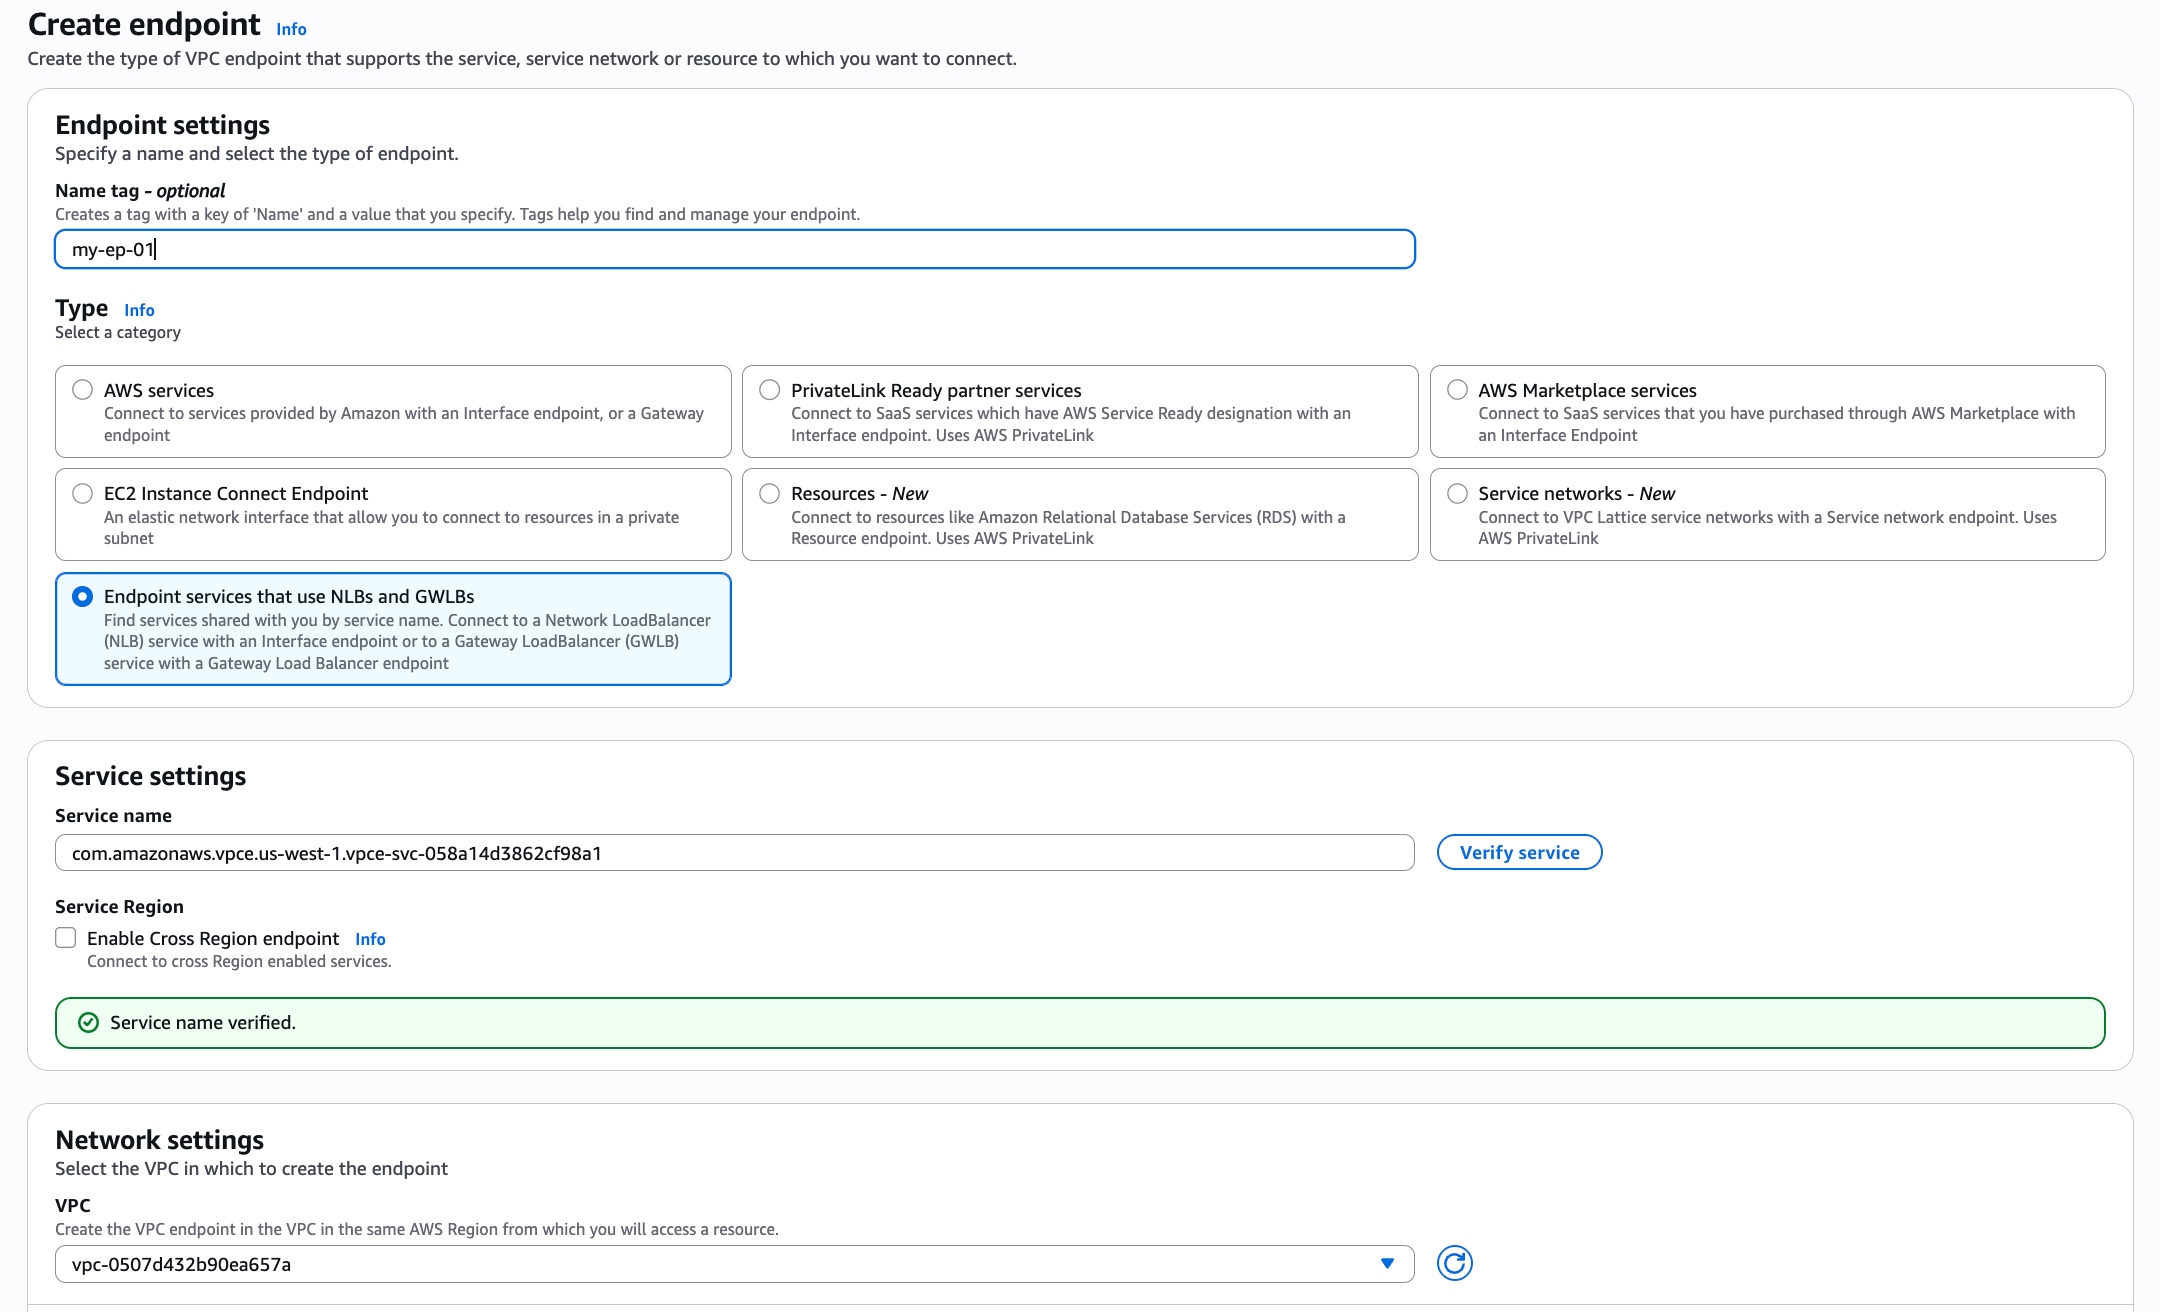
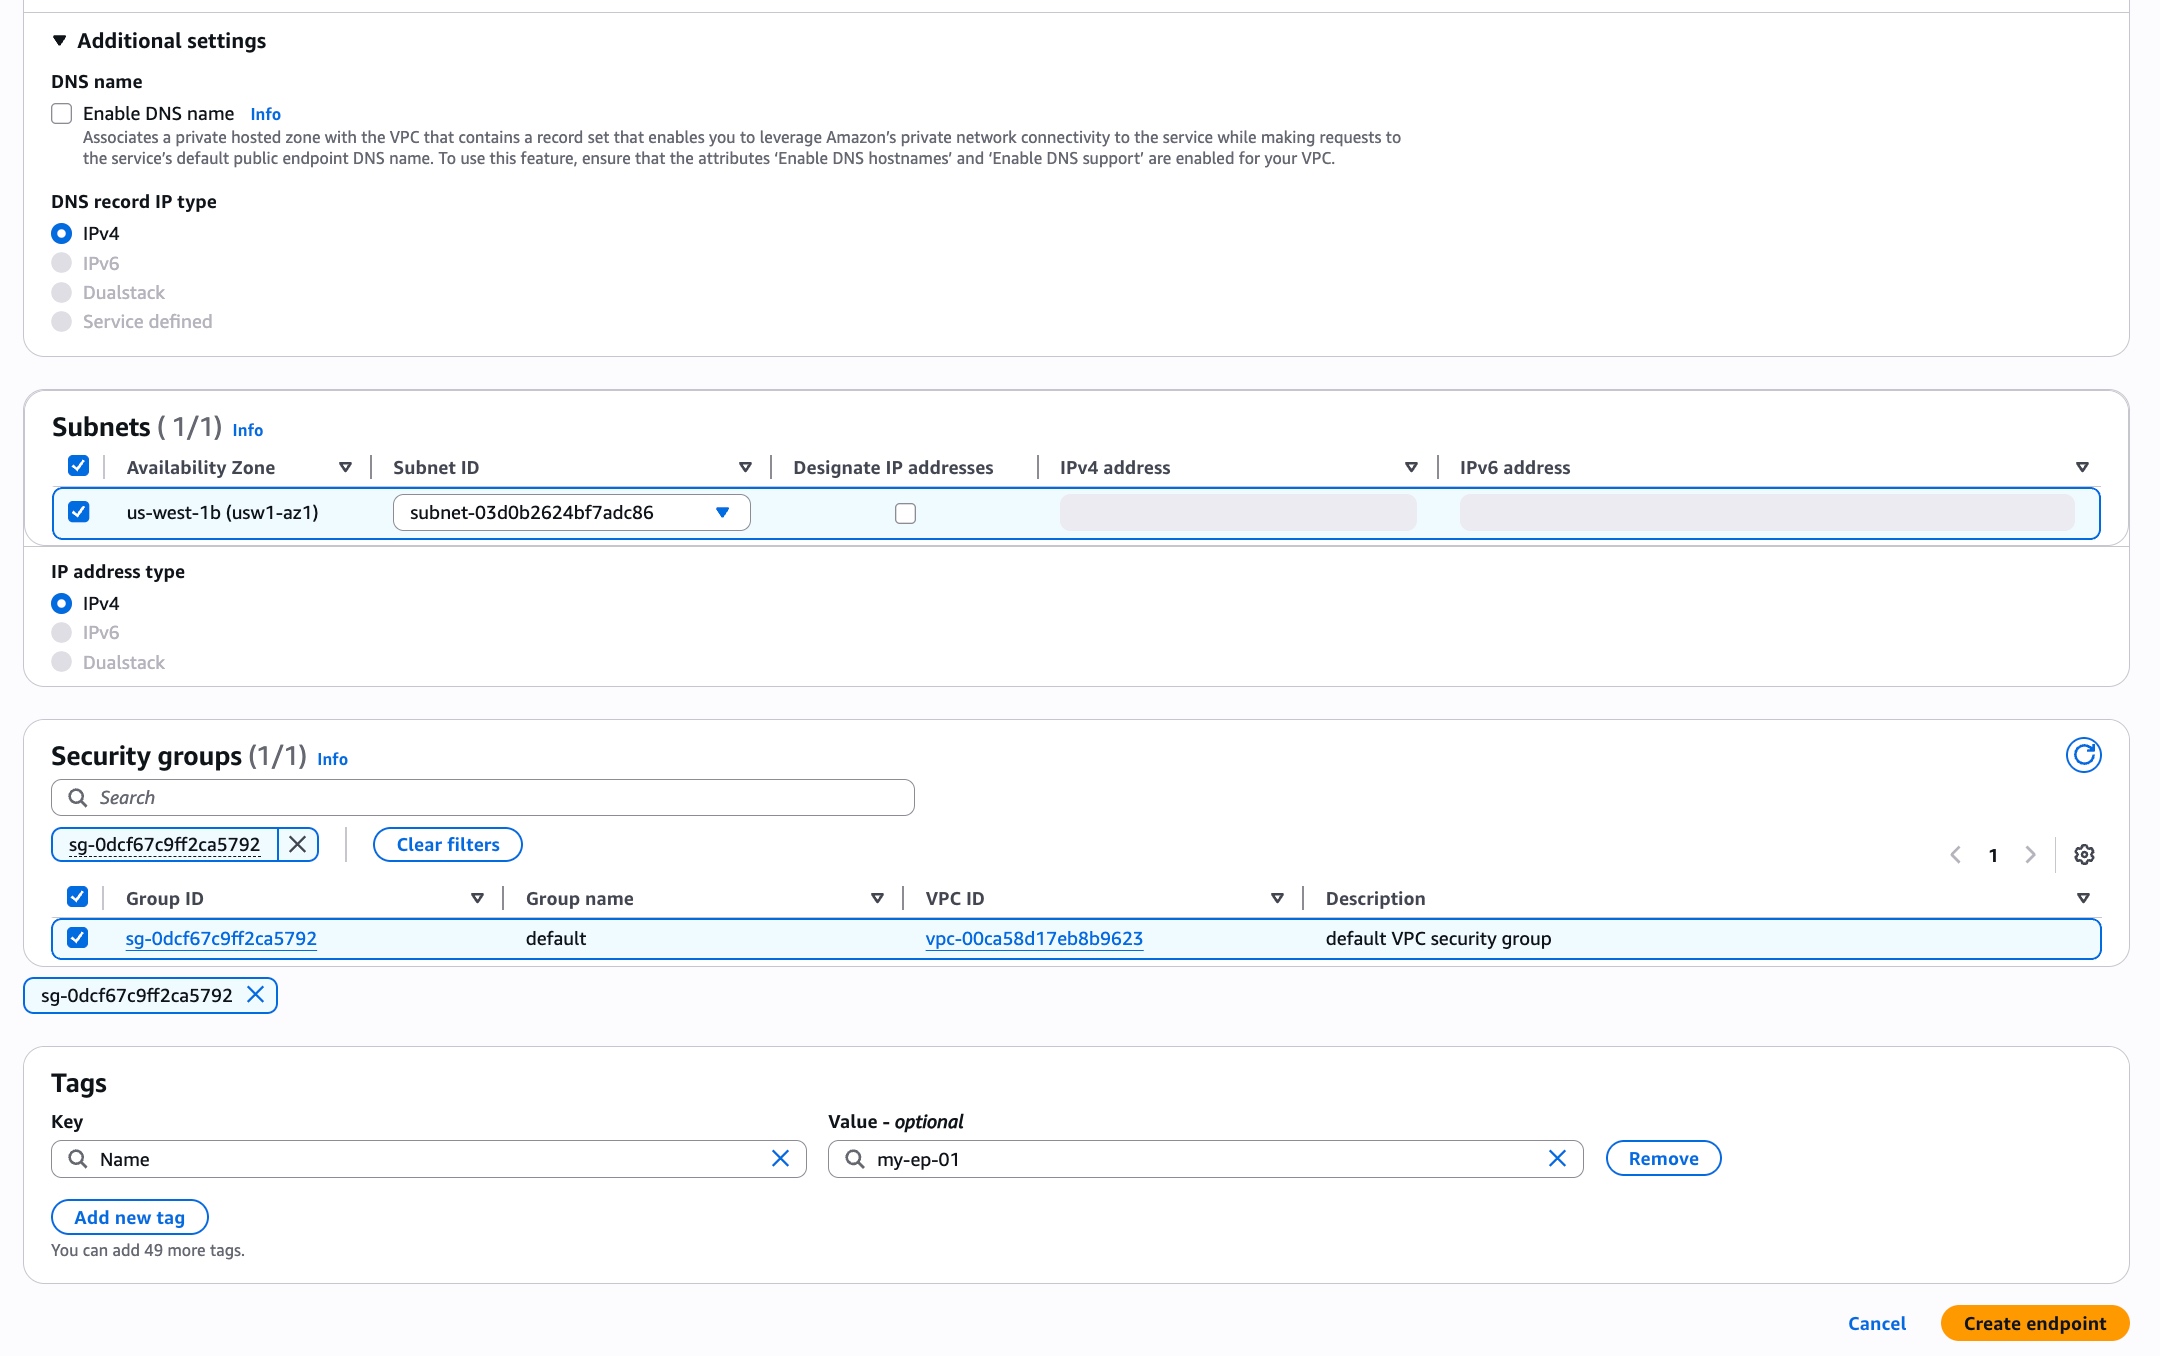
| Parameter | Description |
|---|---|
| Name tag | Optional. Creates a tag with a key of 'Name' and a value that you specify. |
| Service category | Required. Select the service category. The endpoint service of the VeloDB Cloud warehouse belongs to Endpoint services that use NLBs and GWLBs, so click to select it. |
| Service name | Required. One-click shortcut to copy the Service Name of the endpoint service of VeloDB Cloud warehouse in the page that displays the Endpoint Service information required for creating an endpoint, fill in the input box and click Verify service . |
| VPC | Required. Select the VPC in which to create your endpoint. |
| Subnets | Required. Select the same Availability Zone as the one where the endpoint service of the VeloDB Cloud warehouse is located (limited by the cloud vendor's Private Link product), and then select an appropriate subnet ID under it. |
| Security groups | Required. Select a preset security group. Note that the security rules should allow the protocol and port used by the VeloDB Cloud warehouse, as well as the IP address of the source where the application/client connects to the VeloDB Cloud warehouse. |
| Tags | Optional. You can add tags associated with the resource. |
- After the endpoint is created, its status will be changed from " Pending " to " Available ", indicating that the endpoint has successfully connected with the warehouse's endpoint service.
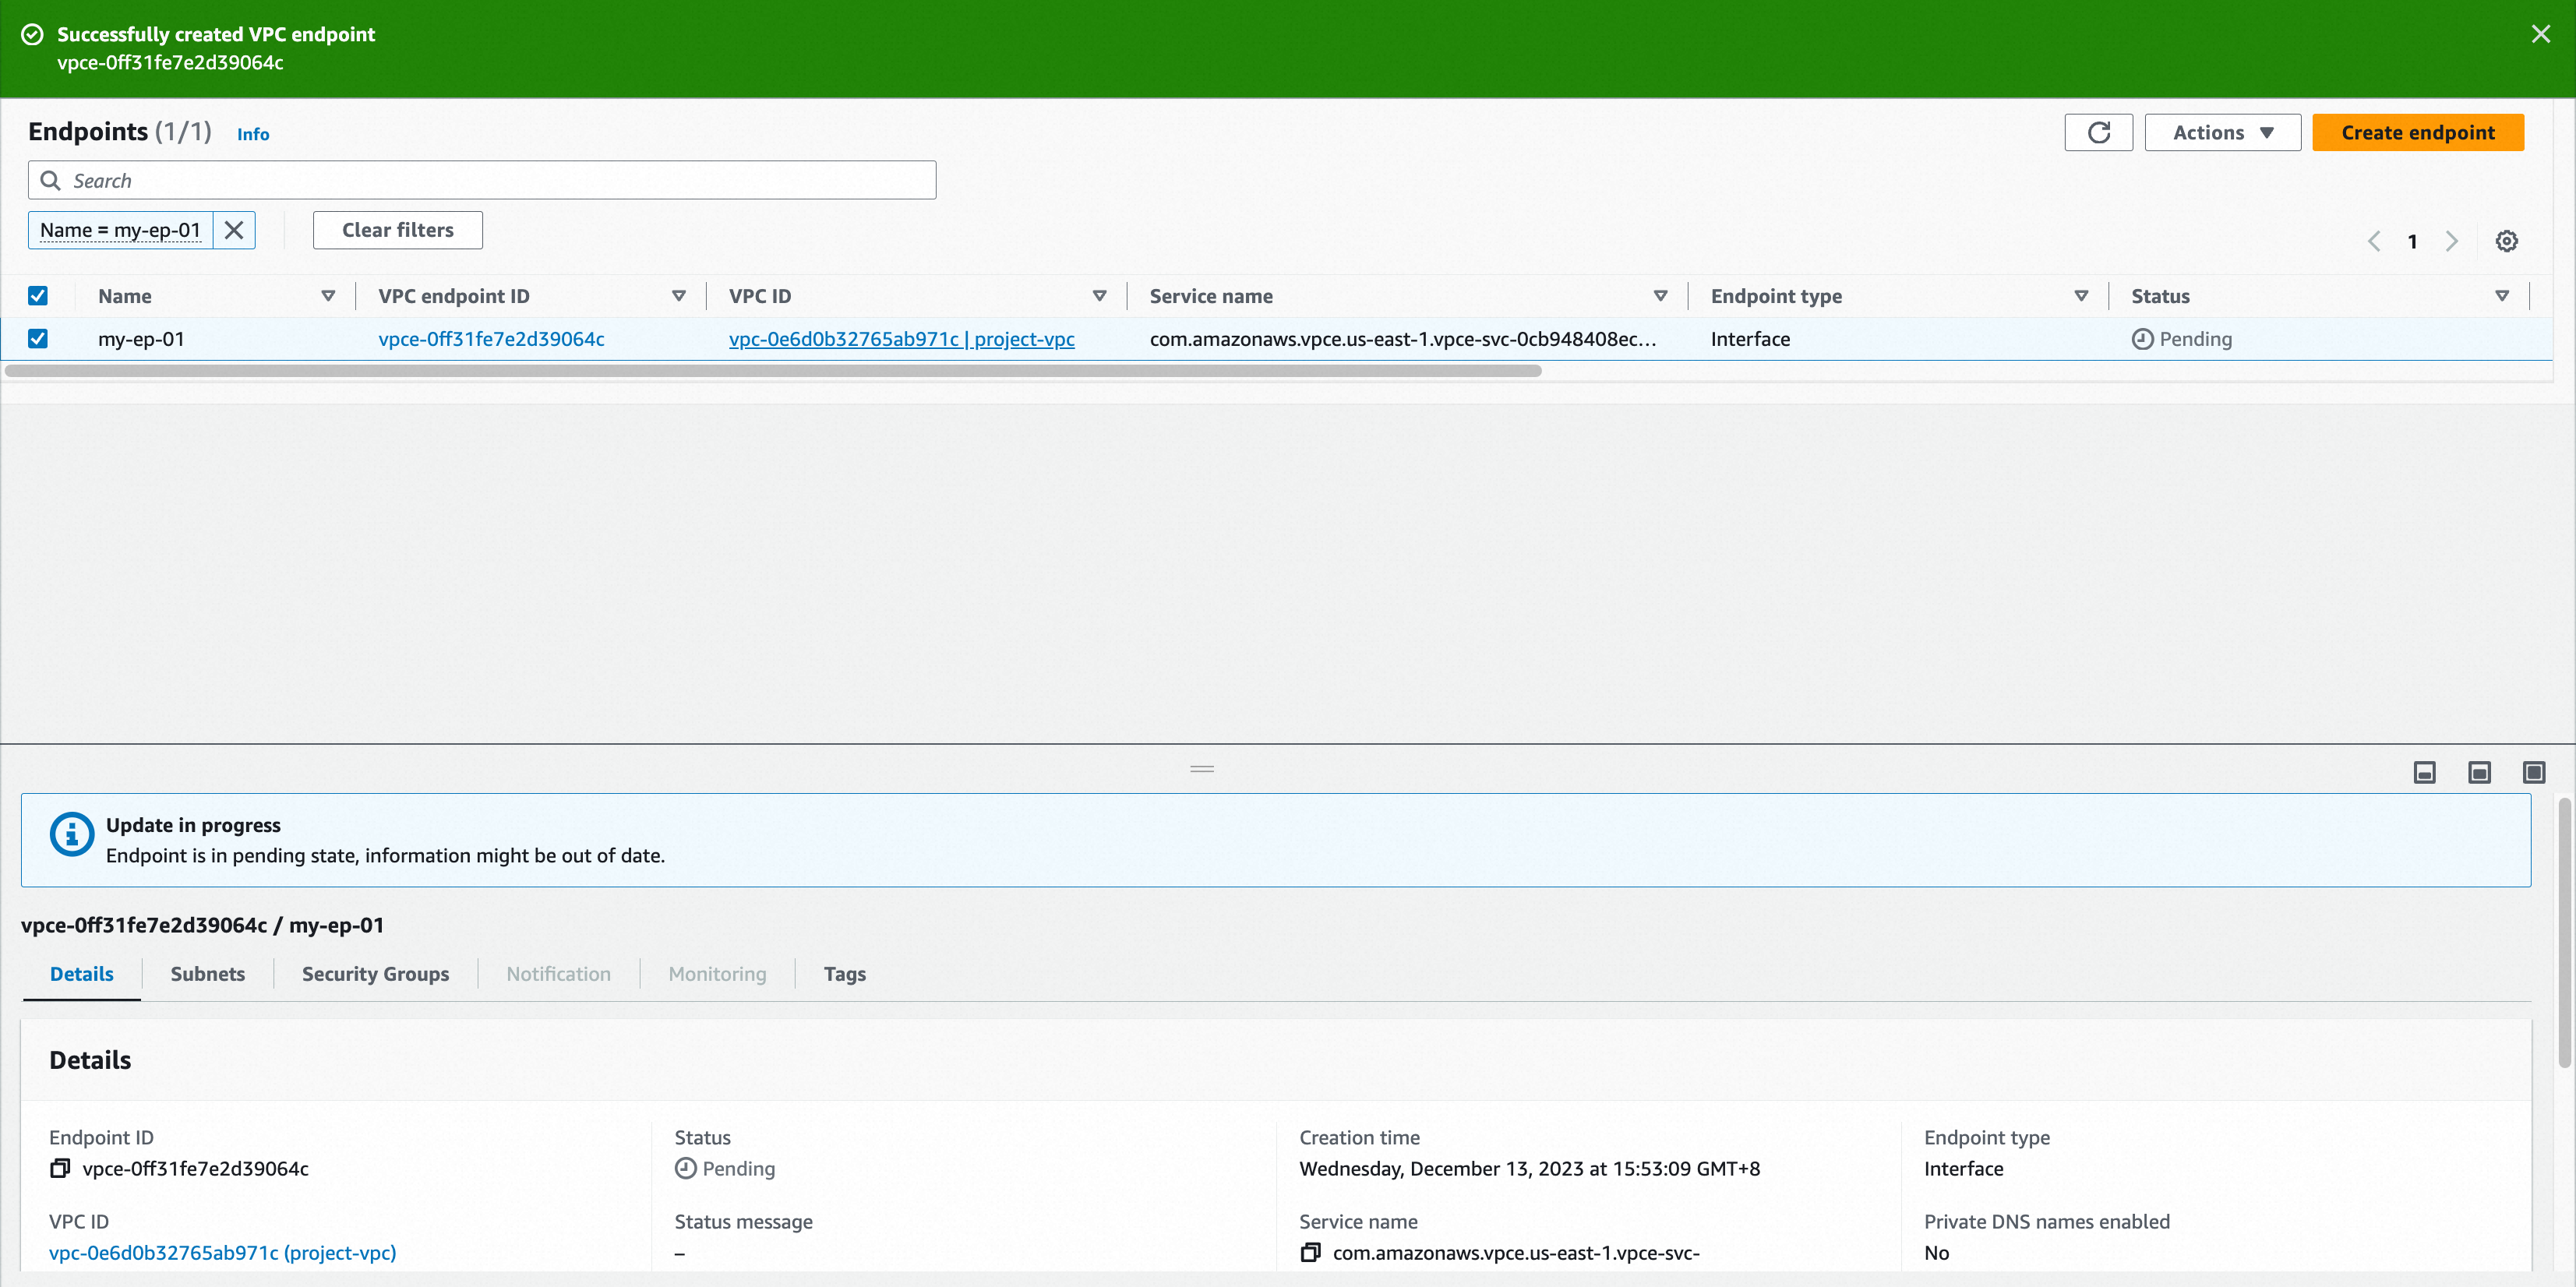
- After refreshing the Connections page of the VeloDB Cloud warehouse, the endpoint list will display the connection information of the endpoint.
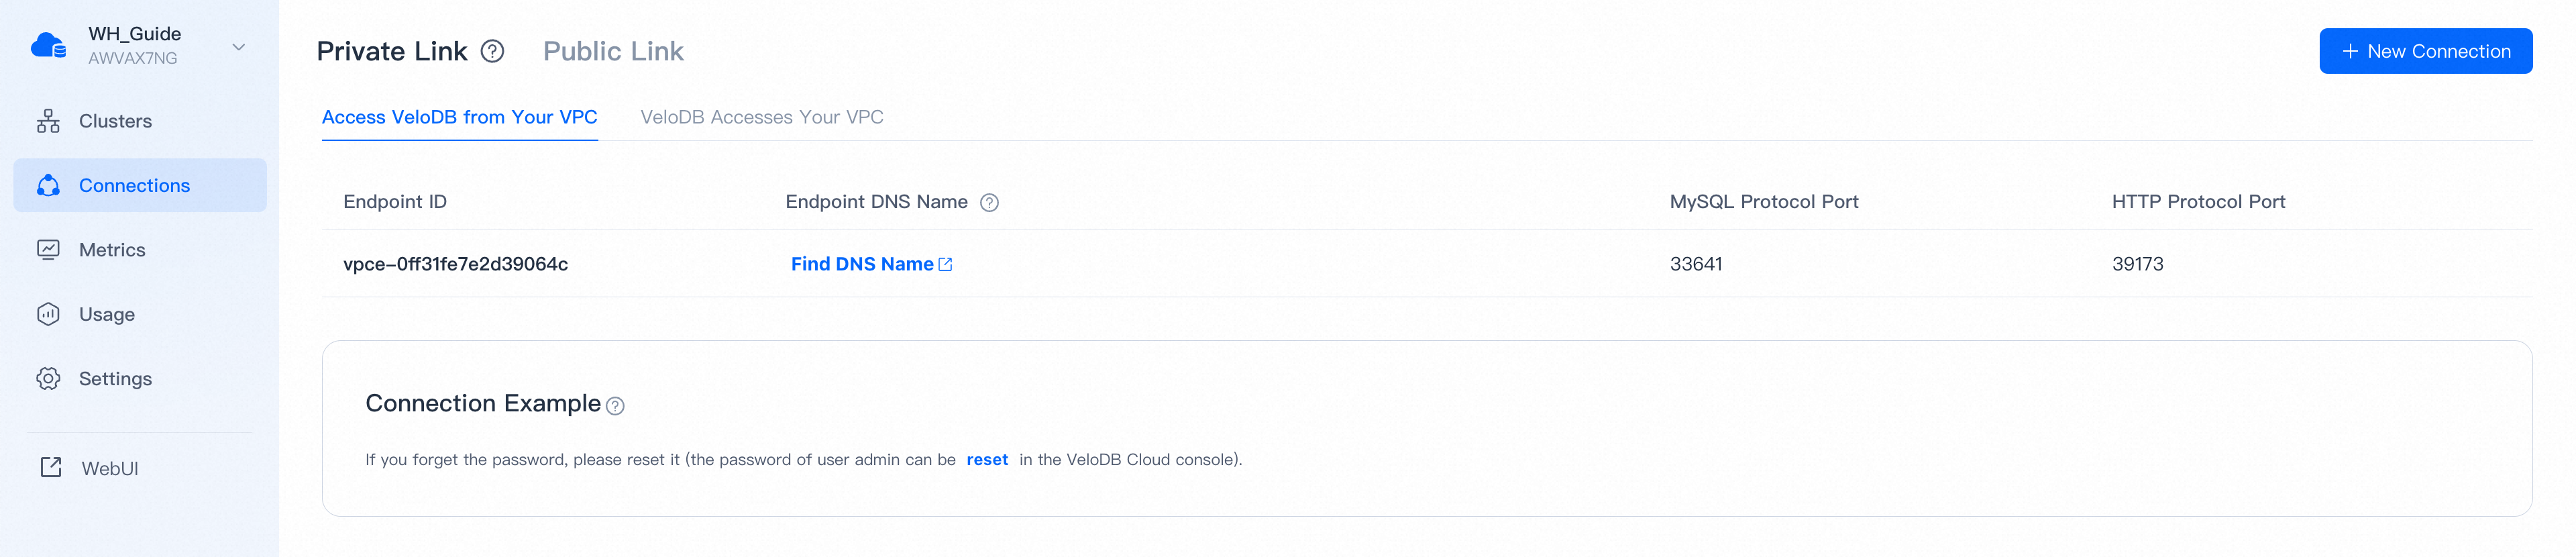
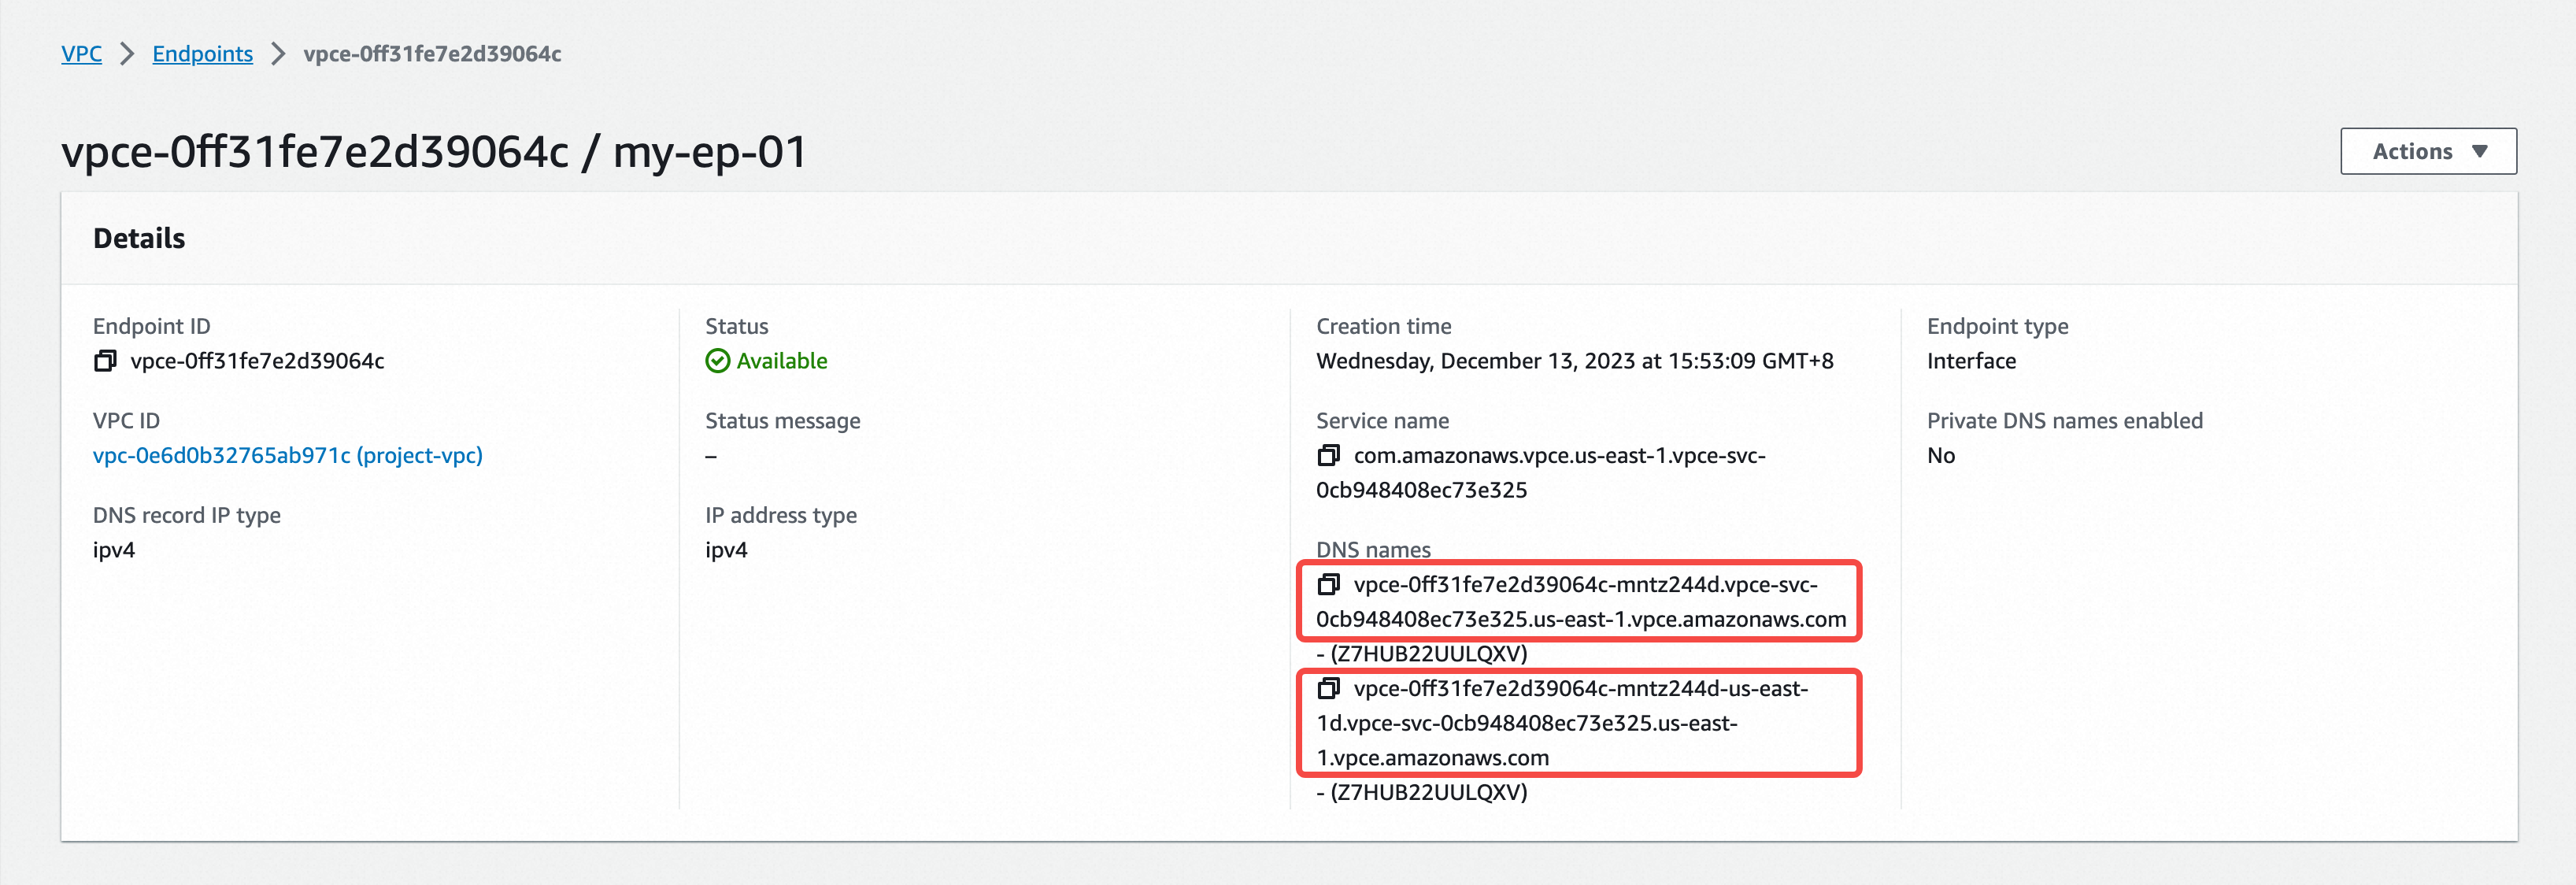
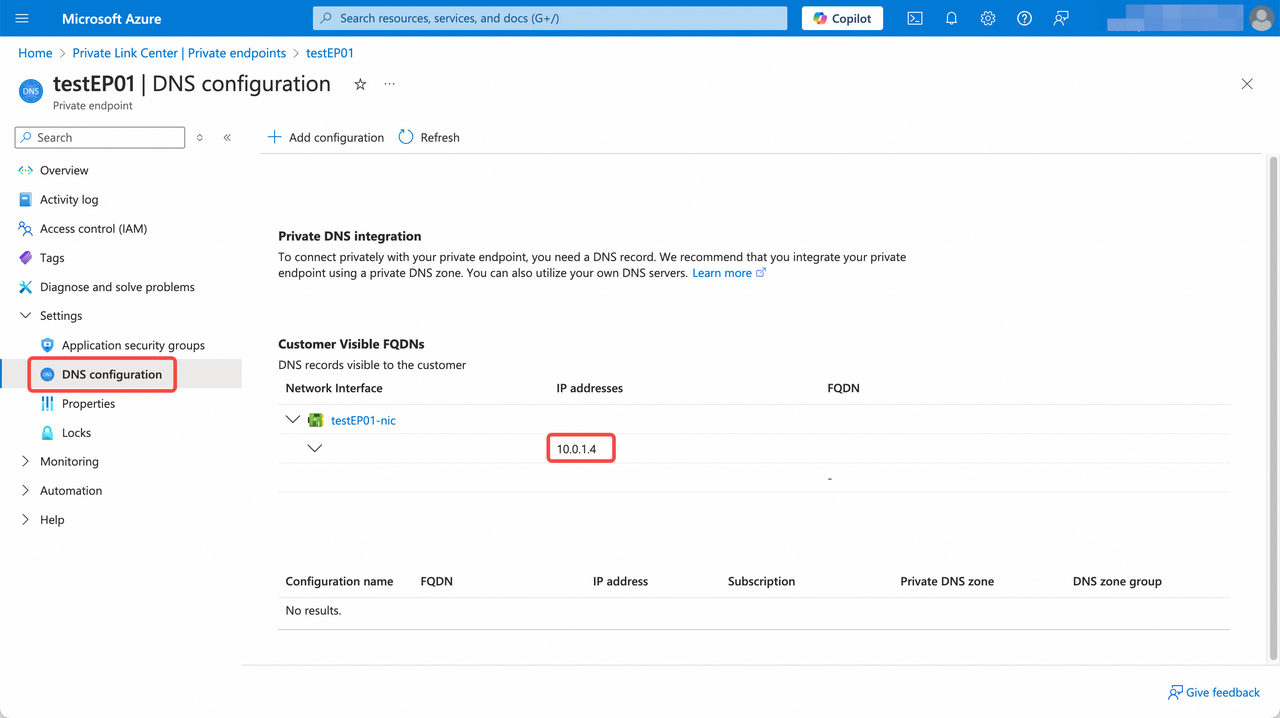
Note You need to click Find DNS Name to open the Endpoint Details page of AWS Private Link product console, find the DNS Name of the endpoint and use it to access the VeloDB Cloud warehouse.
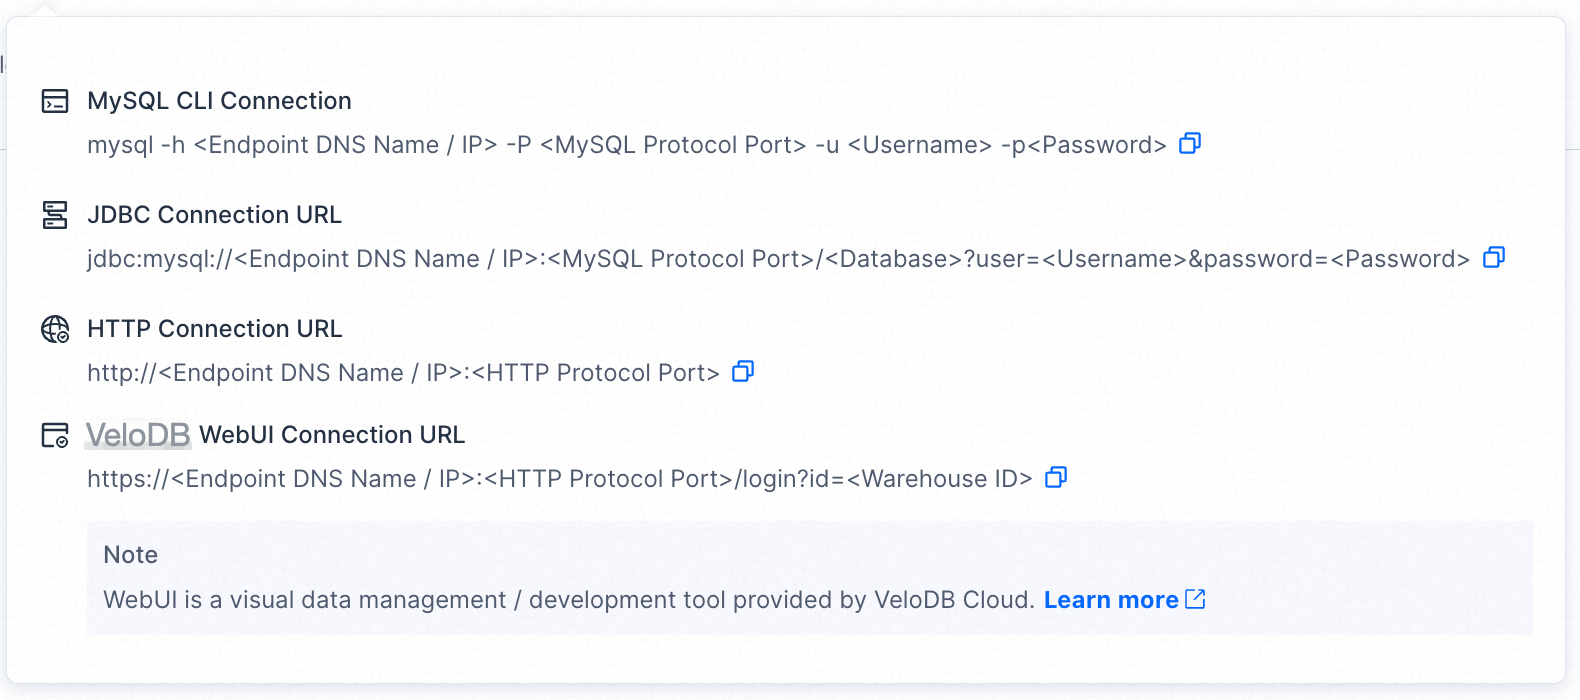
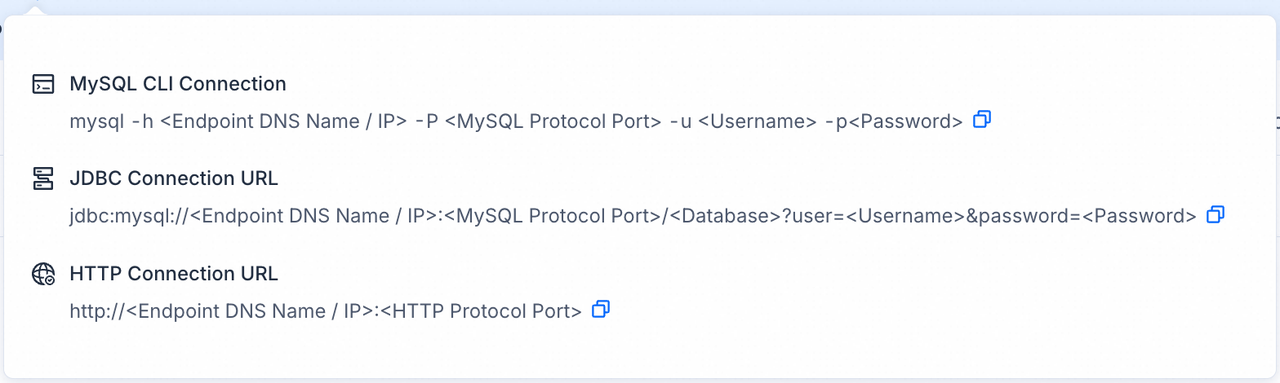
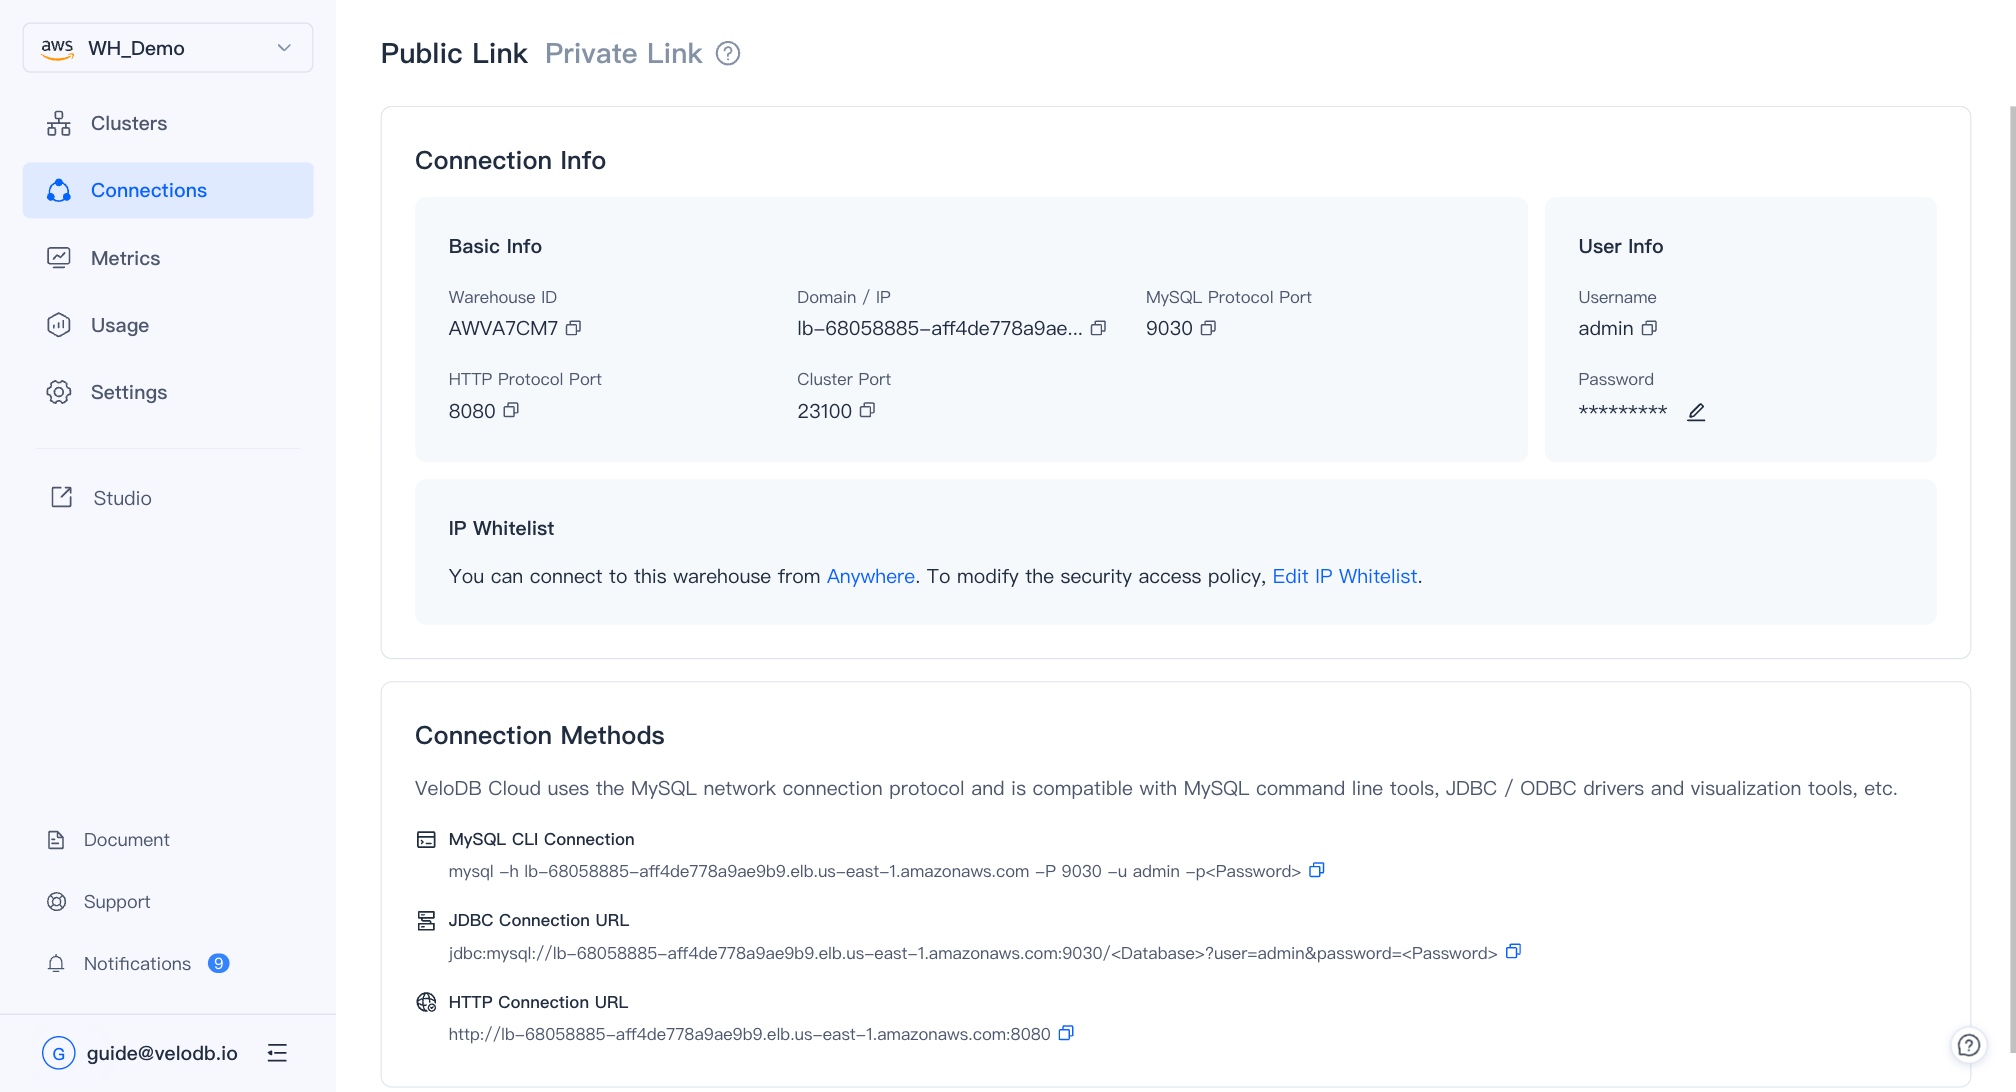
- The application/client can access the VeloDB Cloud warehouse through the DNS name of the endpoint by MySQL protocol or HTTP protocol. For the specific connection method, refer to the pop-up bubble for Connection Examples .
Note
VeloDB Cloud includes two independent account systems: One is used to connect to the warehouse, as described in this topic. The other one is used to log into the console, which is described in the Registration and Login topic.
For first-time connection, please use the admin username and its password which can be initialized or reset on the Settings page.
Azure
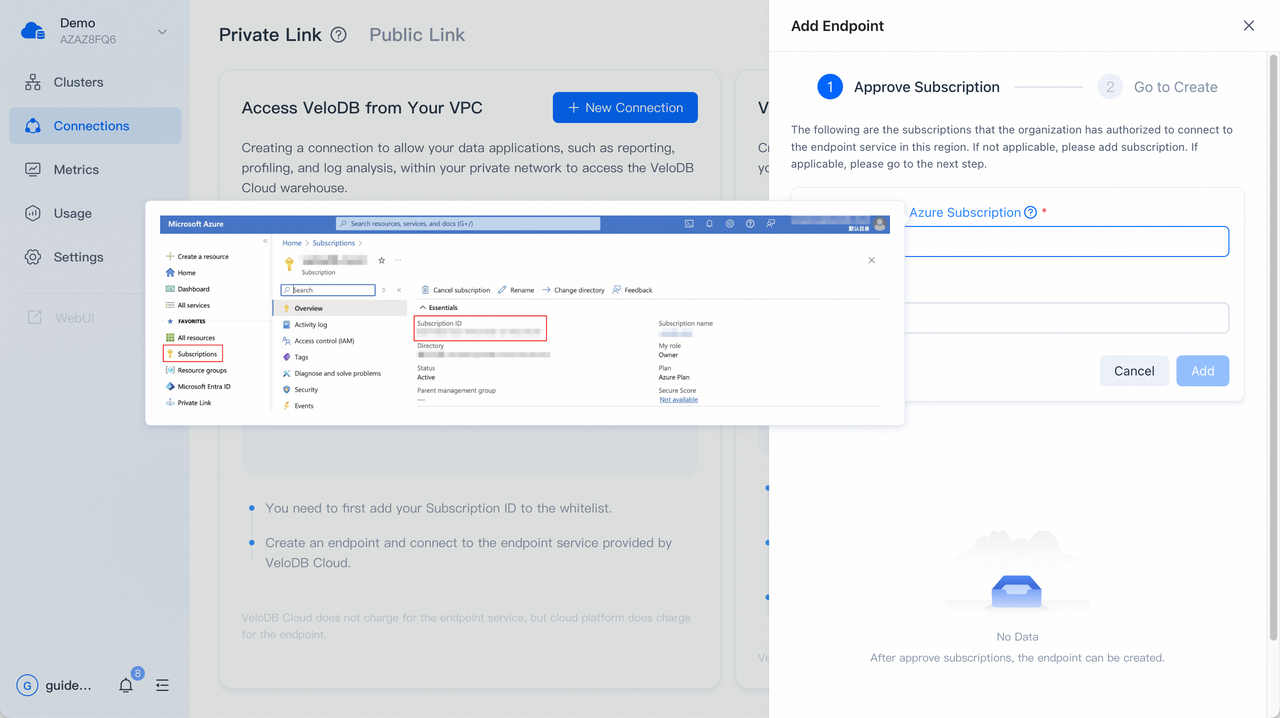
- Switch to the target warehouse, click Connections on the navigation bar, and click New Connection to Access VeloDB from Your VPC on the Private Link tab to create an endpoint. Firstly, you need to approve a subscription to access the endpoint service of VeloDB Cloud warehouse.
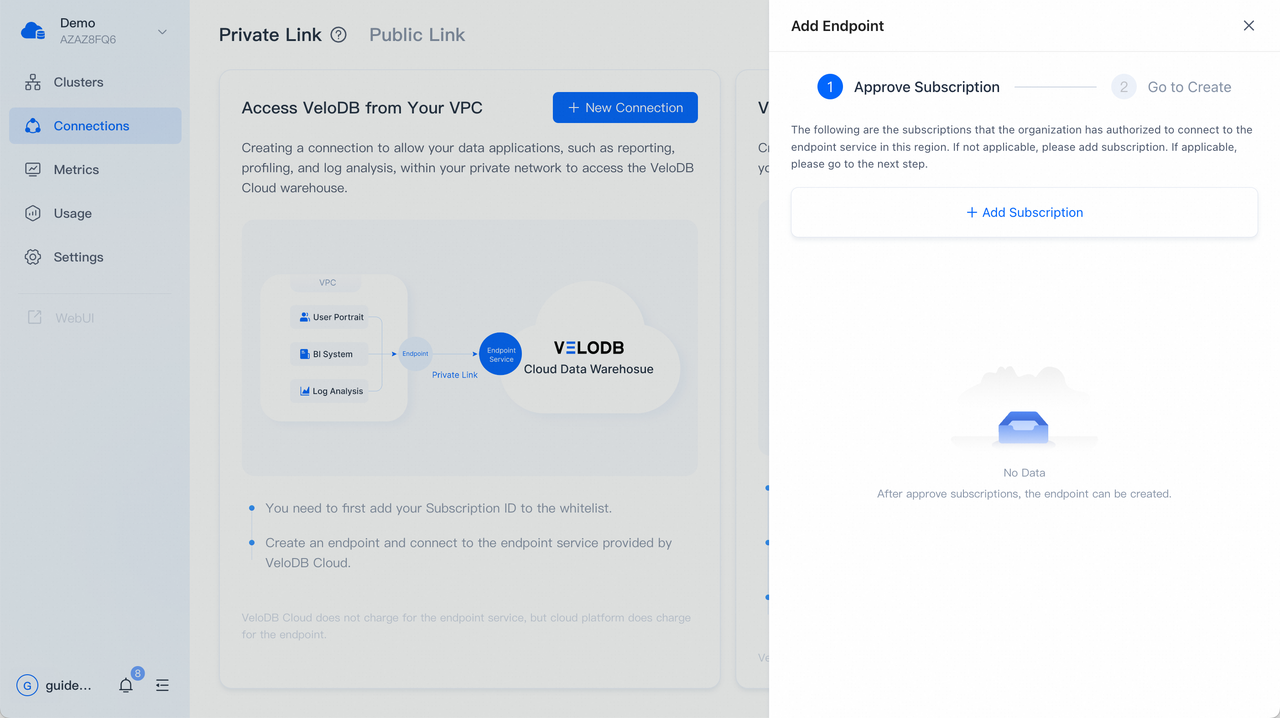
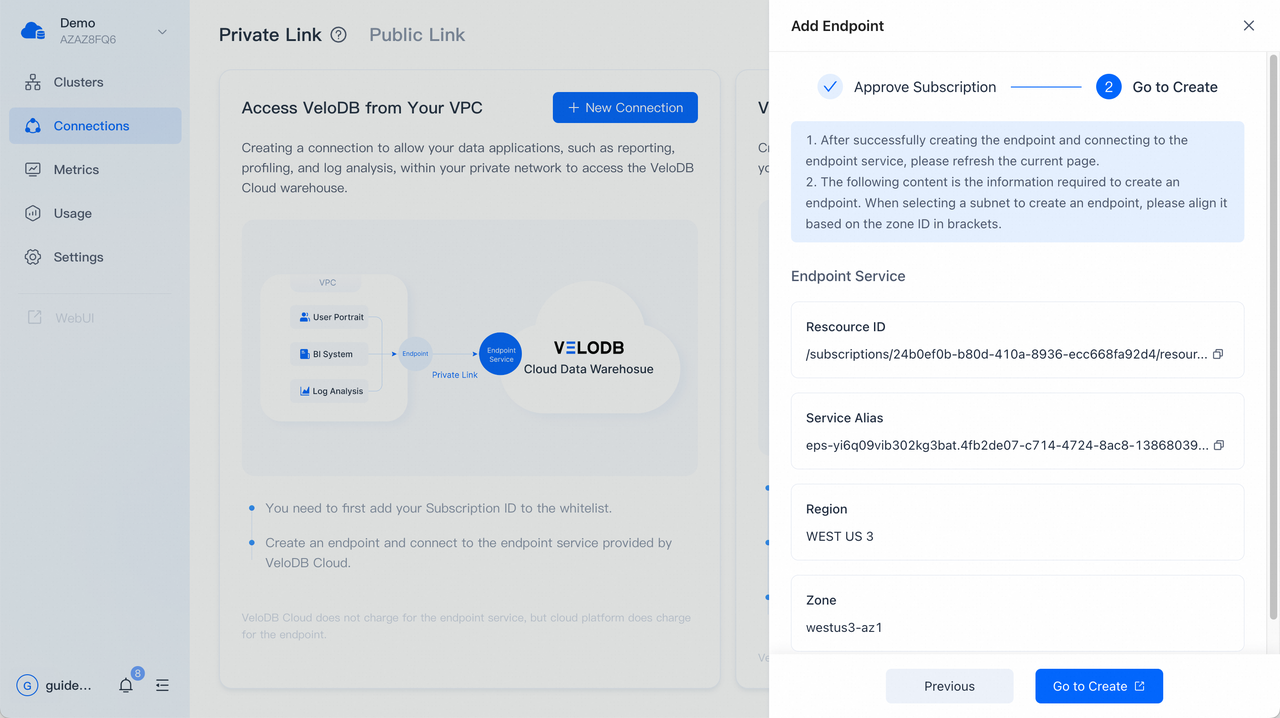
- After approving a subscription to access the endpoint service, the page displays the Endpoint Service information required for creating an endpoint. You can click Go to Create to go to the cloud platform's Private Link product console and create an endpoint.
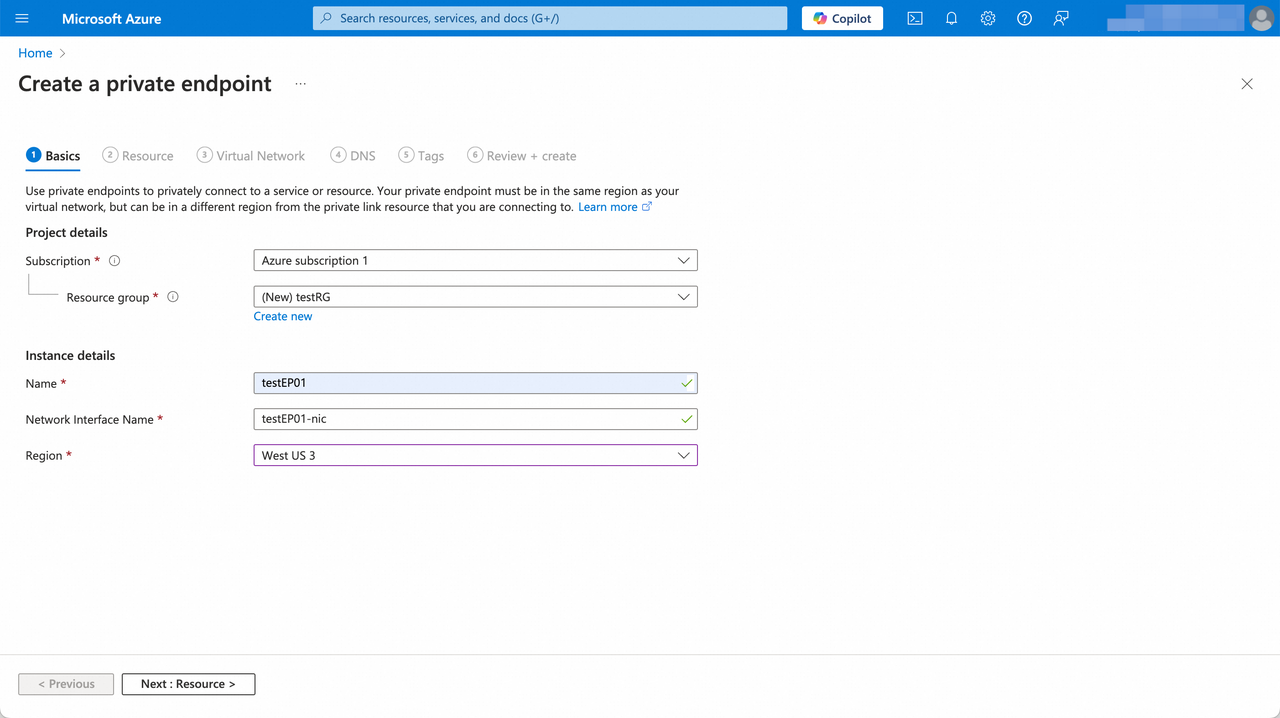
- In the Basics tab of the Create a private endpoint page on the cloud platform's Private Link product console, you need to confirm that the current region is the same as the endpoint service of VeloDB Cloud warehouse (limited by the cloud platform's Private Link product). Follow the wizard prompts to fill in the form as follows and click Next: Resource.
| Parameter | Category | Description |
|---|---|---|
| Subscription | Project details | Required. Select the subscription to access the endpoint service of VeloDB Cloud warehouse. All resources in an Azure subscription are billed together. |
| Resource group | Project details | Required. Select a resource group for the private endpoint to be created in it. If there is no suitable one, you can create a new one. A resource group is a collection of resources that share the same lifecycle, permissions, and policies. |
| Name | Instance details | Required. The instance name of the private endpoint to be created. You can customize it. |
| Network Interface Name | Instance details | Required. The network interface name of the private endpoint to be created. When you enter the instance name, it will be automatically generated and you can modify it. |
| Region | Instance details | "Required. Select the region for the private endpoint to be created in it. Note: You need to select the region is the same as the endpoint service of VeloDB Cloud warehouse (limited by the cloud platform's Private Link product)." |
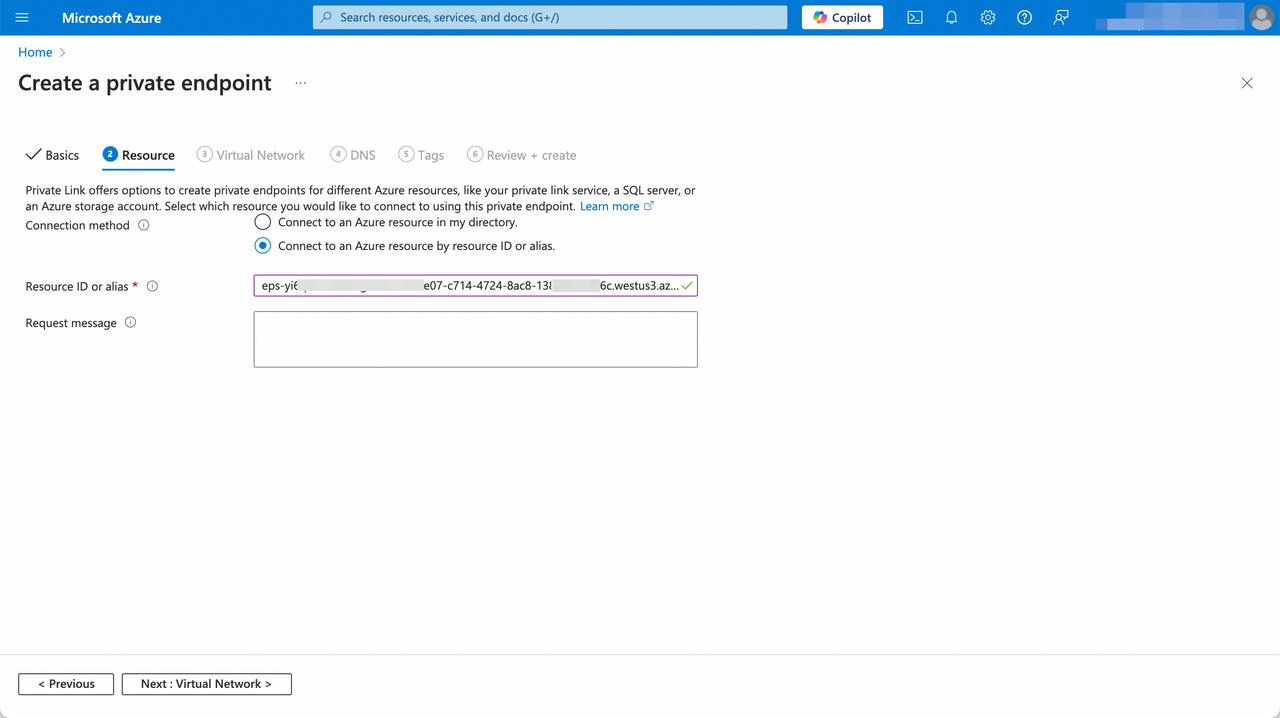
- In the Resource tab of the Create a private endpoint page, choose the connection method Connect to an Azure resource with a resource ID or alias and fill in the form as follows and click Next: Virtual Network.
| Parameter | Description |
|---|---|
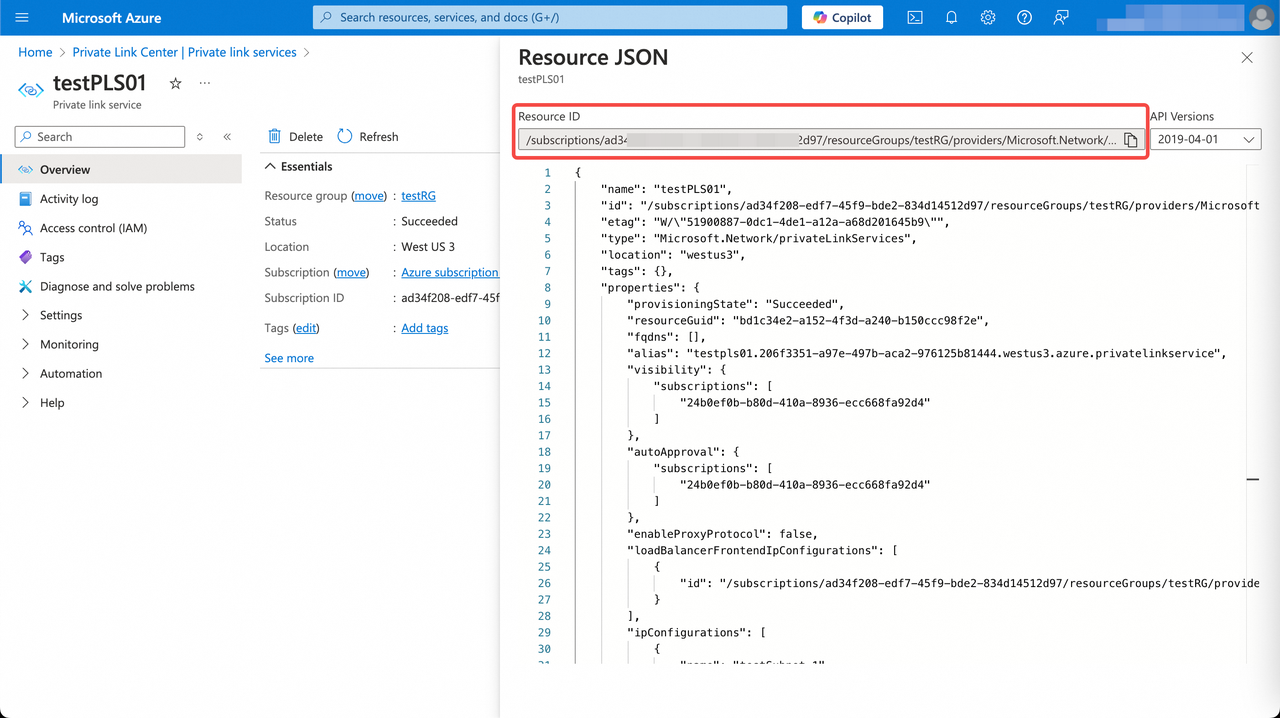
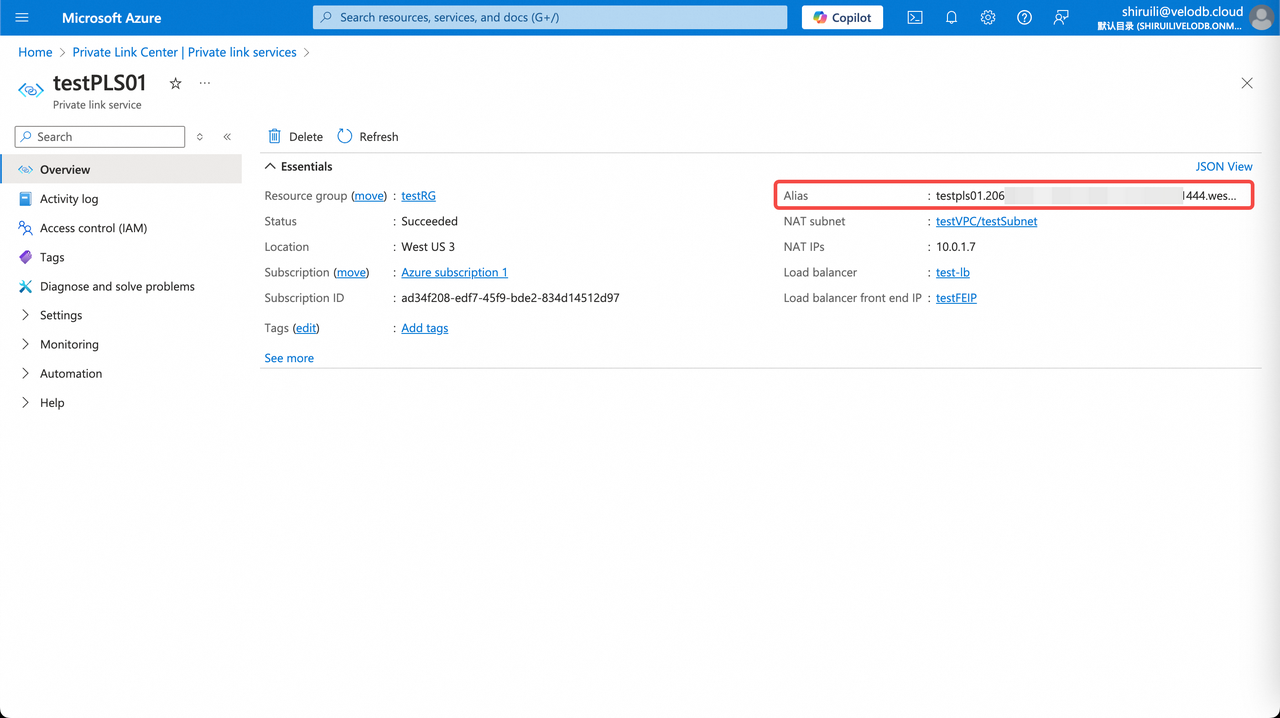
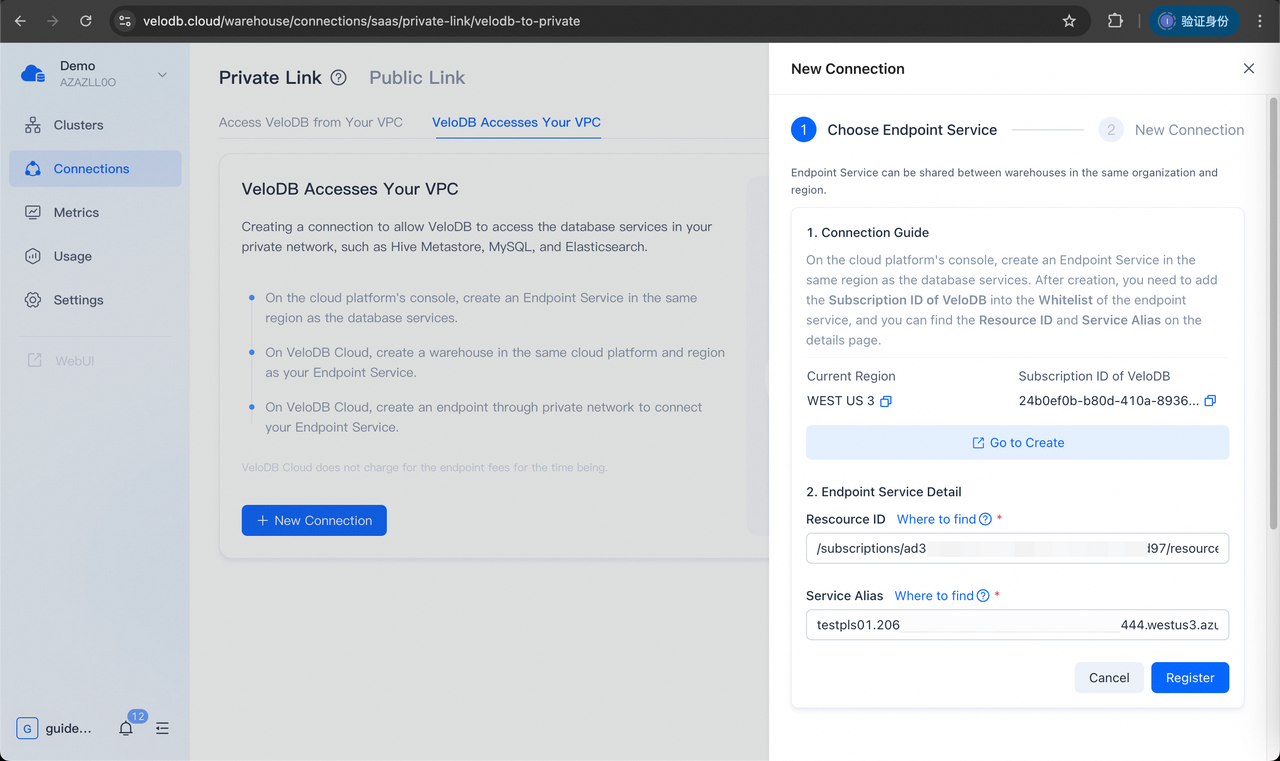
| Resource ID or alias | Required. When connecting to someone else's resource, they must provide you with the resource ID or alias for that resource in order for you to initiate a connection request. In the current scene, you can one-click shortcut to copy the Service Alias value of the endpoint service of VeloDB Cloud warehouse in the page that displays the Endpoint Service information required for creating an endpoint, then fill in the input box. |
| Request message | Optional. This message will be sent to the resource owner (This refers to VeloDB Cloud.) to assist them in the connection management process. Don't include private or sensitive information. |
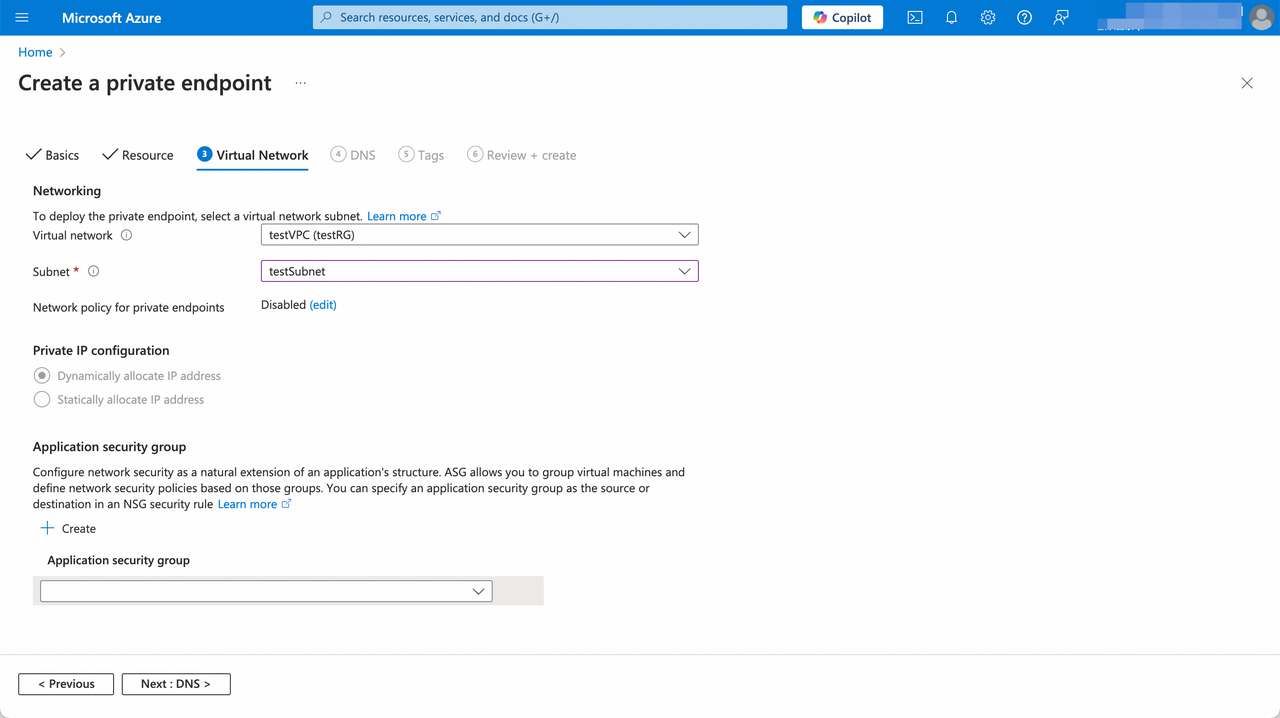
- In the Virtual Network tab of the Create a private endpoint page, Select the virtual network and subnet for the private endpoint to be created in it. Follow the wizard prompts to fill in the form as follows and click Next: DNS.
| Parameter | Category | Description |
|---|---|---|
| Virtual network | Networking | Required. Only virtual networks in the currently selected subscription and location are listed. Select the virtual network for the private endpoint to be created in it. If there is no suitable one, you can create a new one on the cloud platform's Virtual network product console. |
| Subnet | Networking | Required. Only subnets in the currently selected virtual network are listed. Select a subnet for the private endpoint to be created in it. If there is no suitable one, you can create a new one on the cloud platform's Virtual network product console. |
| Network policy for private endpoints | Networking | Optional. The network policy for the private endpoint to be created. The default is disabled, you can edit it. |
| Private IP configuration | Private IP configuration | Optional. You can choose Dynamically allocate IP address or Statically allocate IP address. According to the virtual network and subnet configured above, Dynamically allocate IP address is selected by default. |
| Application security group | Application security group | Optional. Select the application security group for the private endpoint to be created. If there is no suitable one, you can create a new one. |
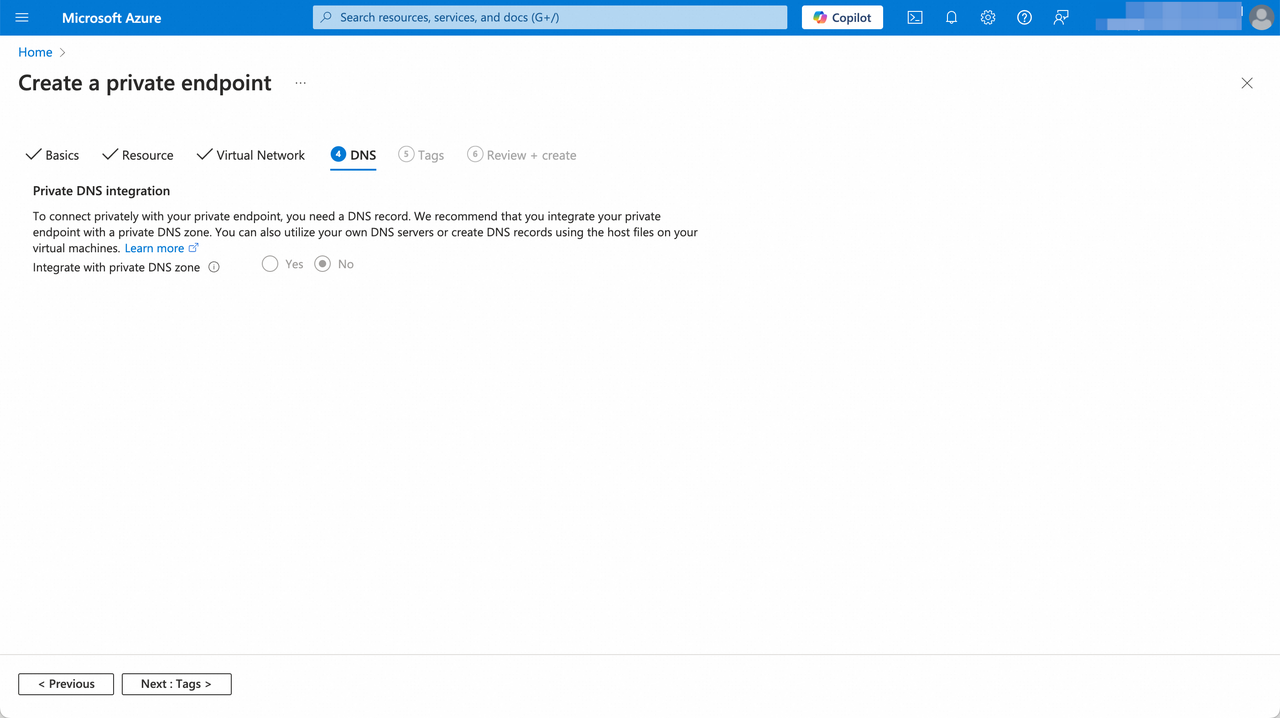
- In the DNS tab of the Create a private endpoint page, Keep the default settings and click Next: Tags.
Note: To connect privately with your private endpoint, you need a DNS record. You need to configure the resource configuration to support Private DNS.
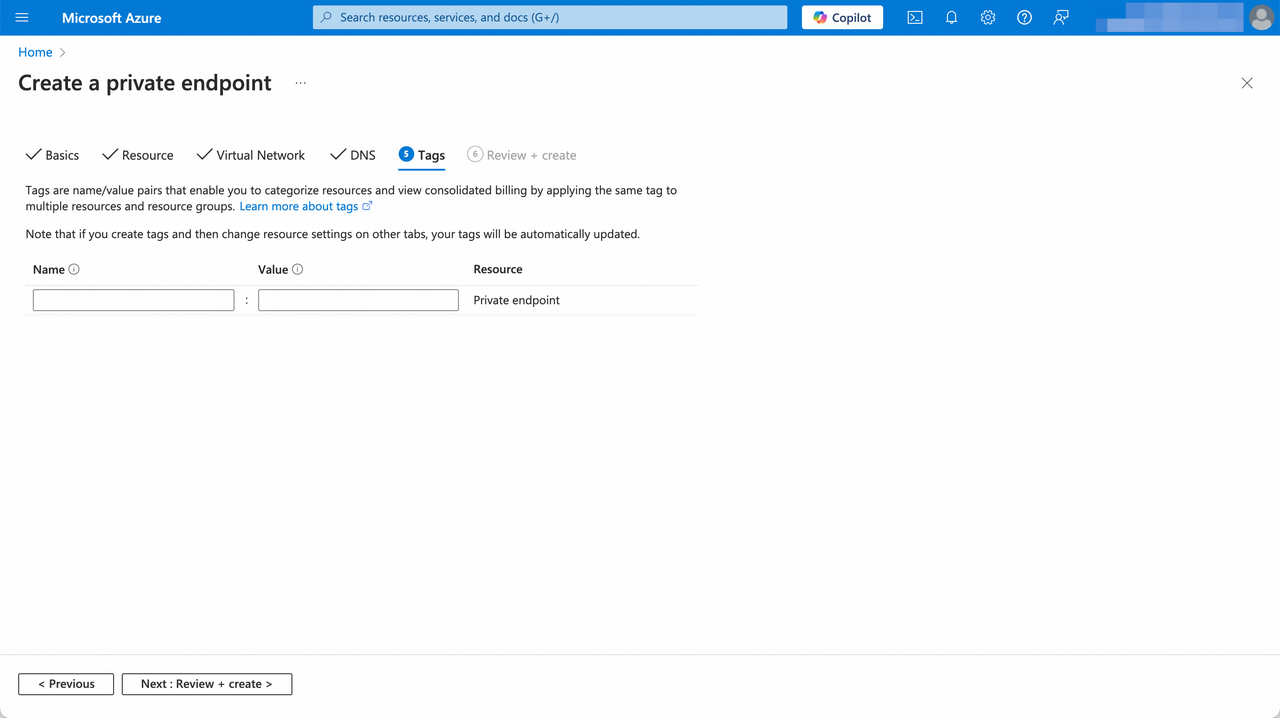
- In the Tags tab of the Create a private endpoint page. , Keep the default settings and click Next: Review + create.
Note: If you want to categorize the private endpoint and view consolidated billing, you can configure the tag for the private endpoint to be created.
- In the Review + create tab of the Create a private endpoint page, you can review the settings for the private endpoint to be created. If some settings are not as expected, you can click Previous back to modify. If there is no problem, you can click Create.
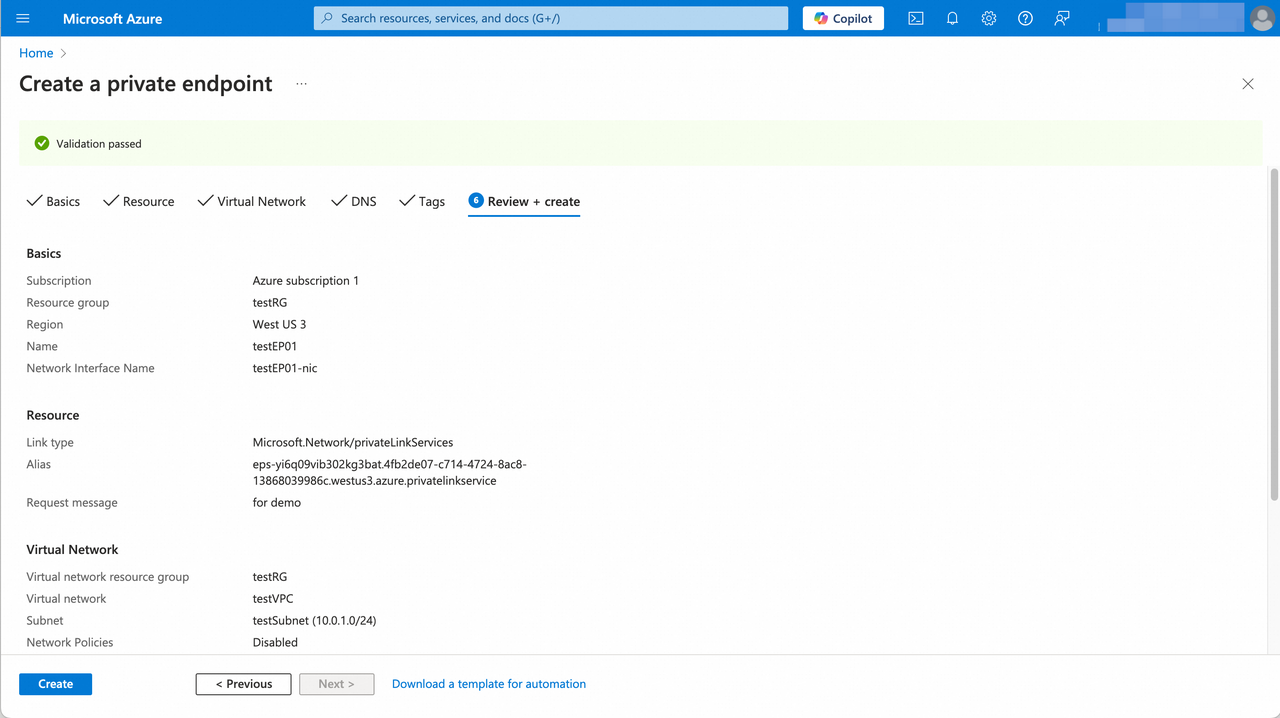
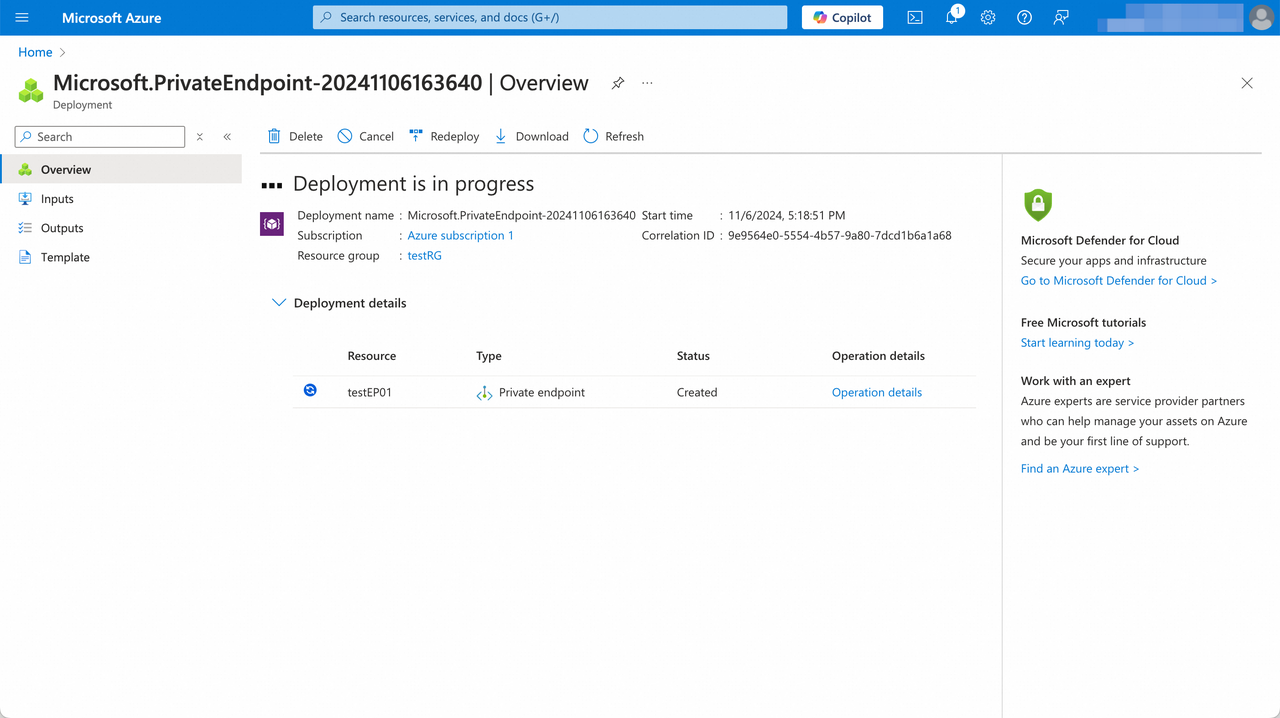
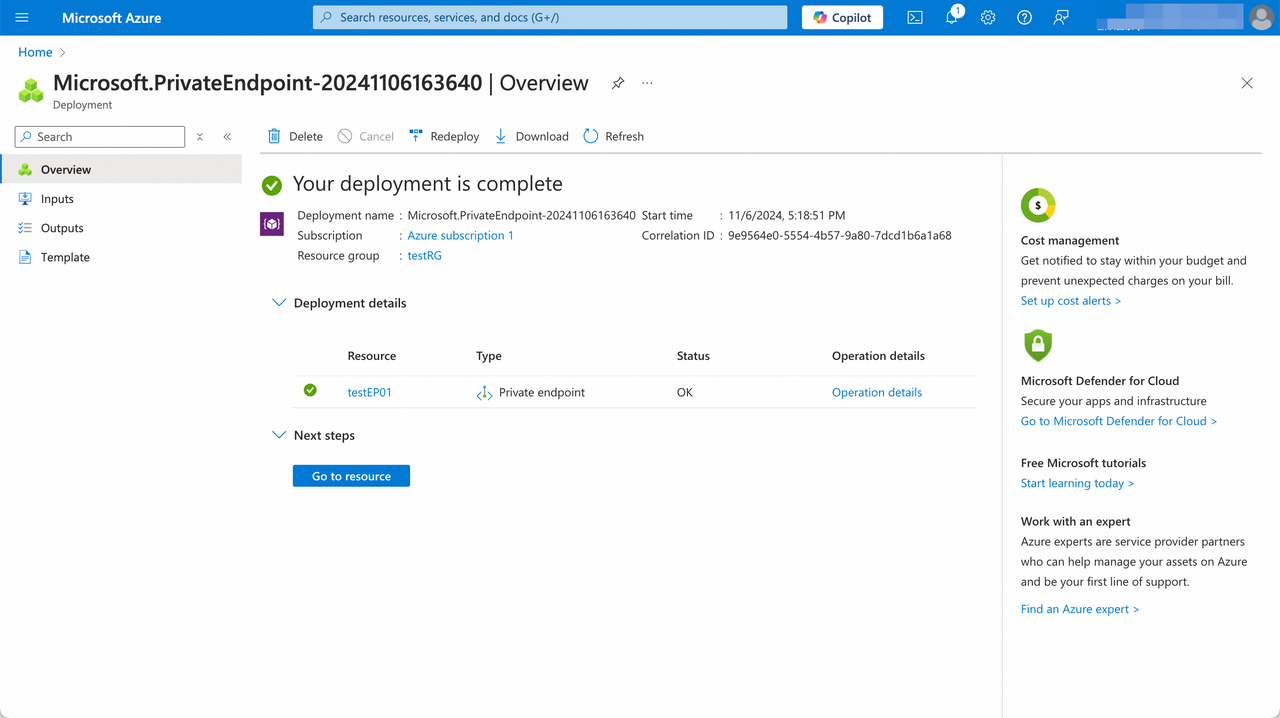
- After the endpoint is created, its status will be changed from "Created" to "OK", indicating that the endpoint has successfully connected with the endpoint service of VeloDB Cloud warehouse.
- After refreshing the Connections page of the VeloDB Cloud warehouse, the endpoint list will display the connection information of the endpoint.
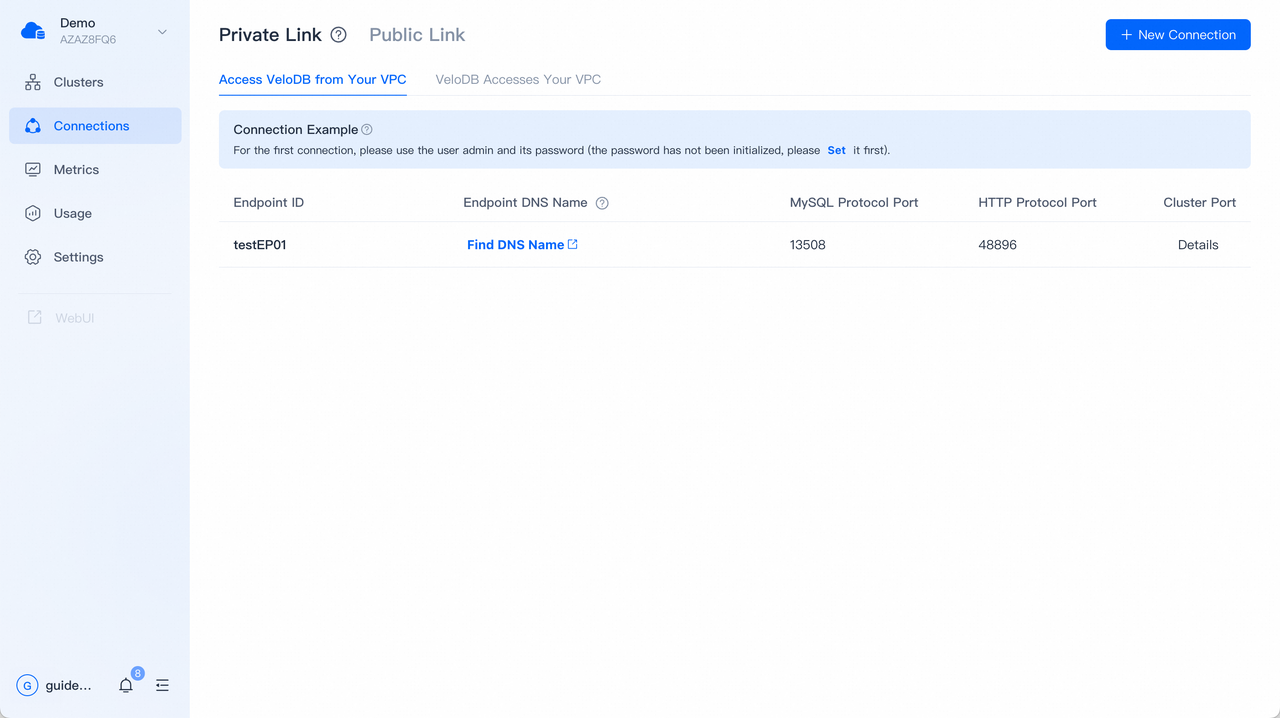
- The application/client can access the VeloDB Cloud warehouse through the IP or DNS name of the endpoint by MySQL protocol or HTTP protocol. You can click Find DNS Name in the endpoint list to open the details page of the endpoint to find the IP or DNS name of it.
- For the specific connection method, you can hover the pop-up bubble for Connection Examples in the Connections page of the VeloDB Cloud warehouse.
VeloDB Accesses Your VPC
Note The endpoint instance and traffic fees generated by VeloDB's access to the private network are currently not charged to users.
AWS
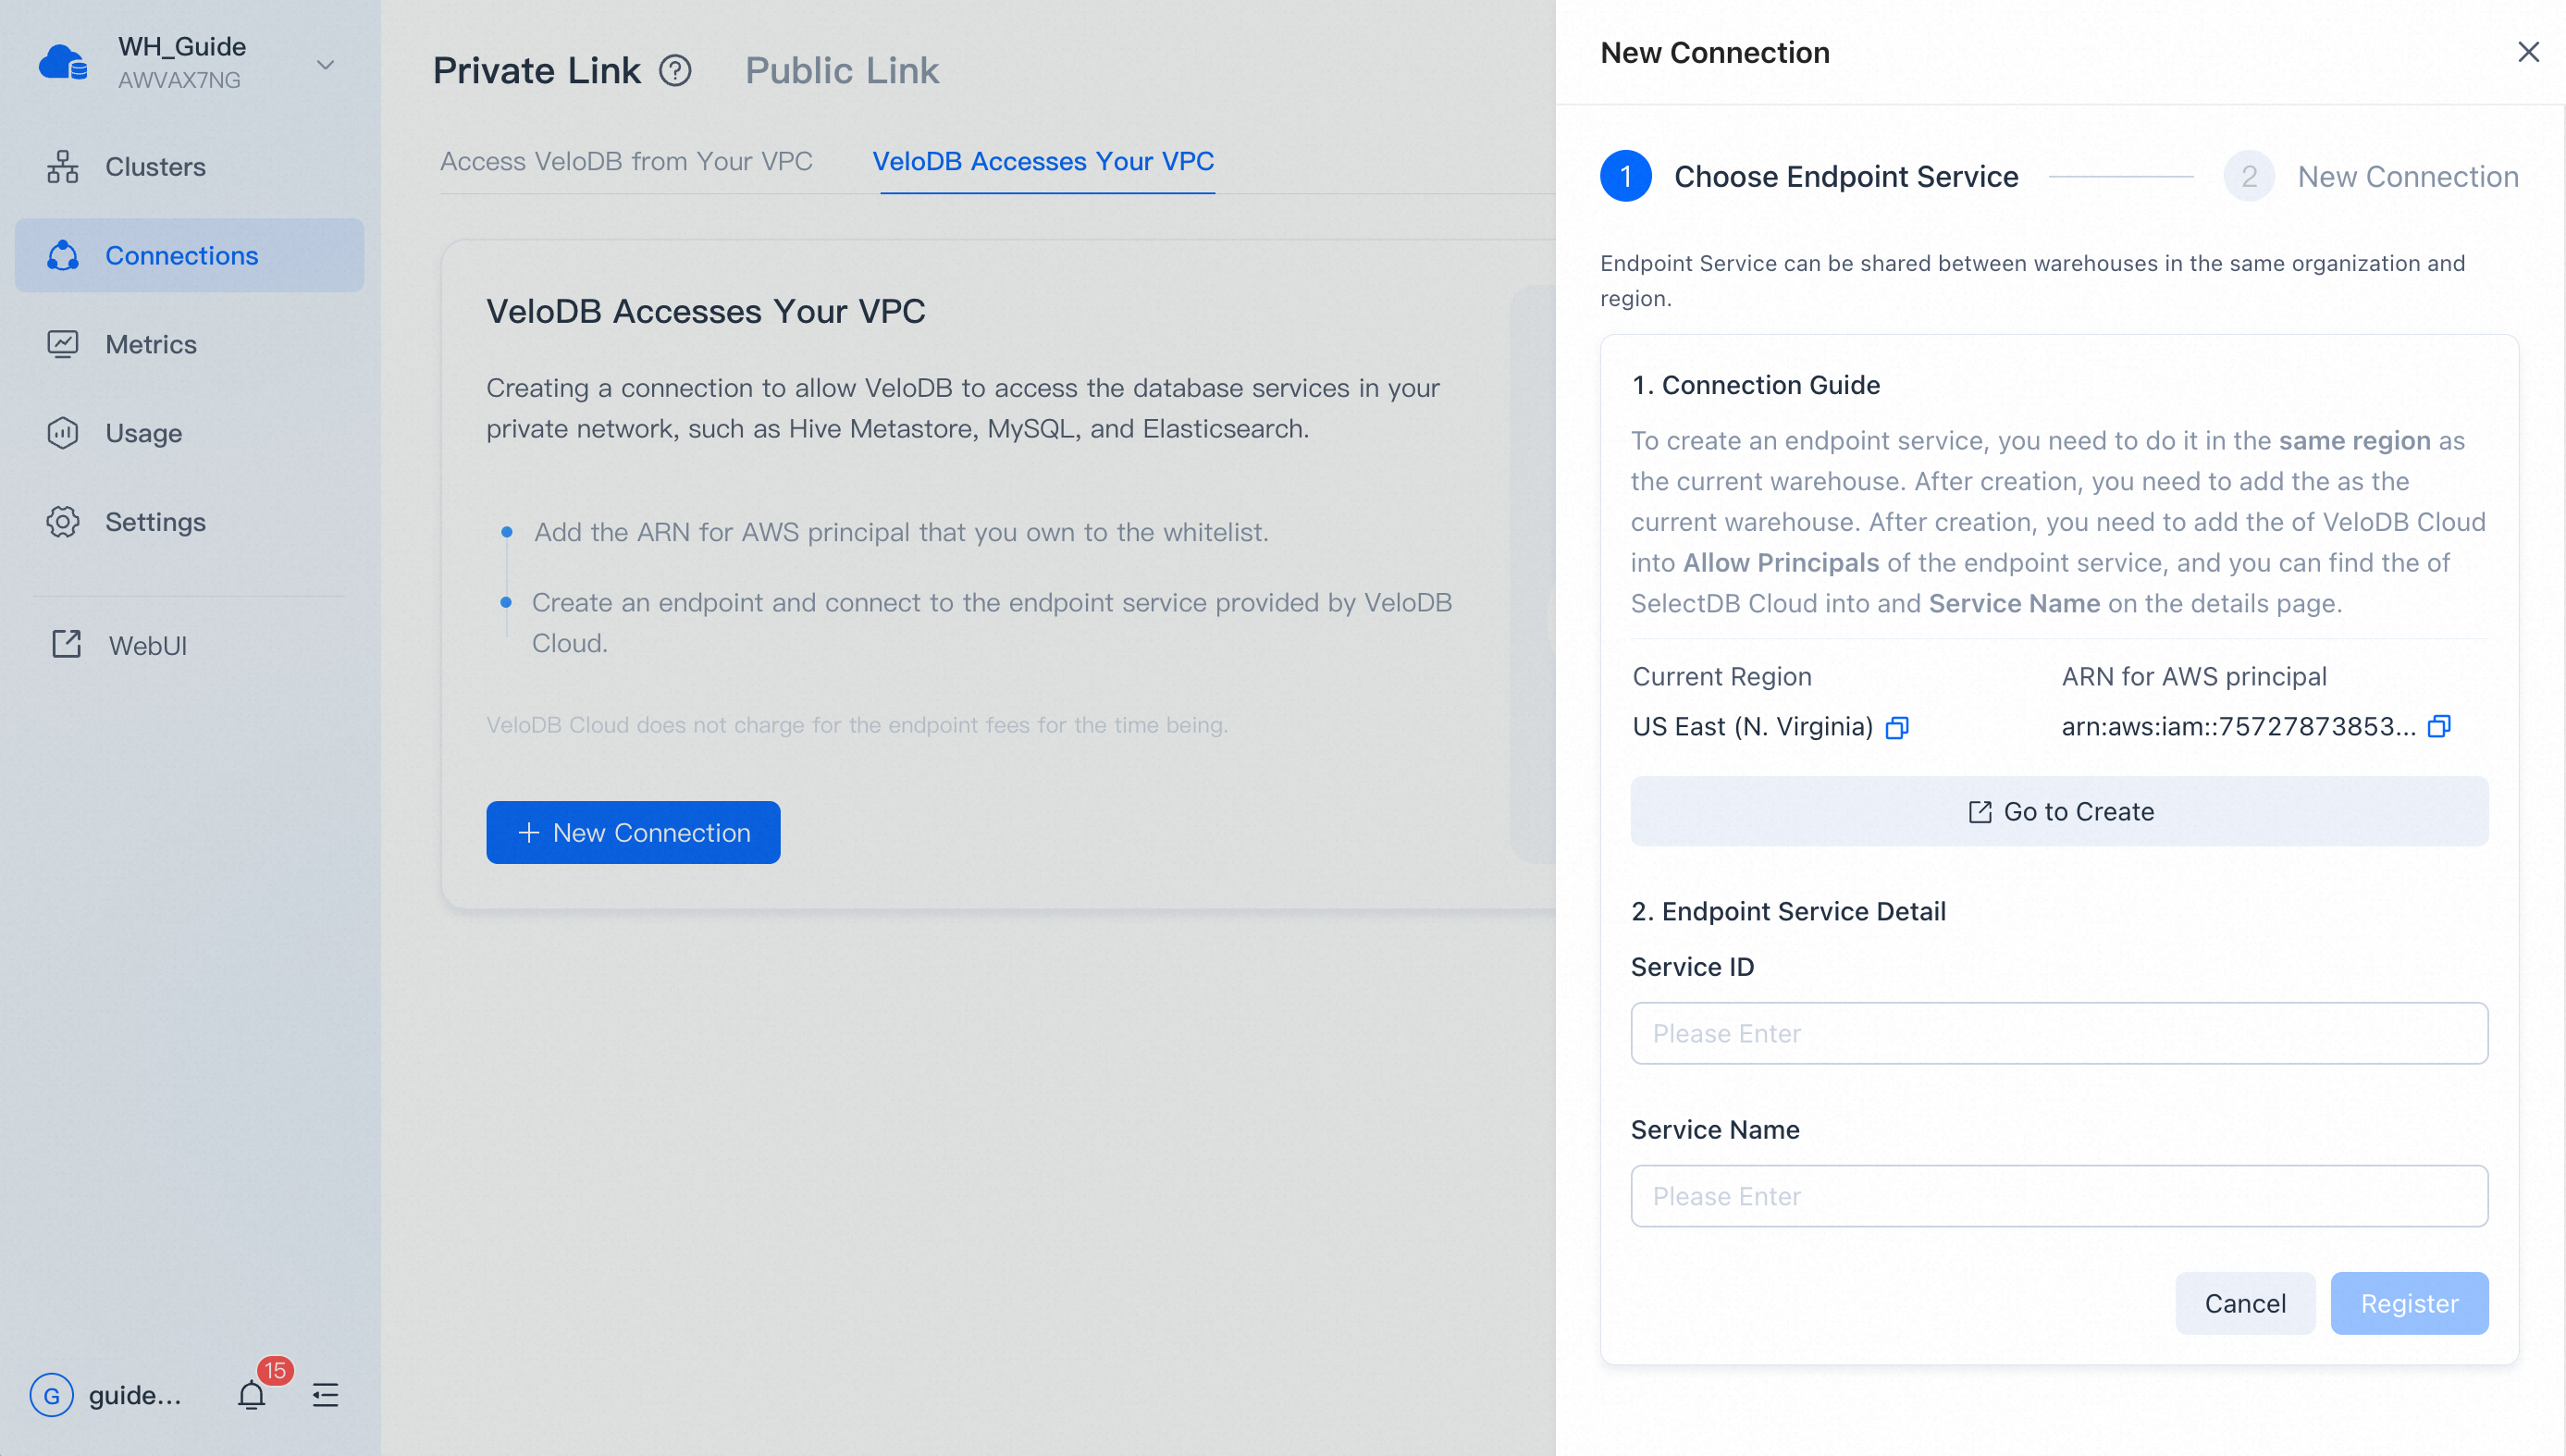
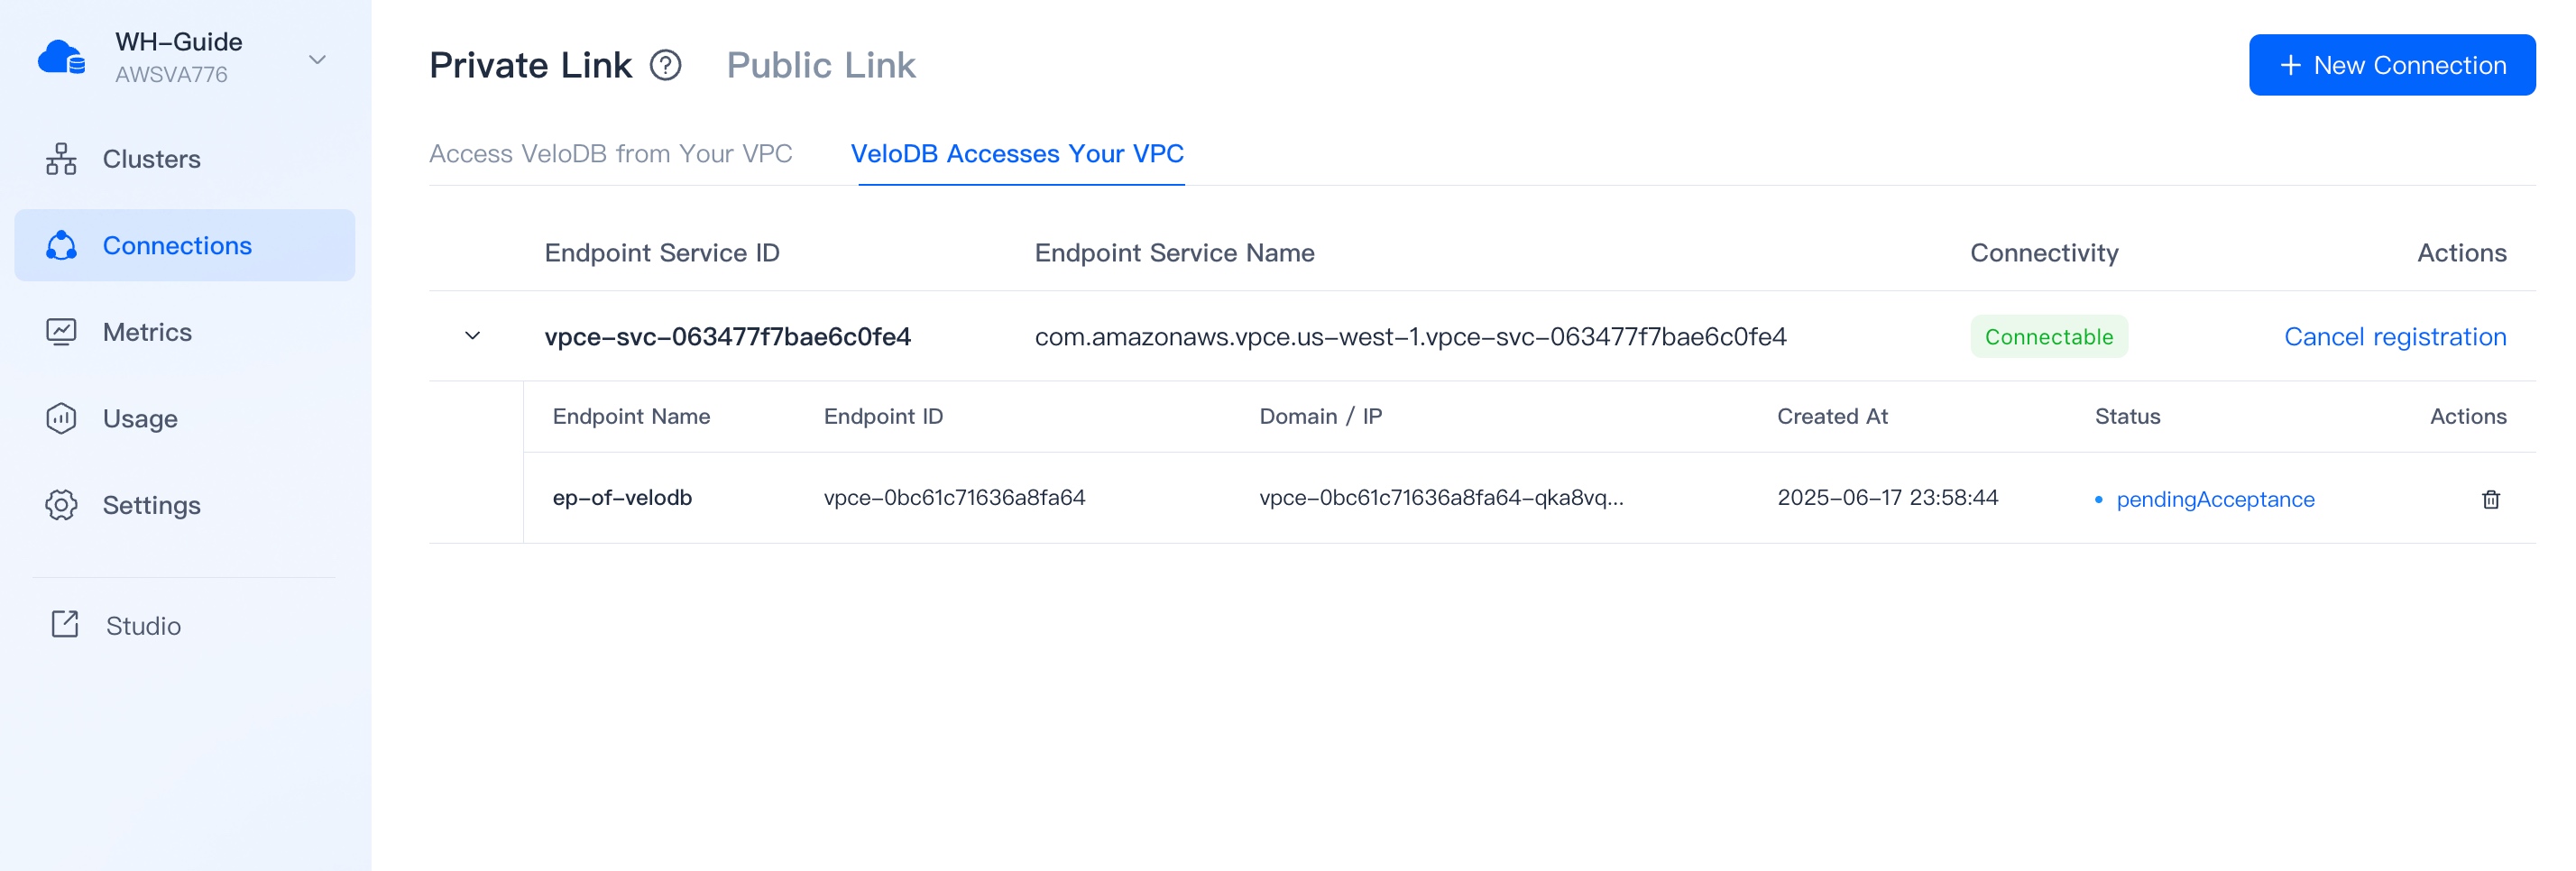
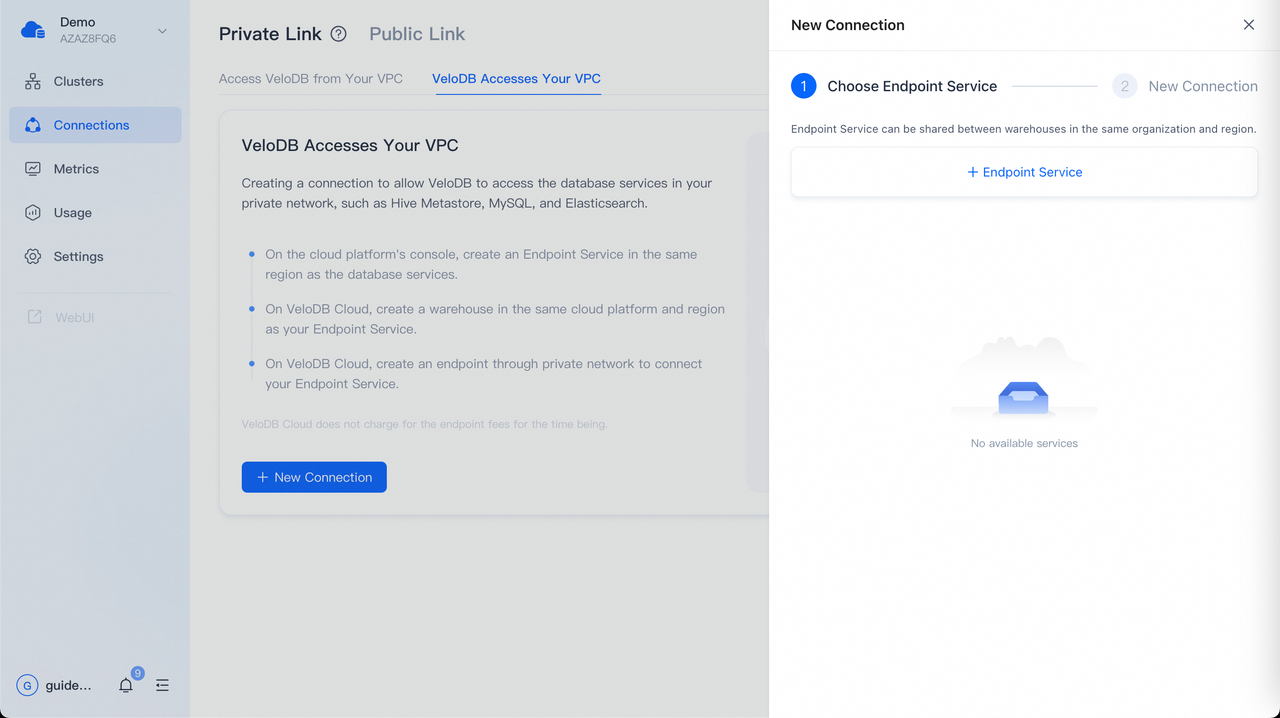
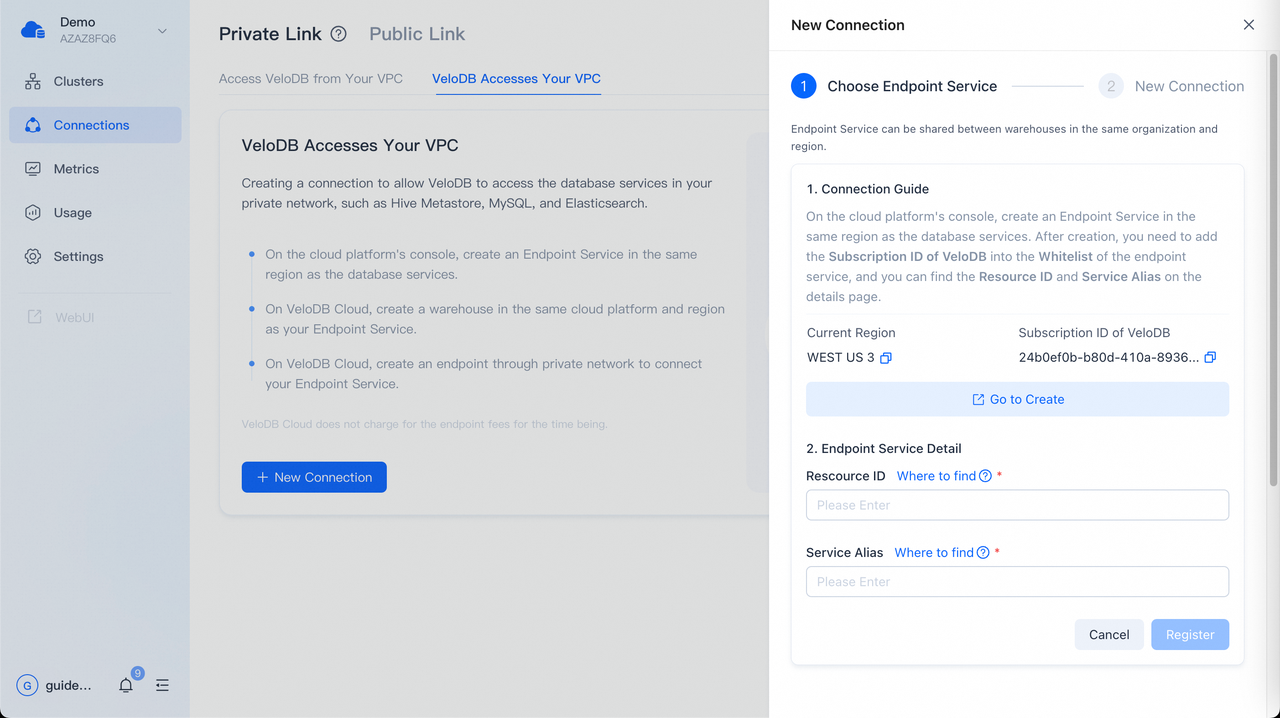
- Switch to the target warehouse, click Connections on the navigation bar, and click New Connection for VeloDB Accesses Your VPC on the Private Link tab to create a connection to your endpoint service.

-
After clicking + Endpoint Service, the pages will display the Current Region of the warehouse and the ARN of VeloDB. You can click Go to Create to go to the cloud platform's Private Link product console and create an endpoint service.
-
Sign in to the AWS Console, select VPC-Endpoint services and switch to the same region as the current warehouse.
-
Click Create endpoint service.
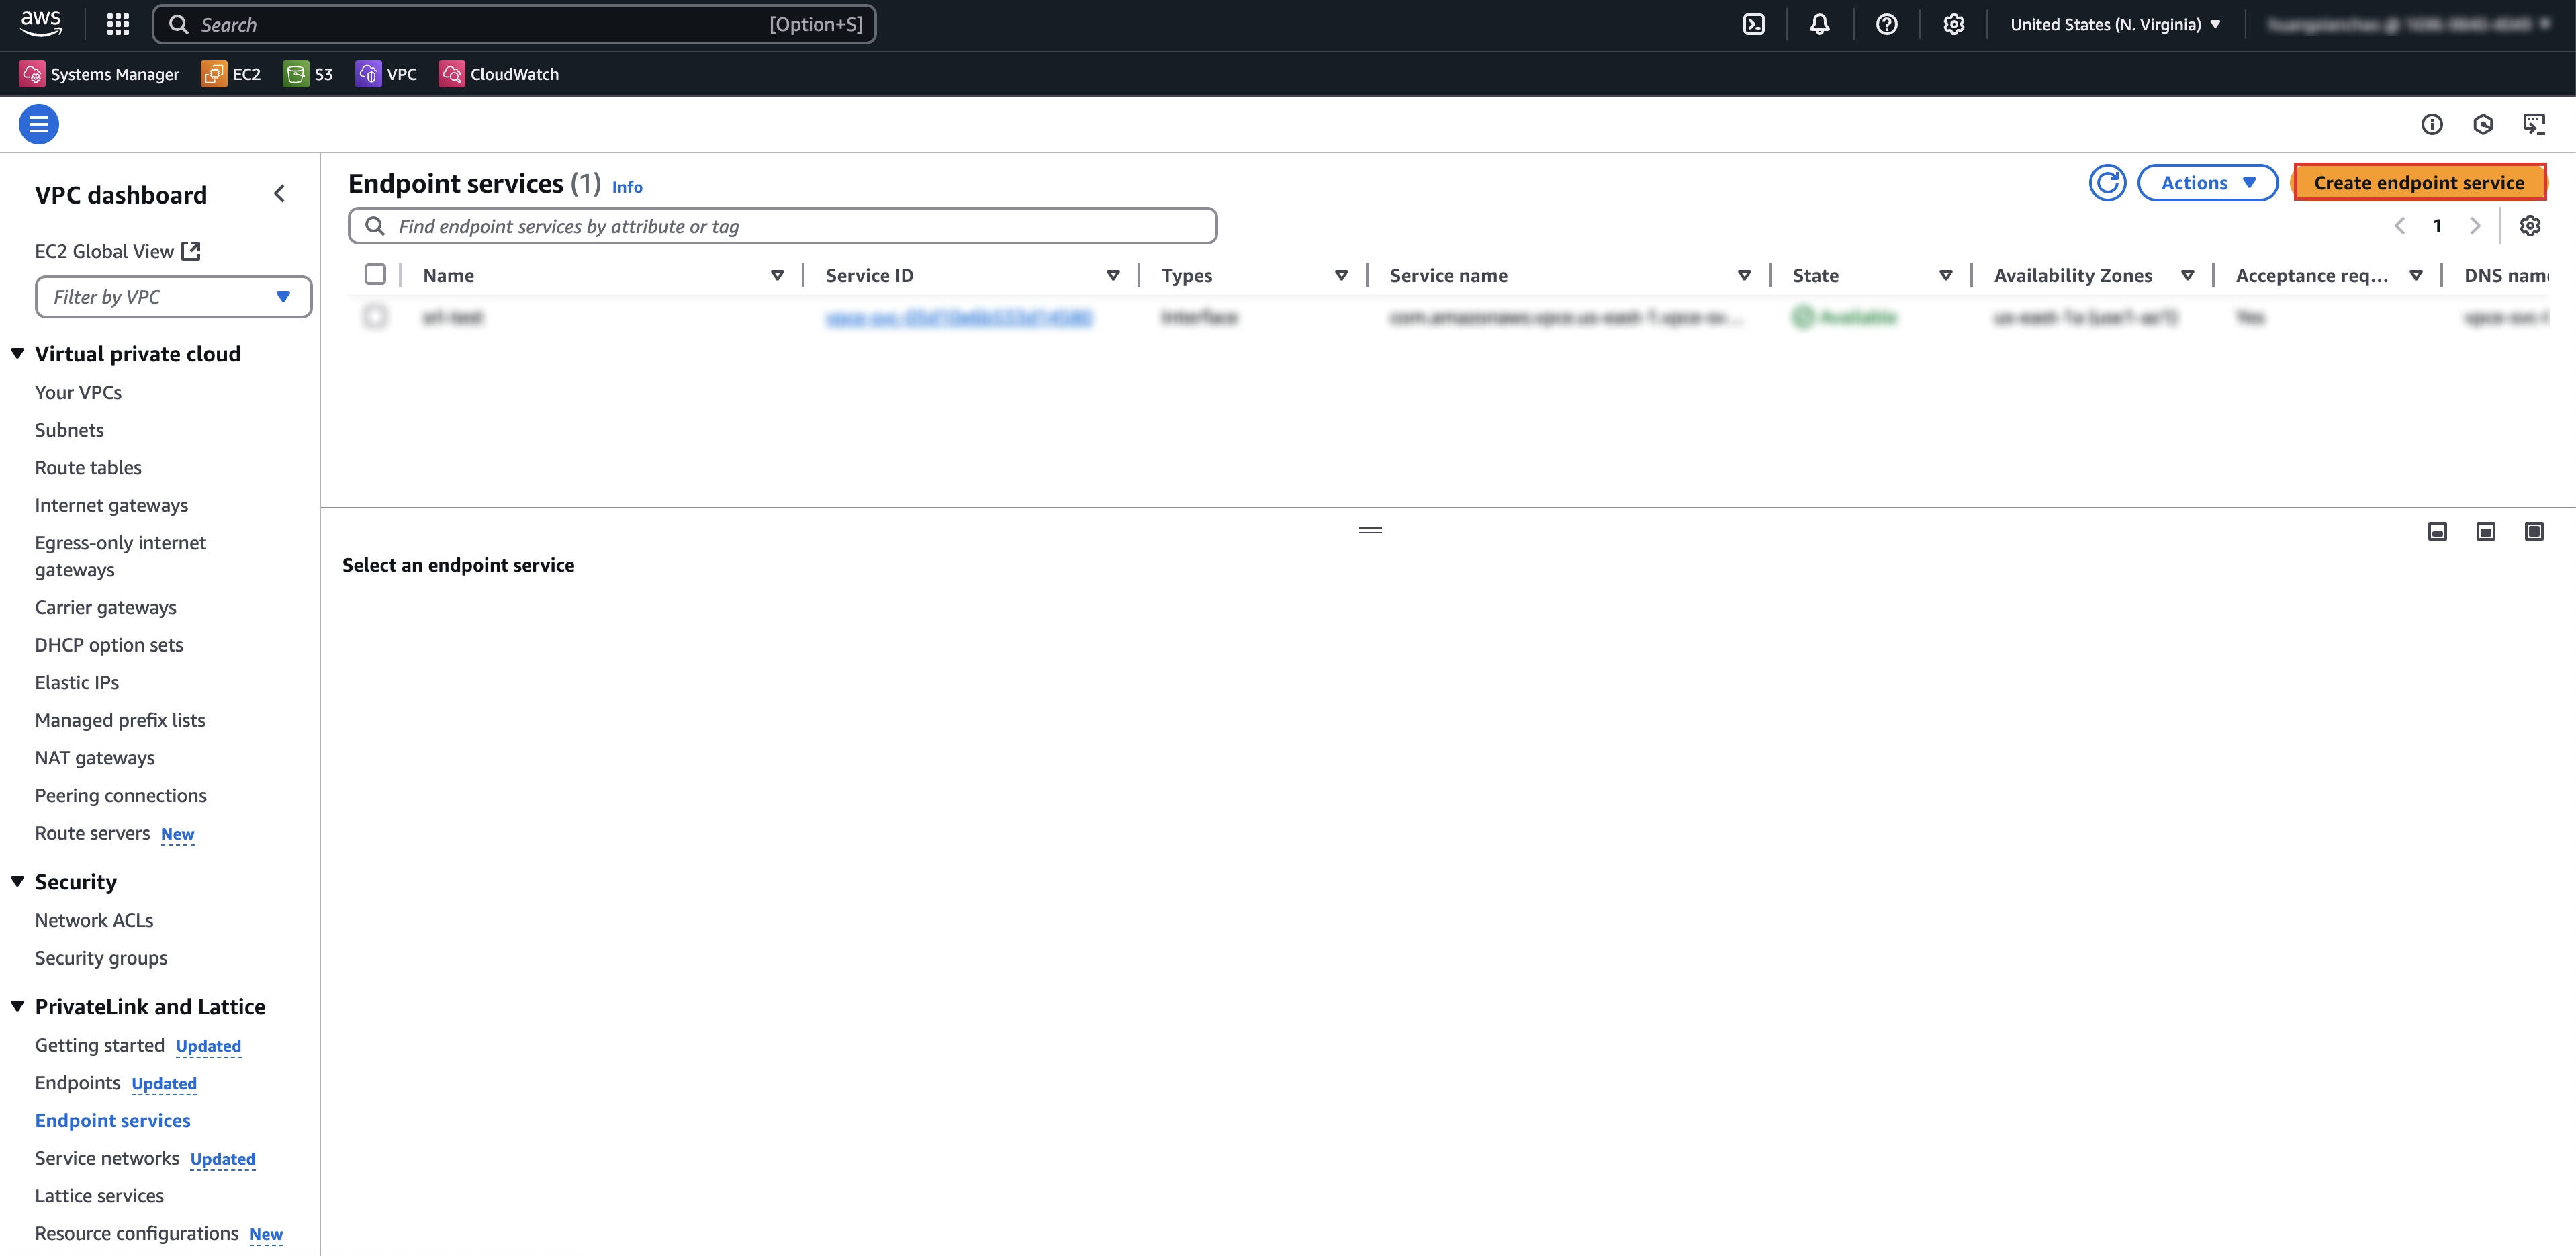
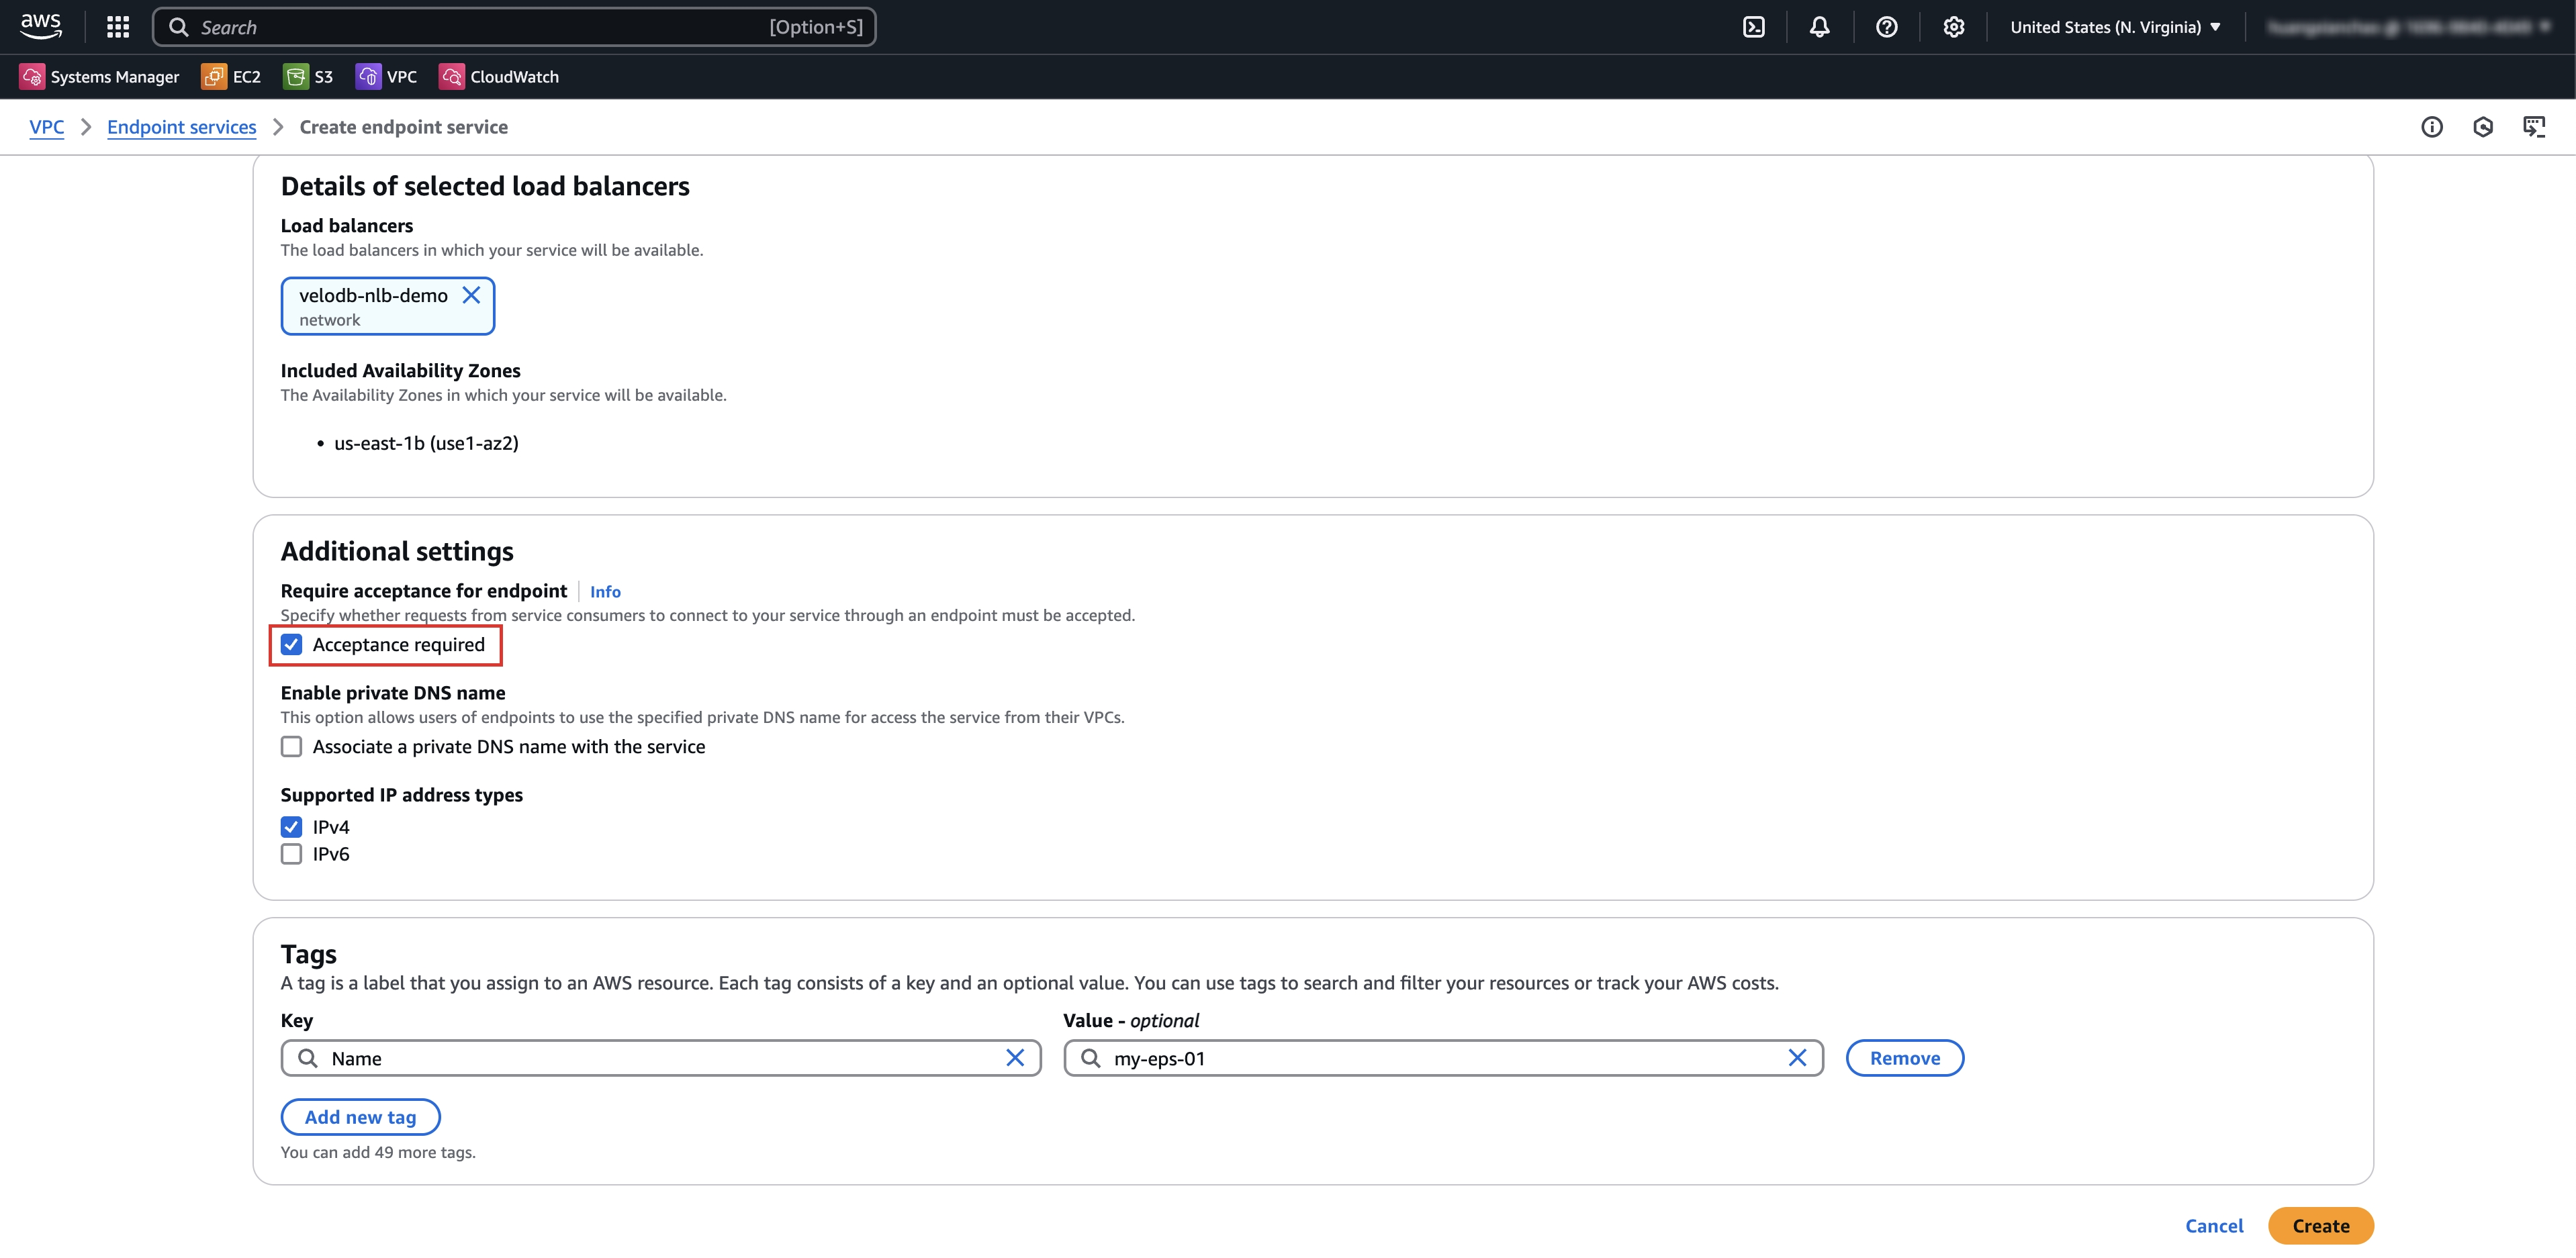
- On the Endpoint Service configuration page, configure the relevant parameters and click Create.
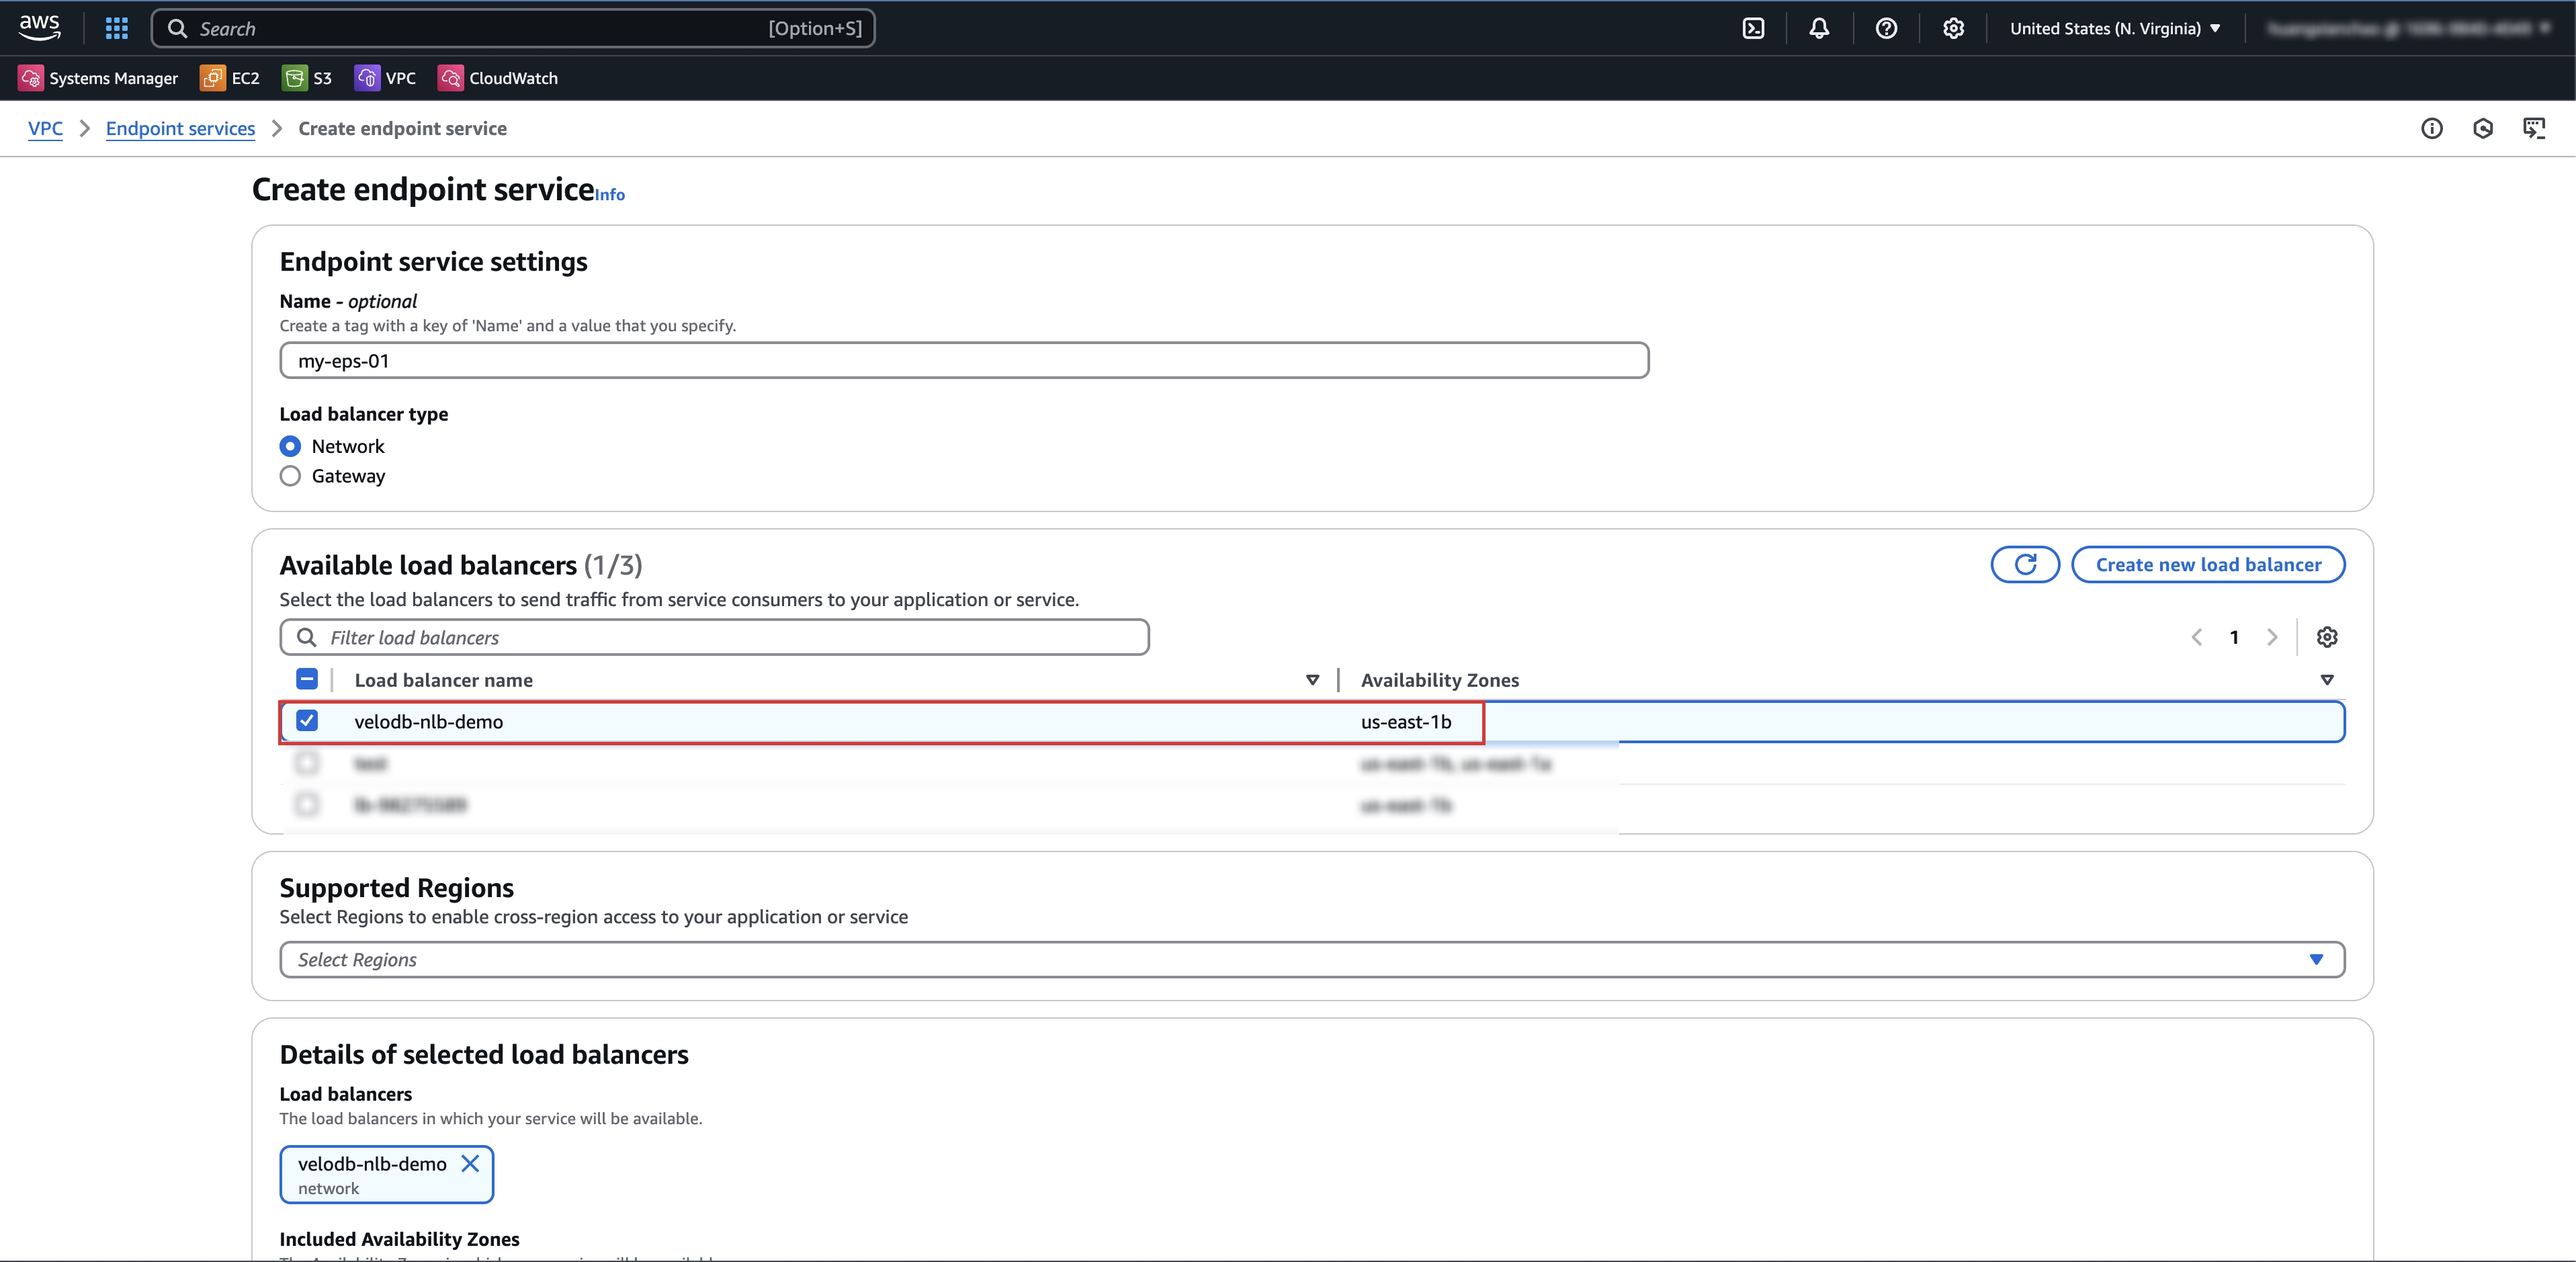
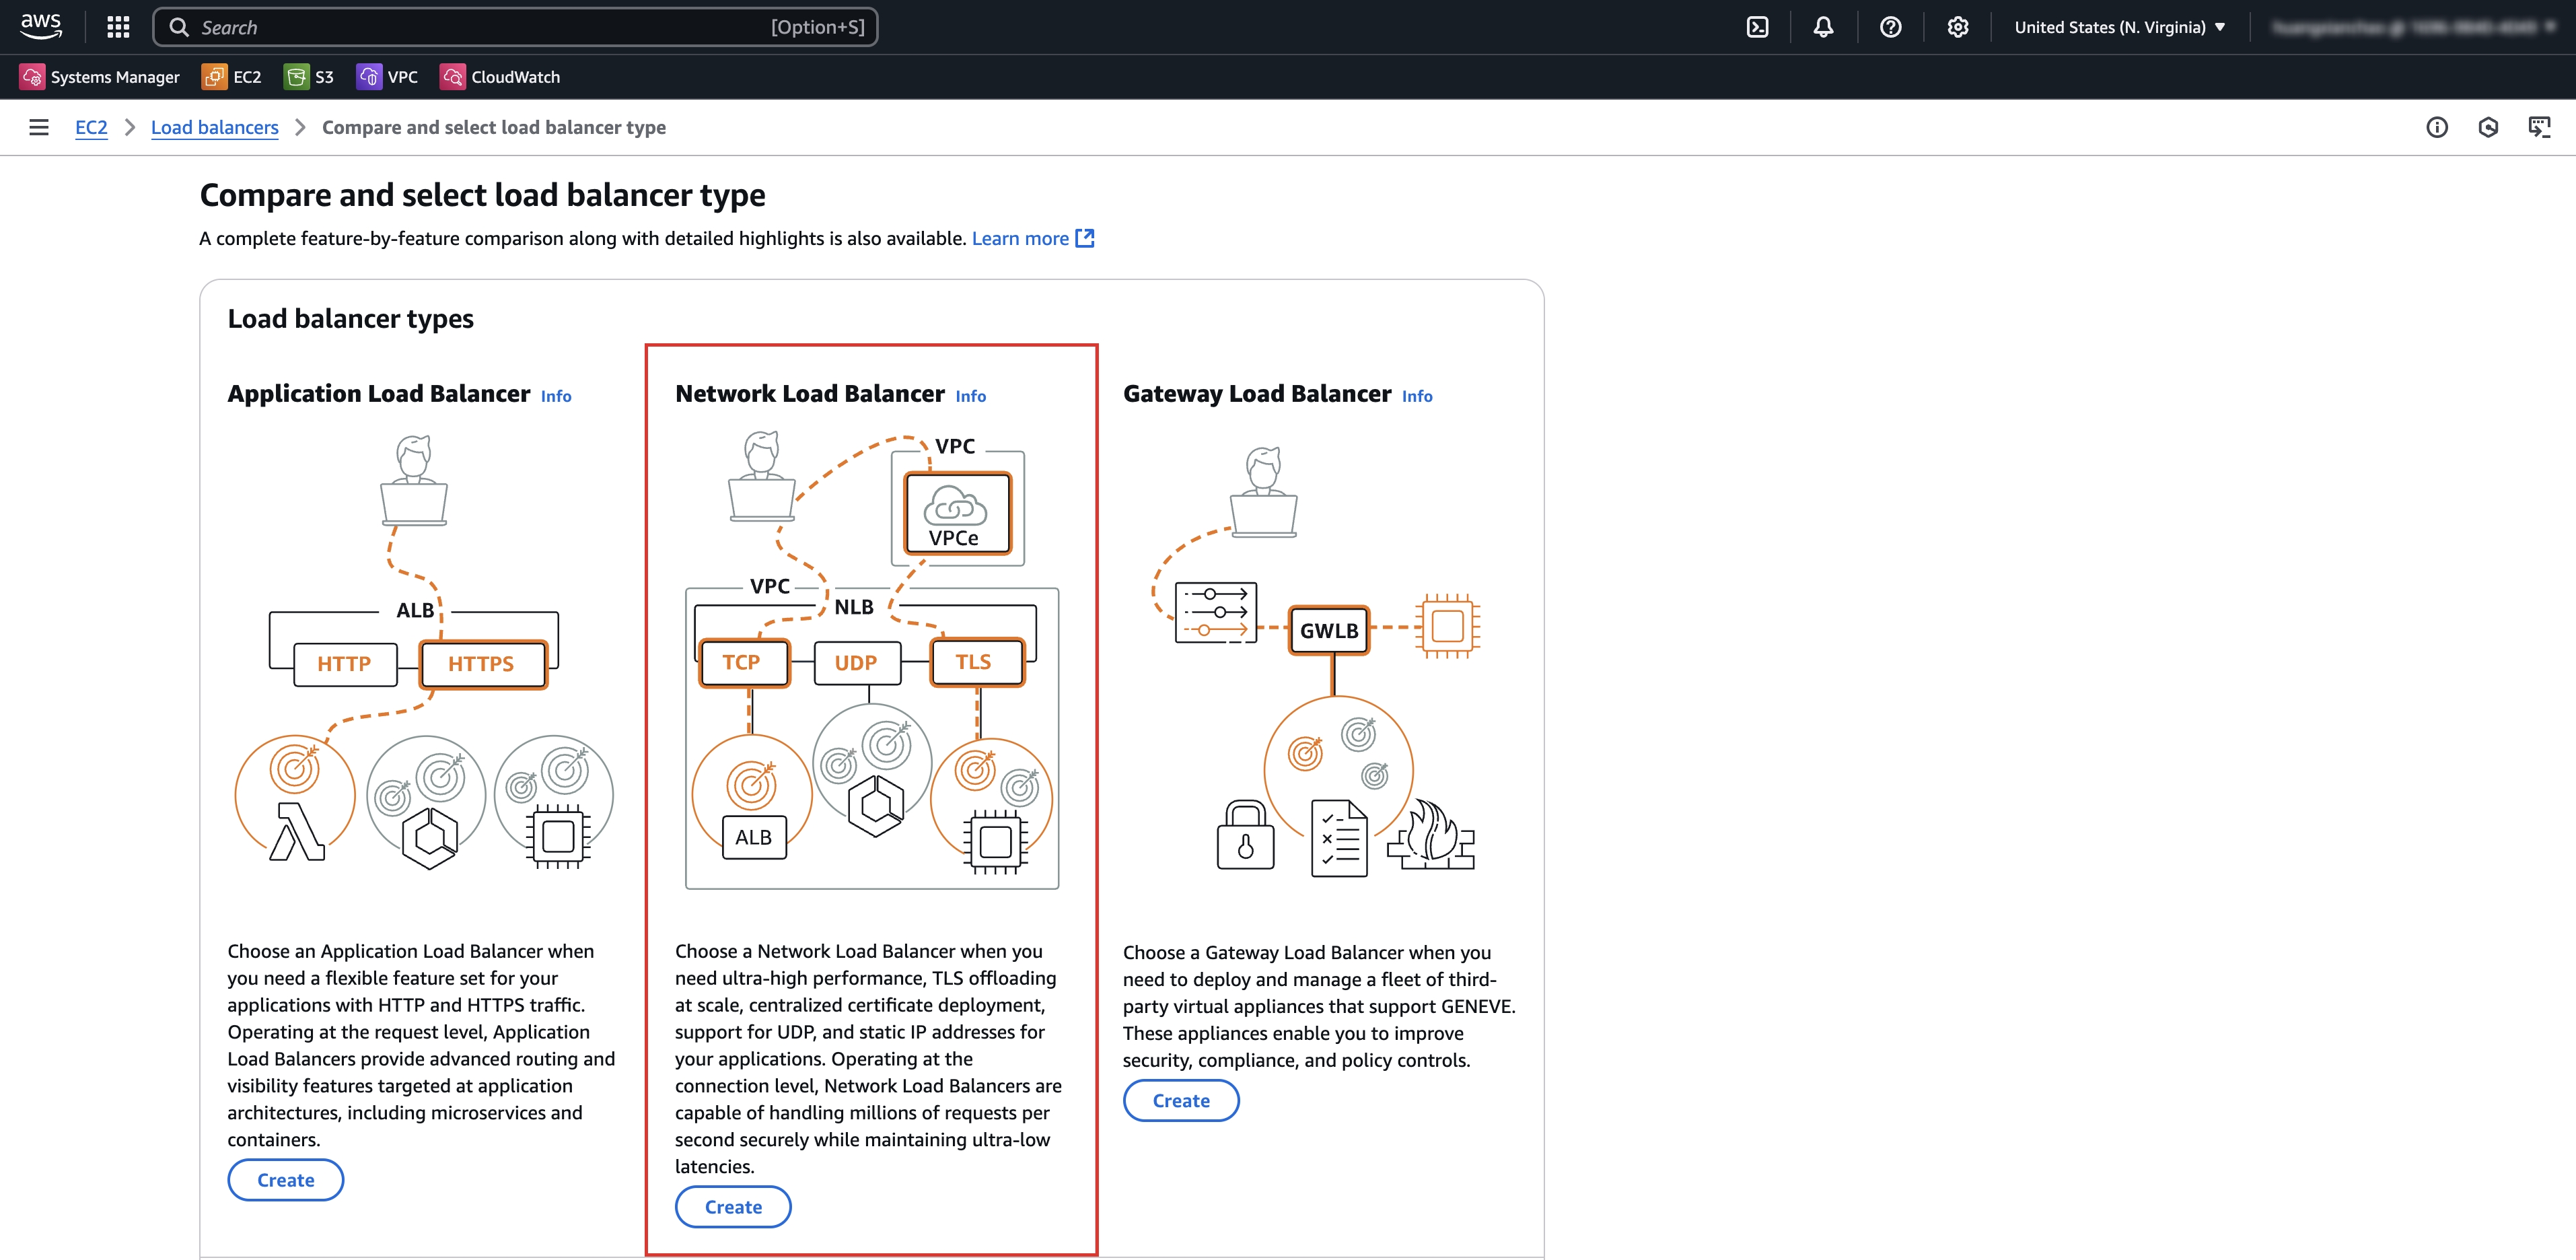
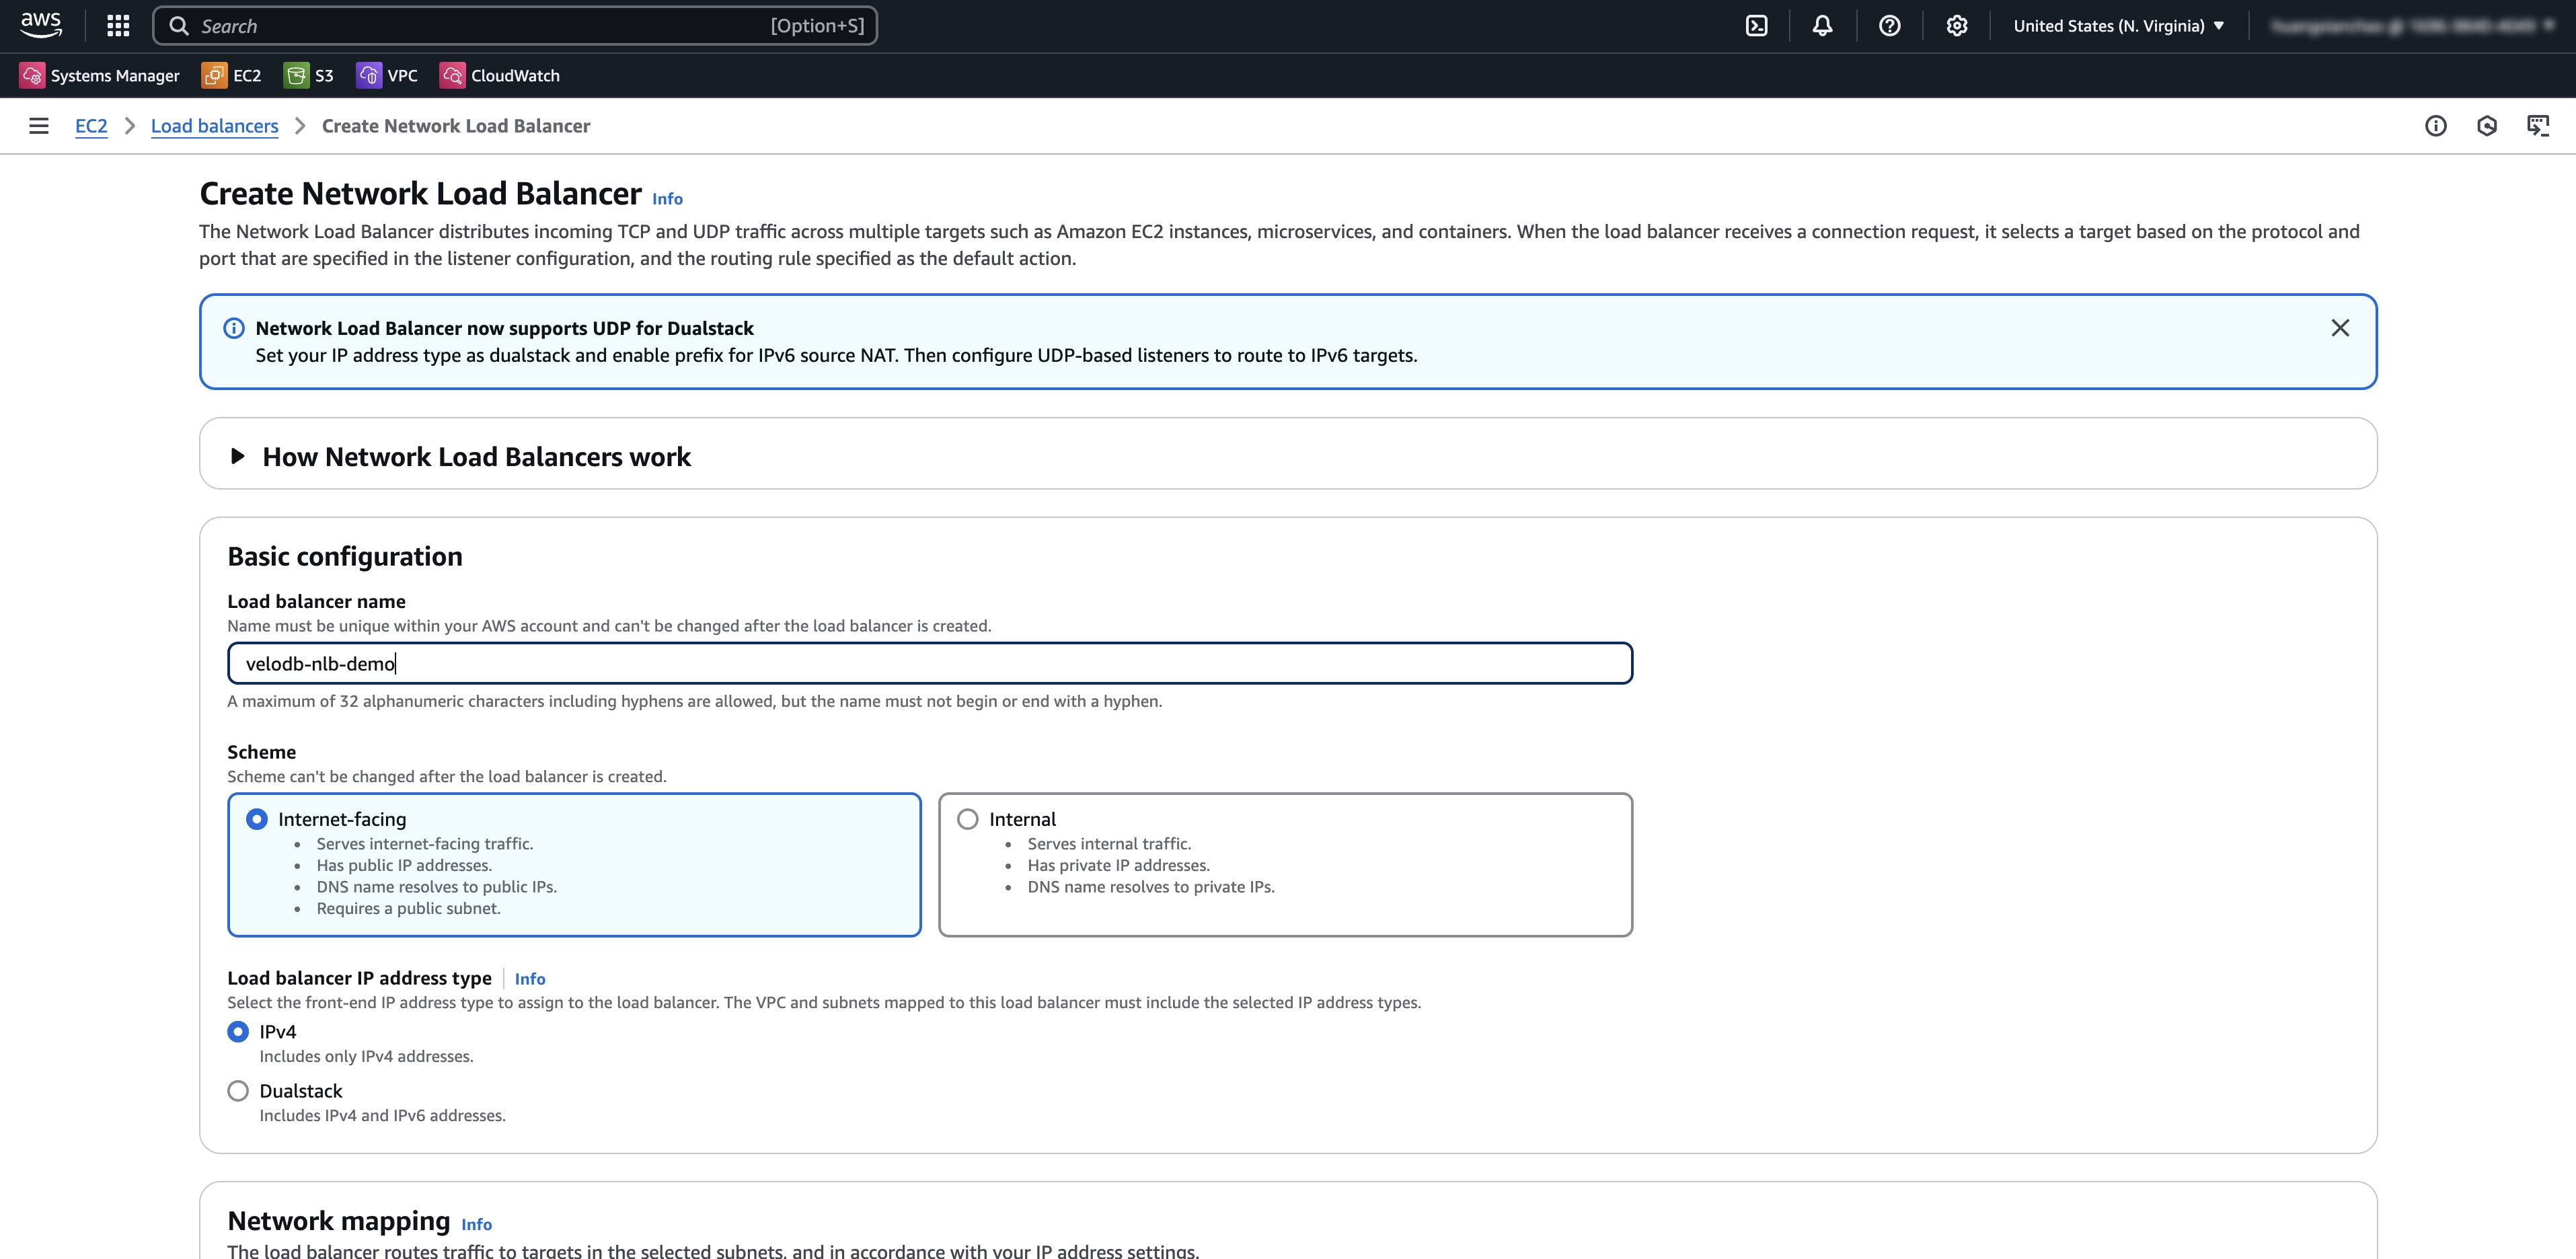
- (Optional) If there is no available network load balancer, you need to click Create Network Load Balancer first. After the creation is completed, click the filter button to make a selection.
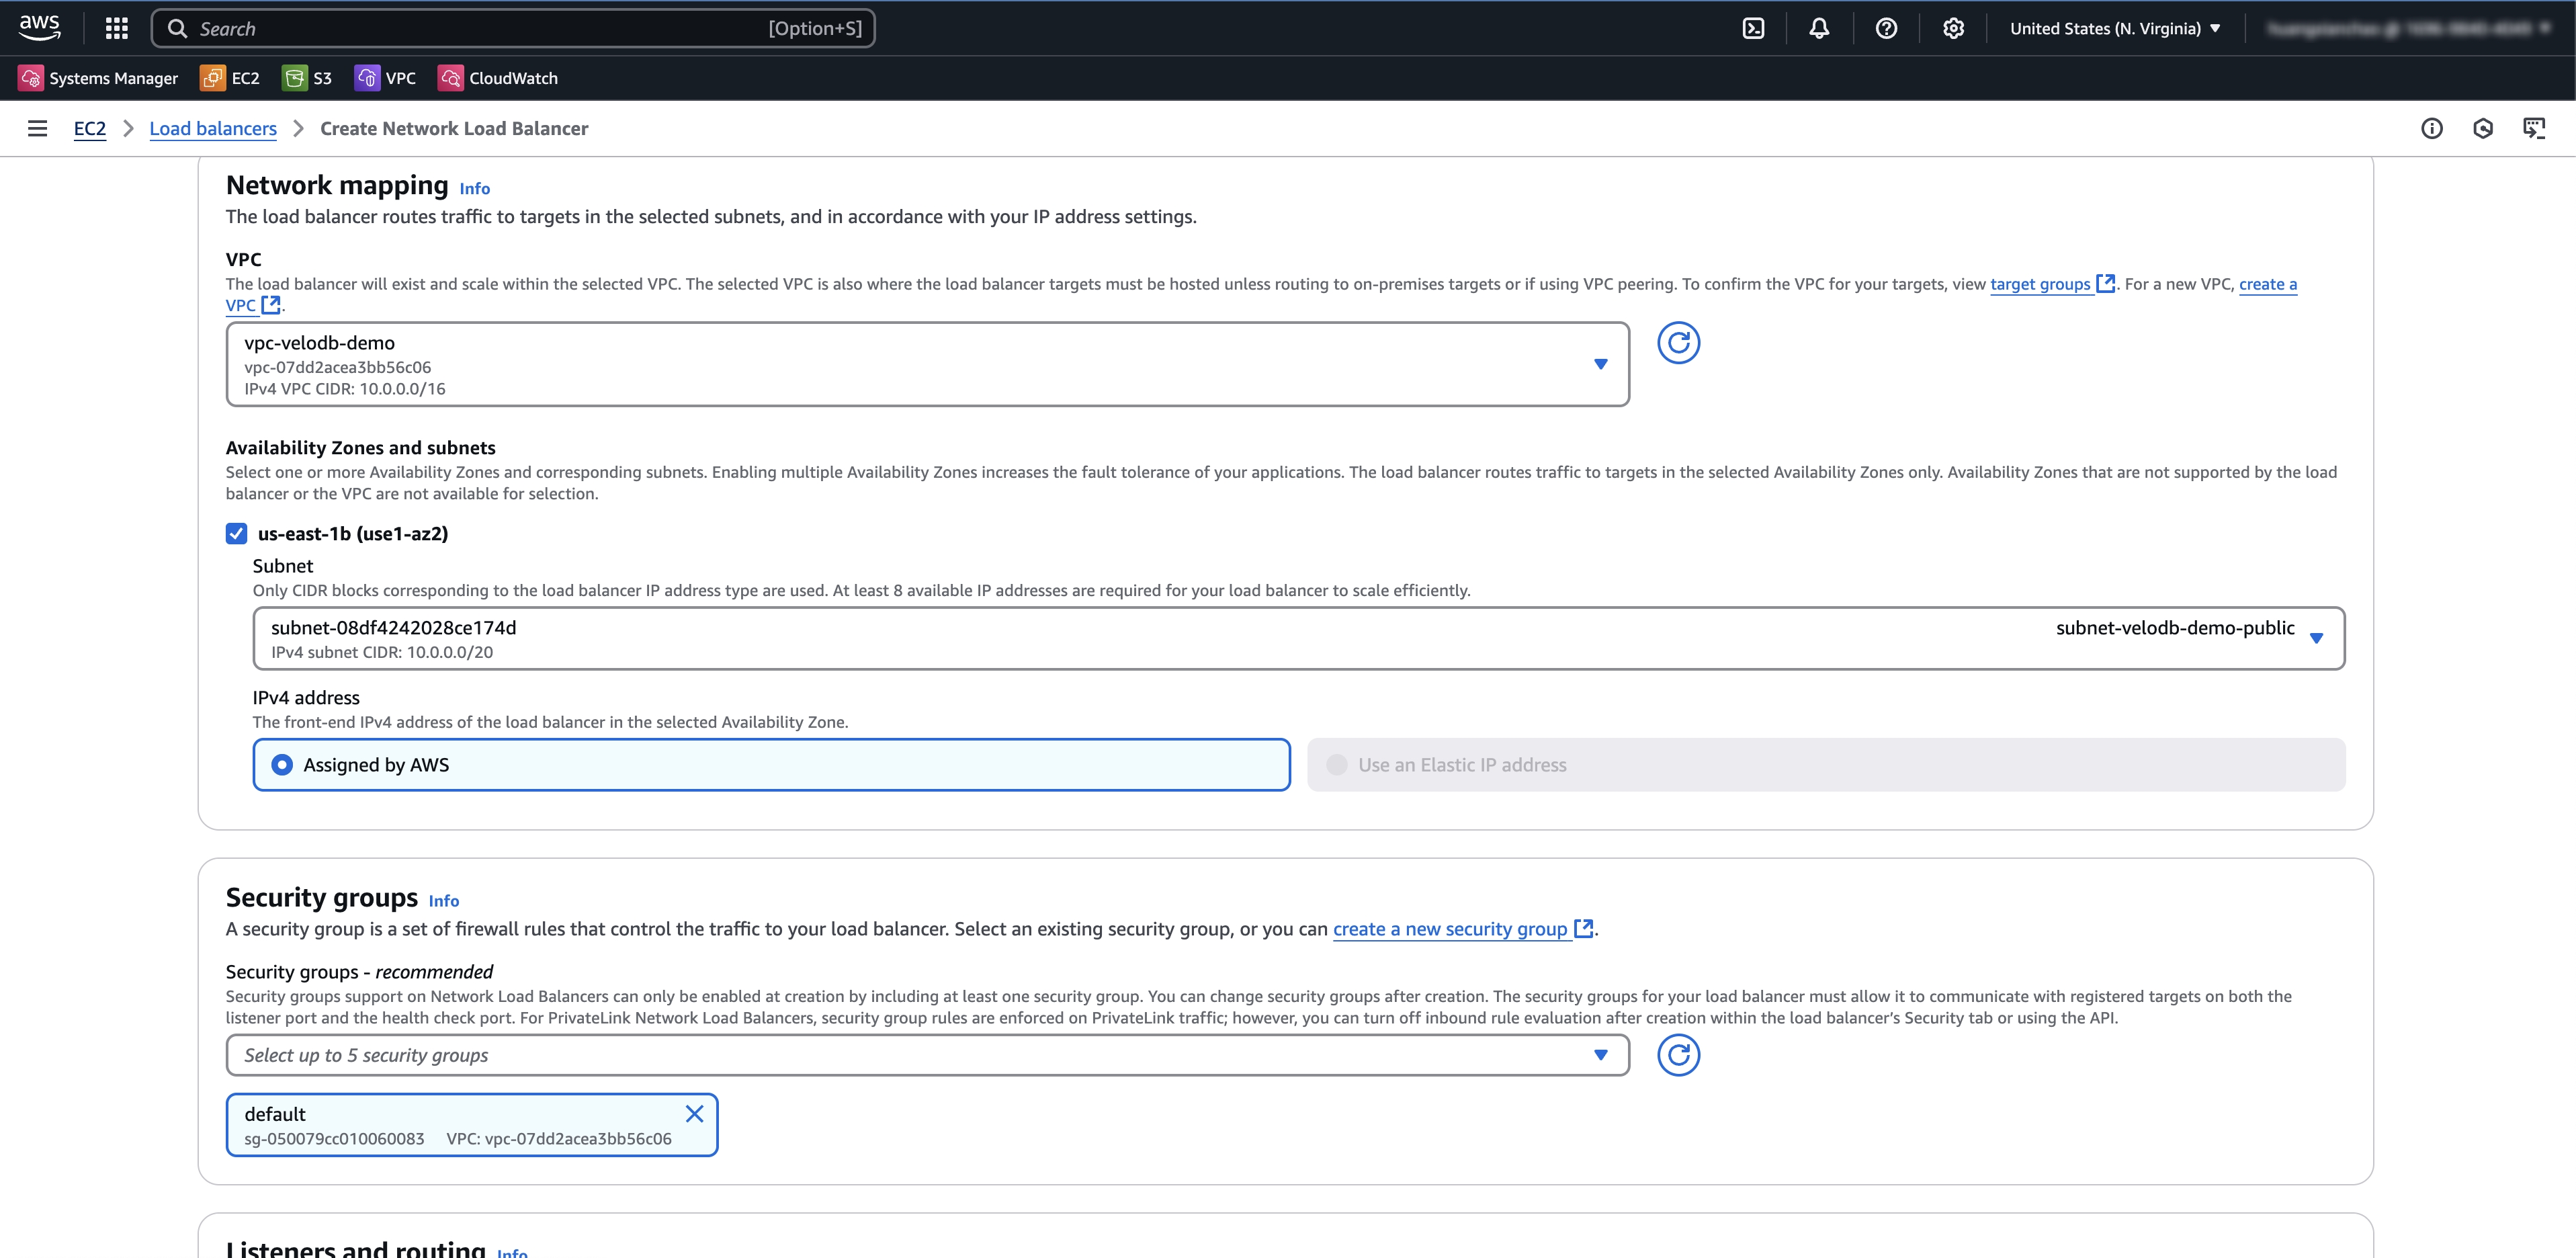
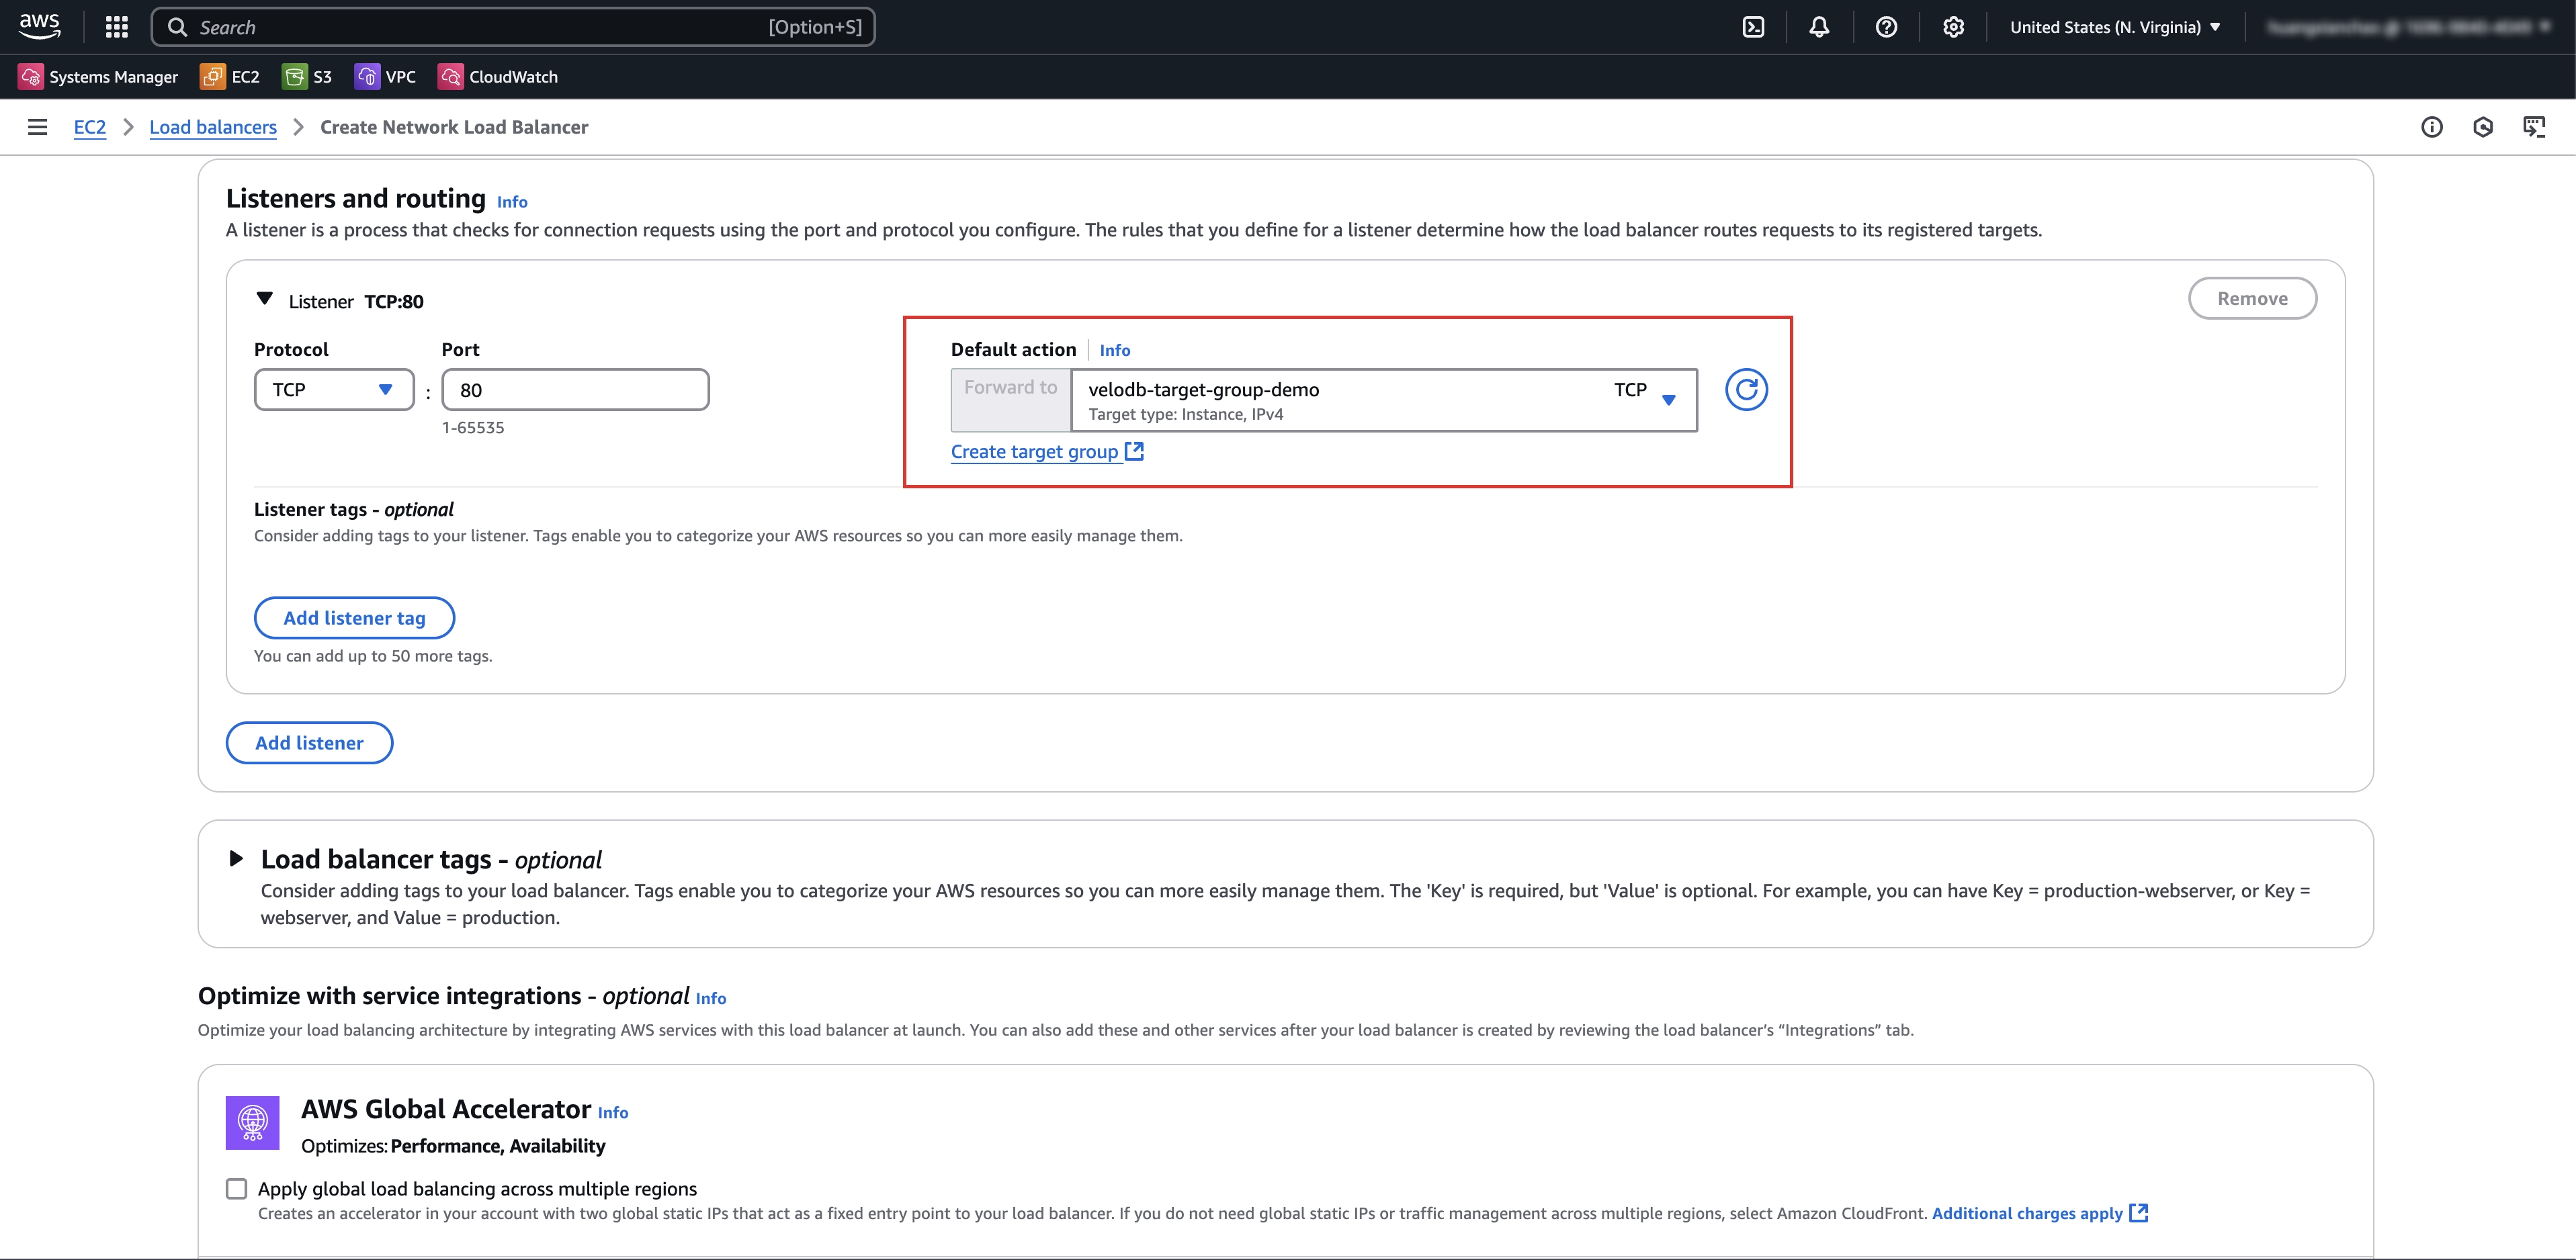
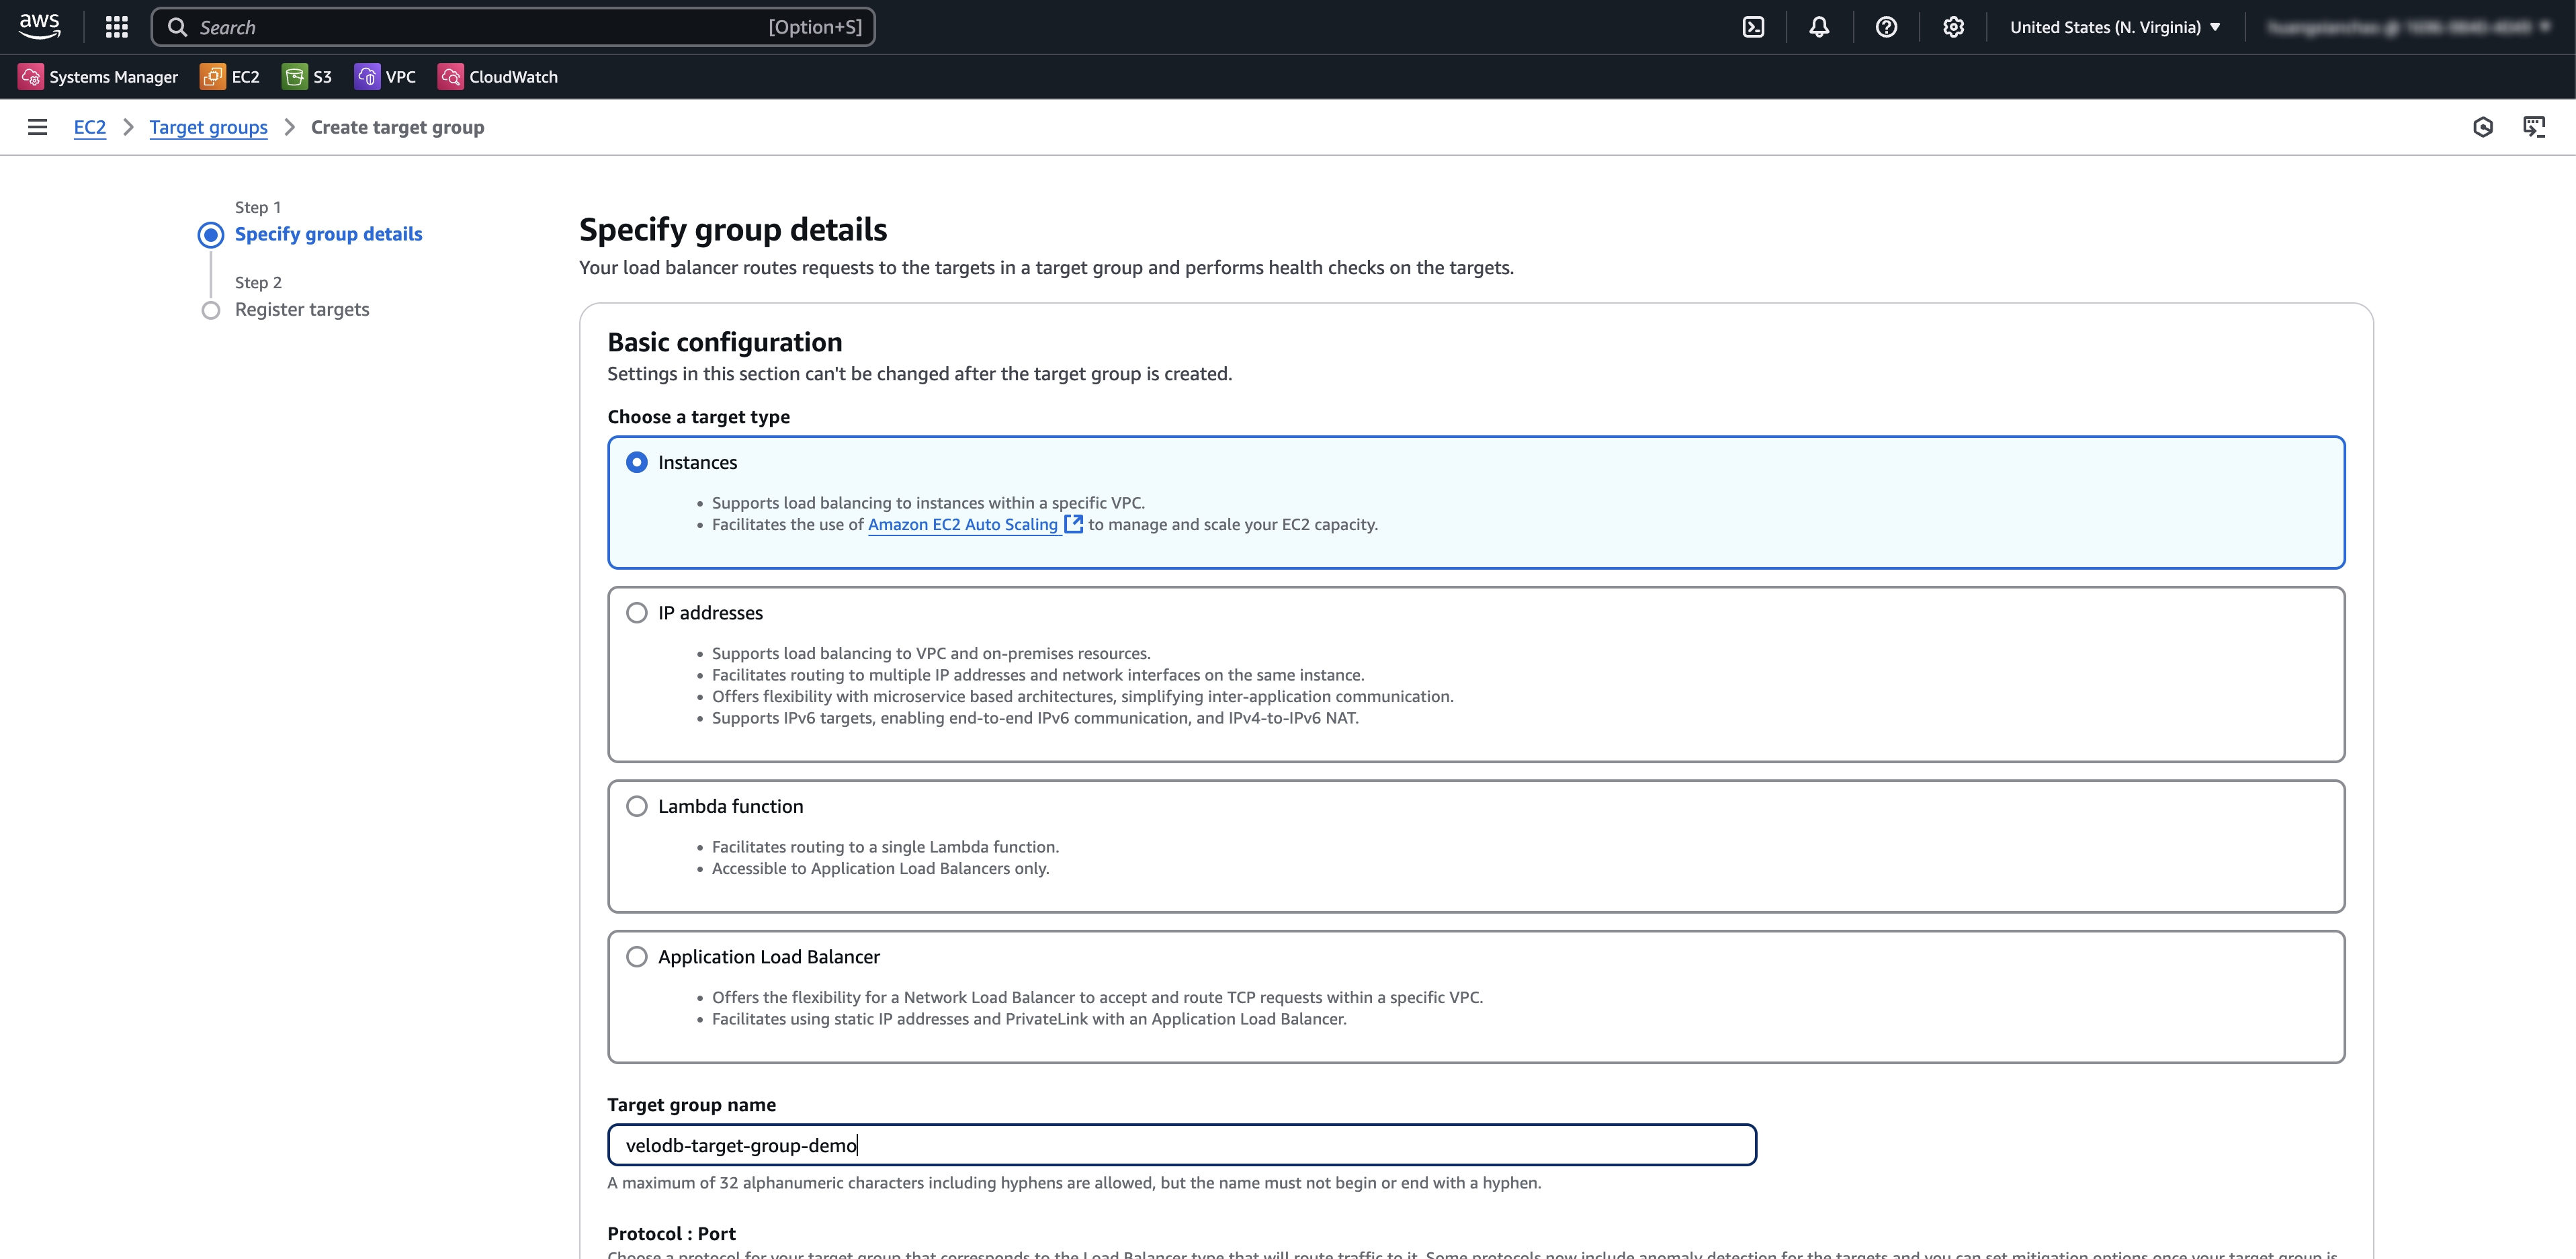
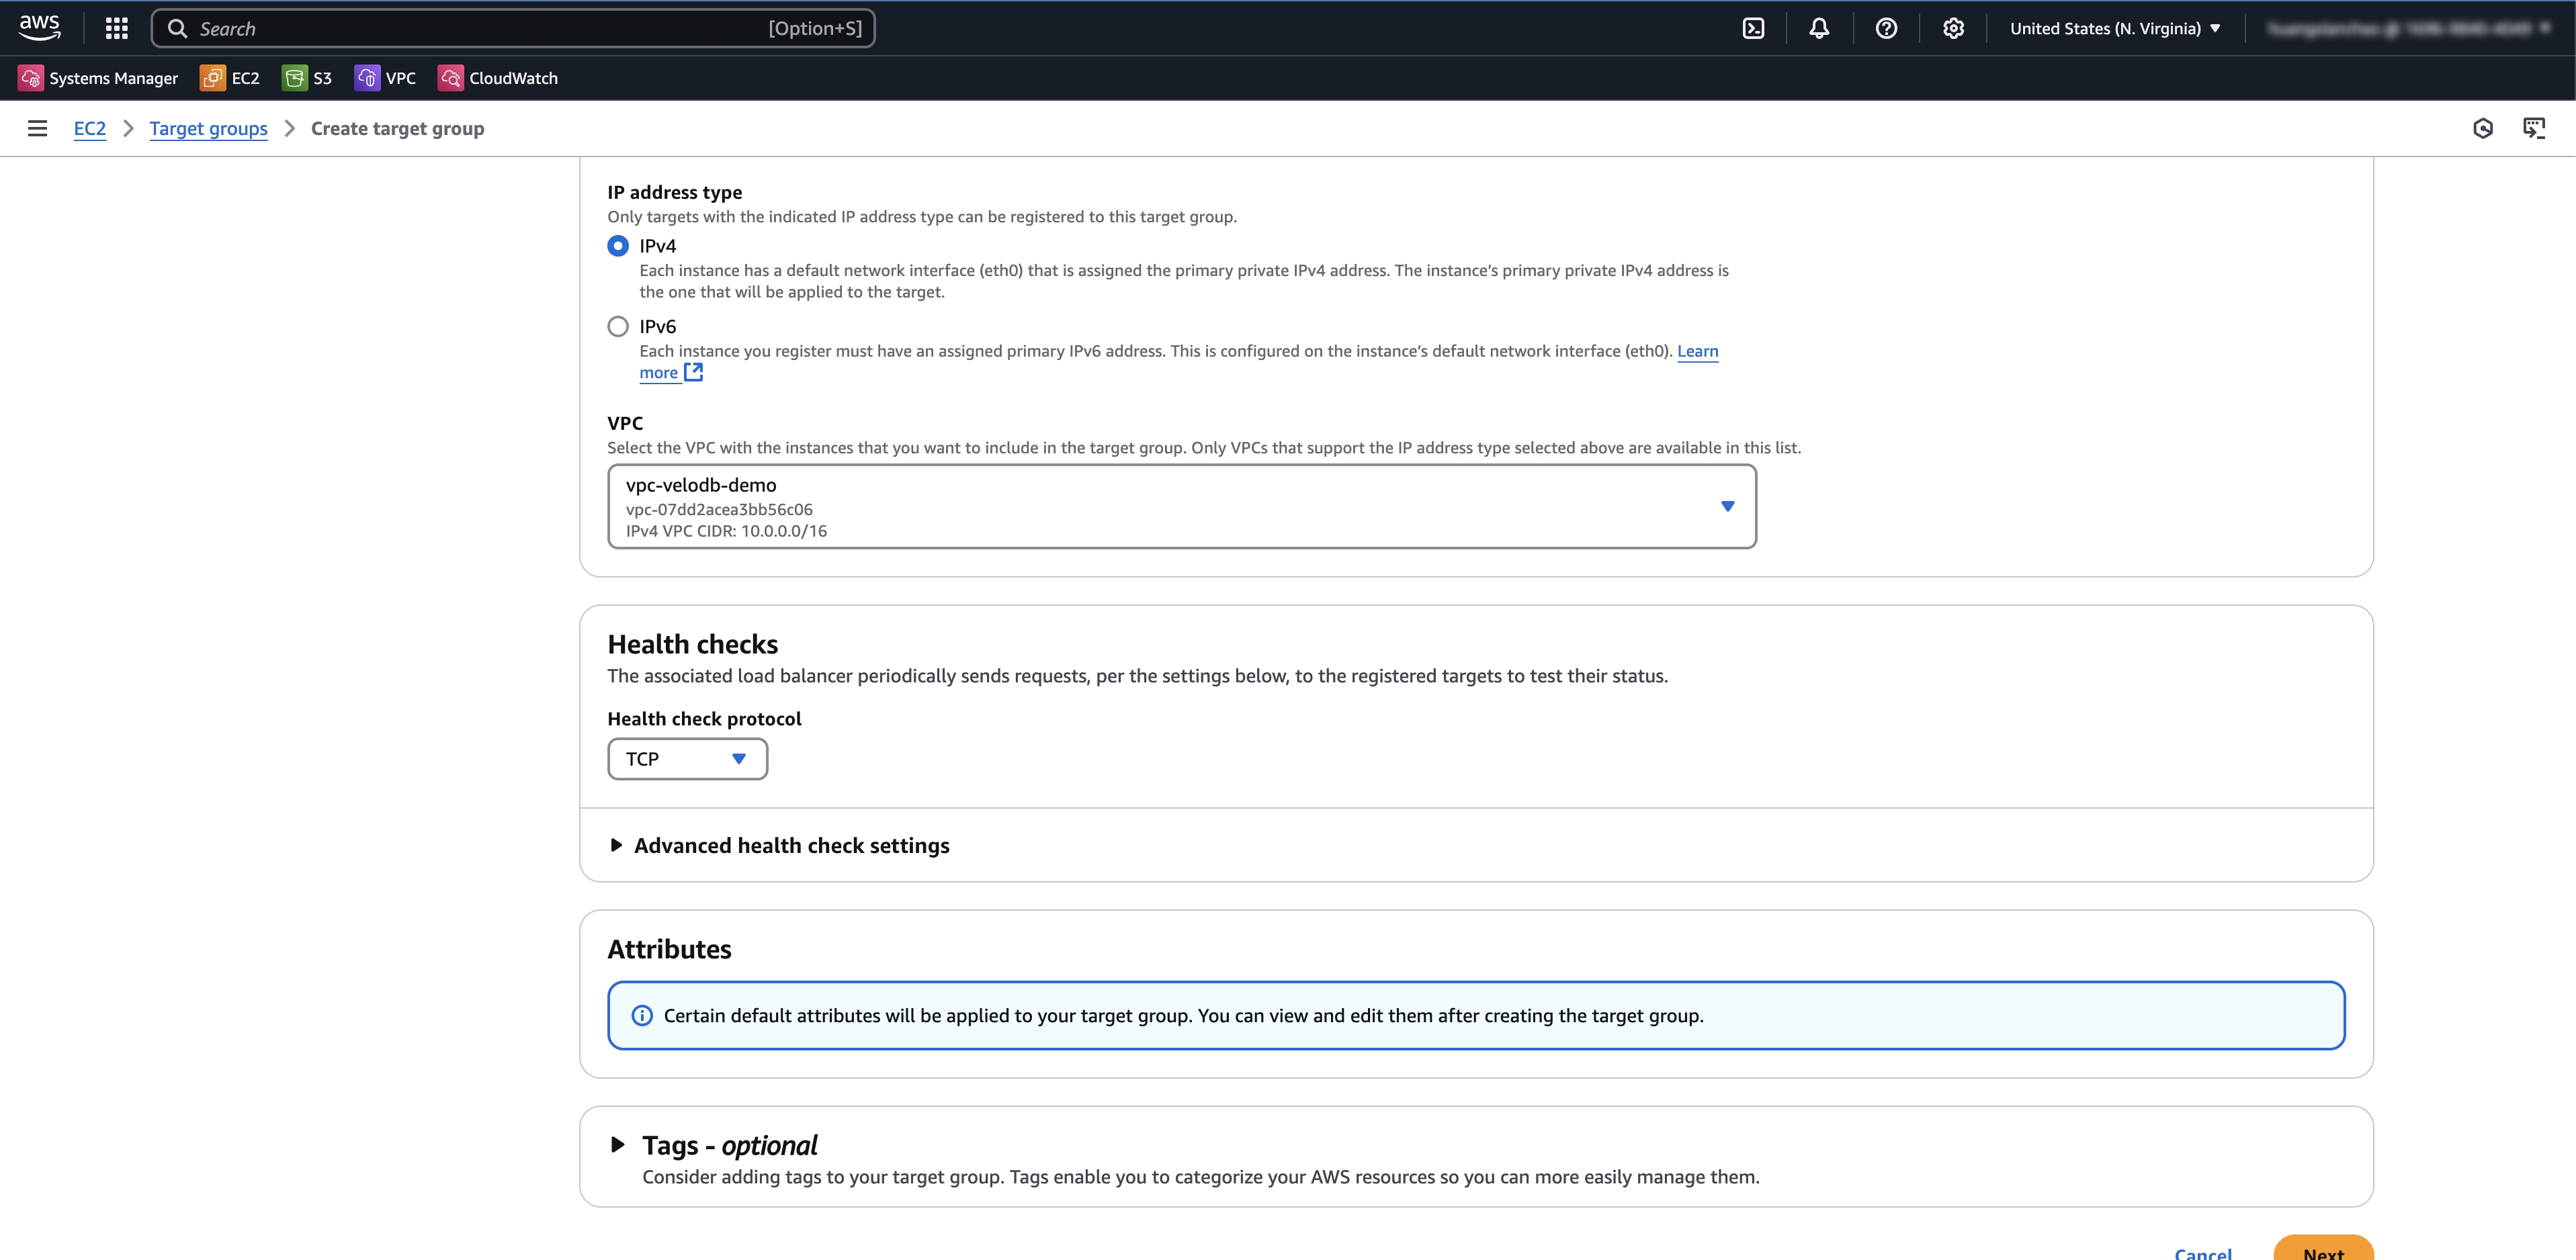
- (Optional) If there is no available target group, you need to click Create Target Group first. After the creation is completed, click the refresh button on the right to make a selection.
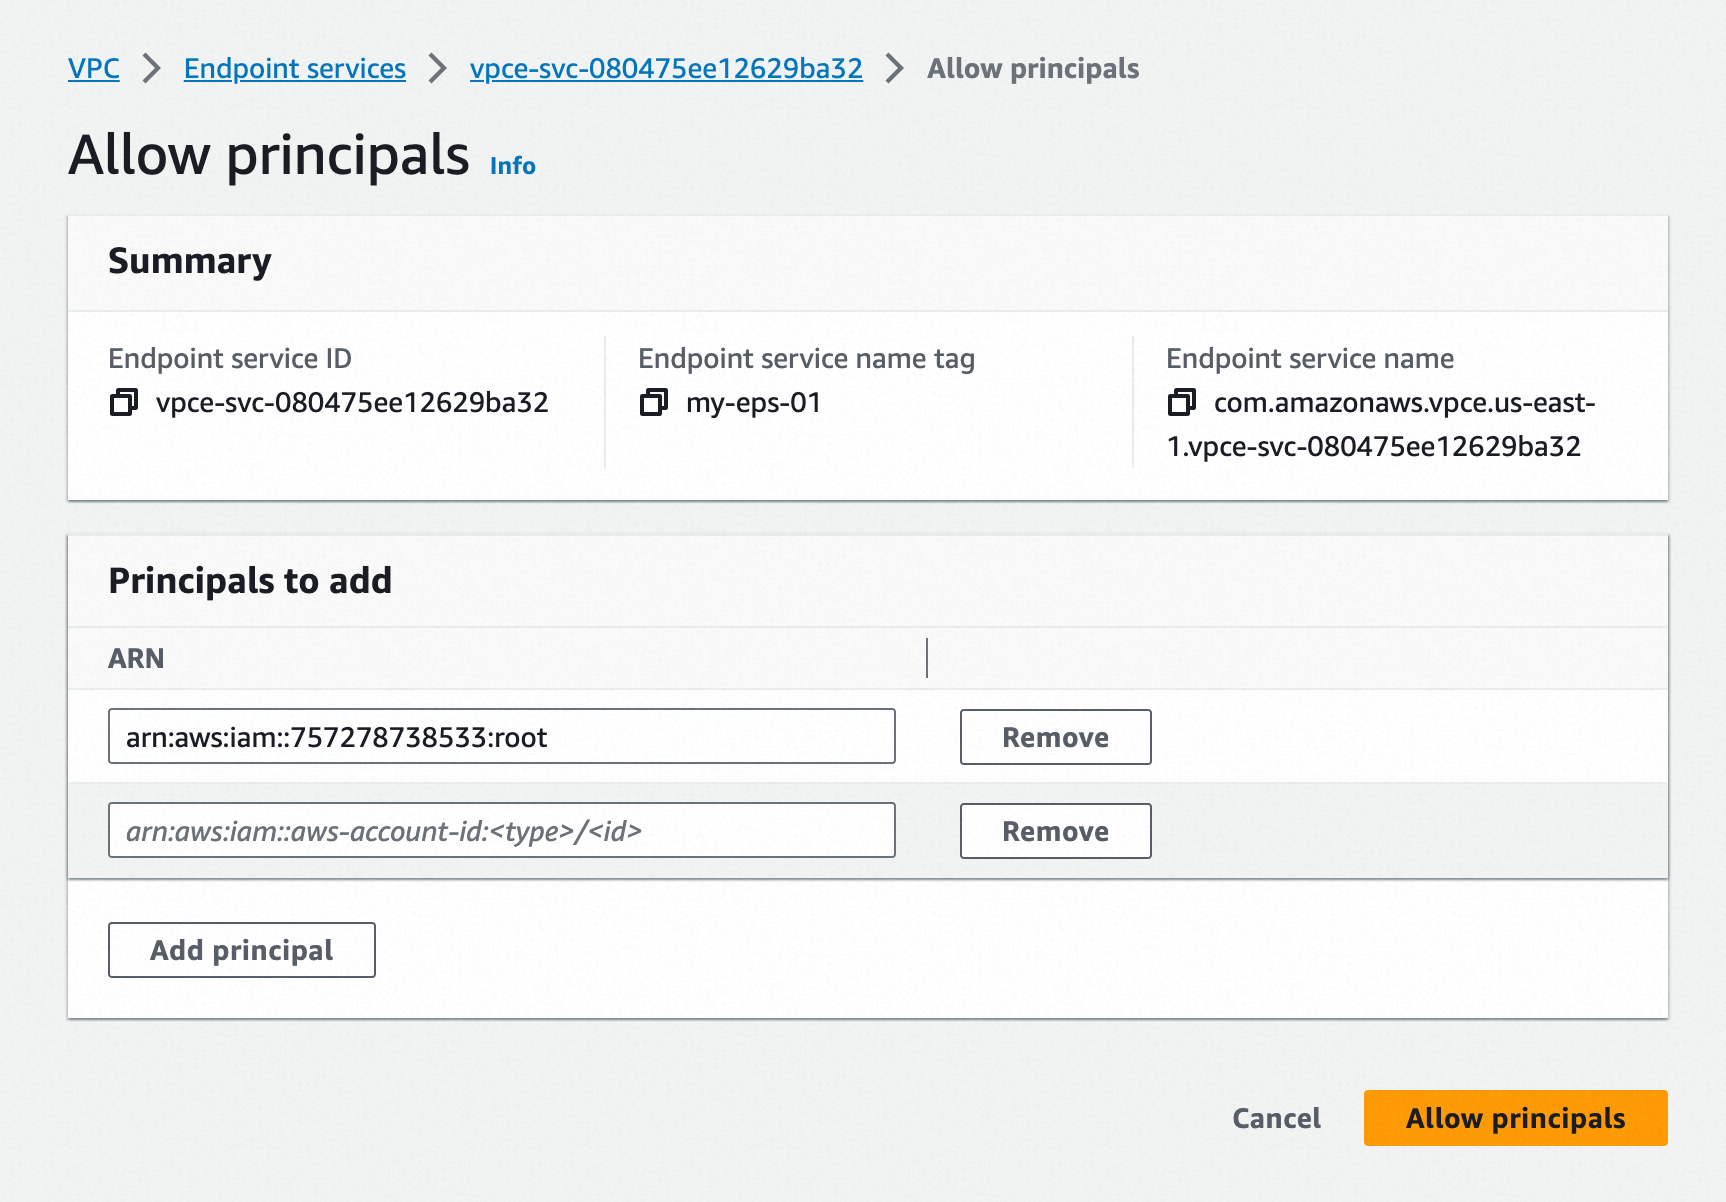
- After creating the endpoint service, add the ARN of VeloDB in the Allow principals Tab of the endpoint service.
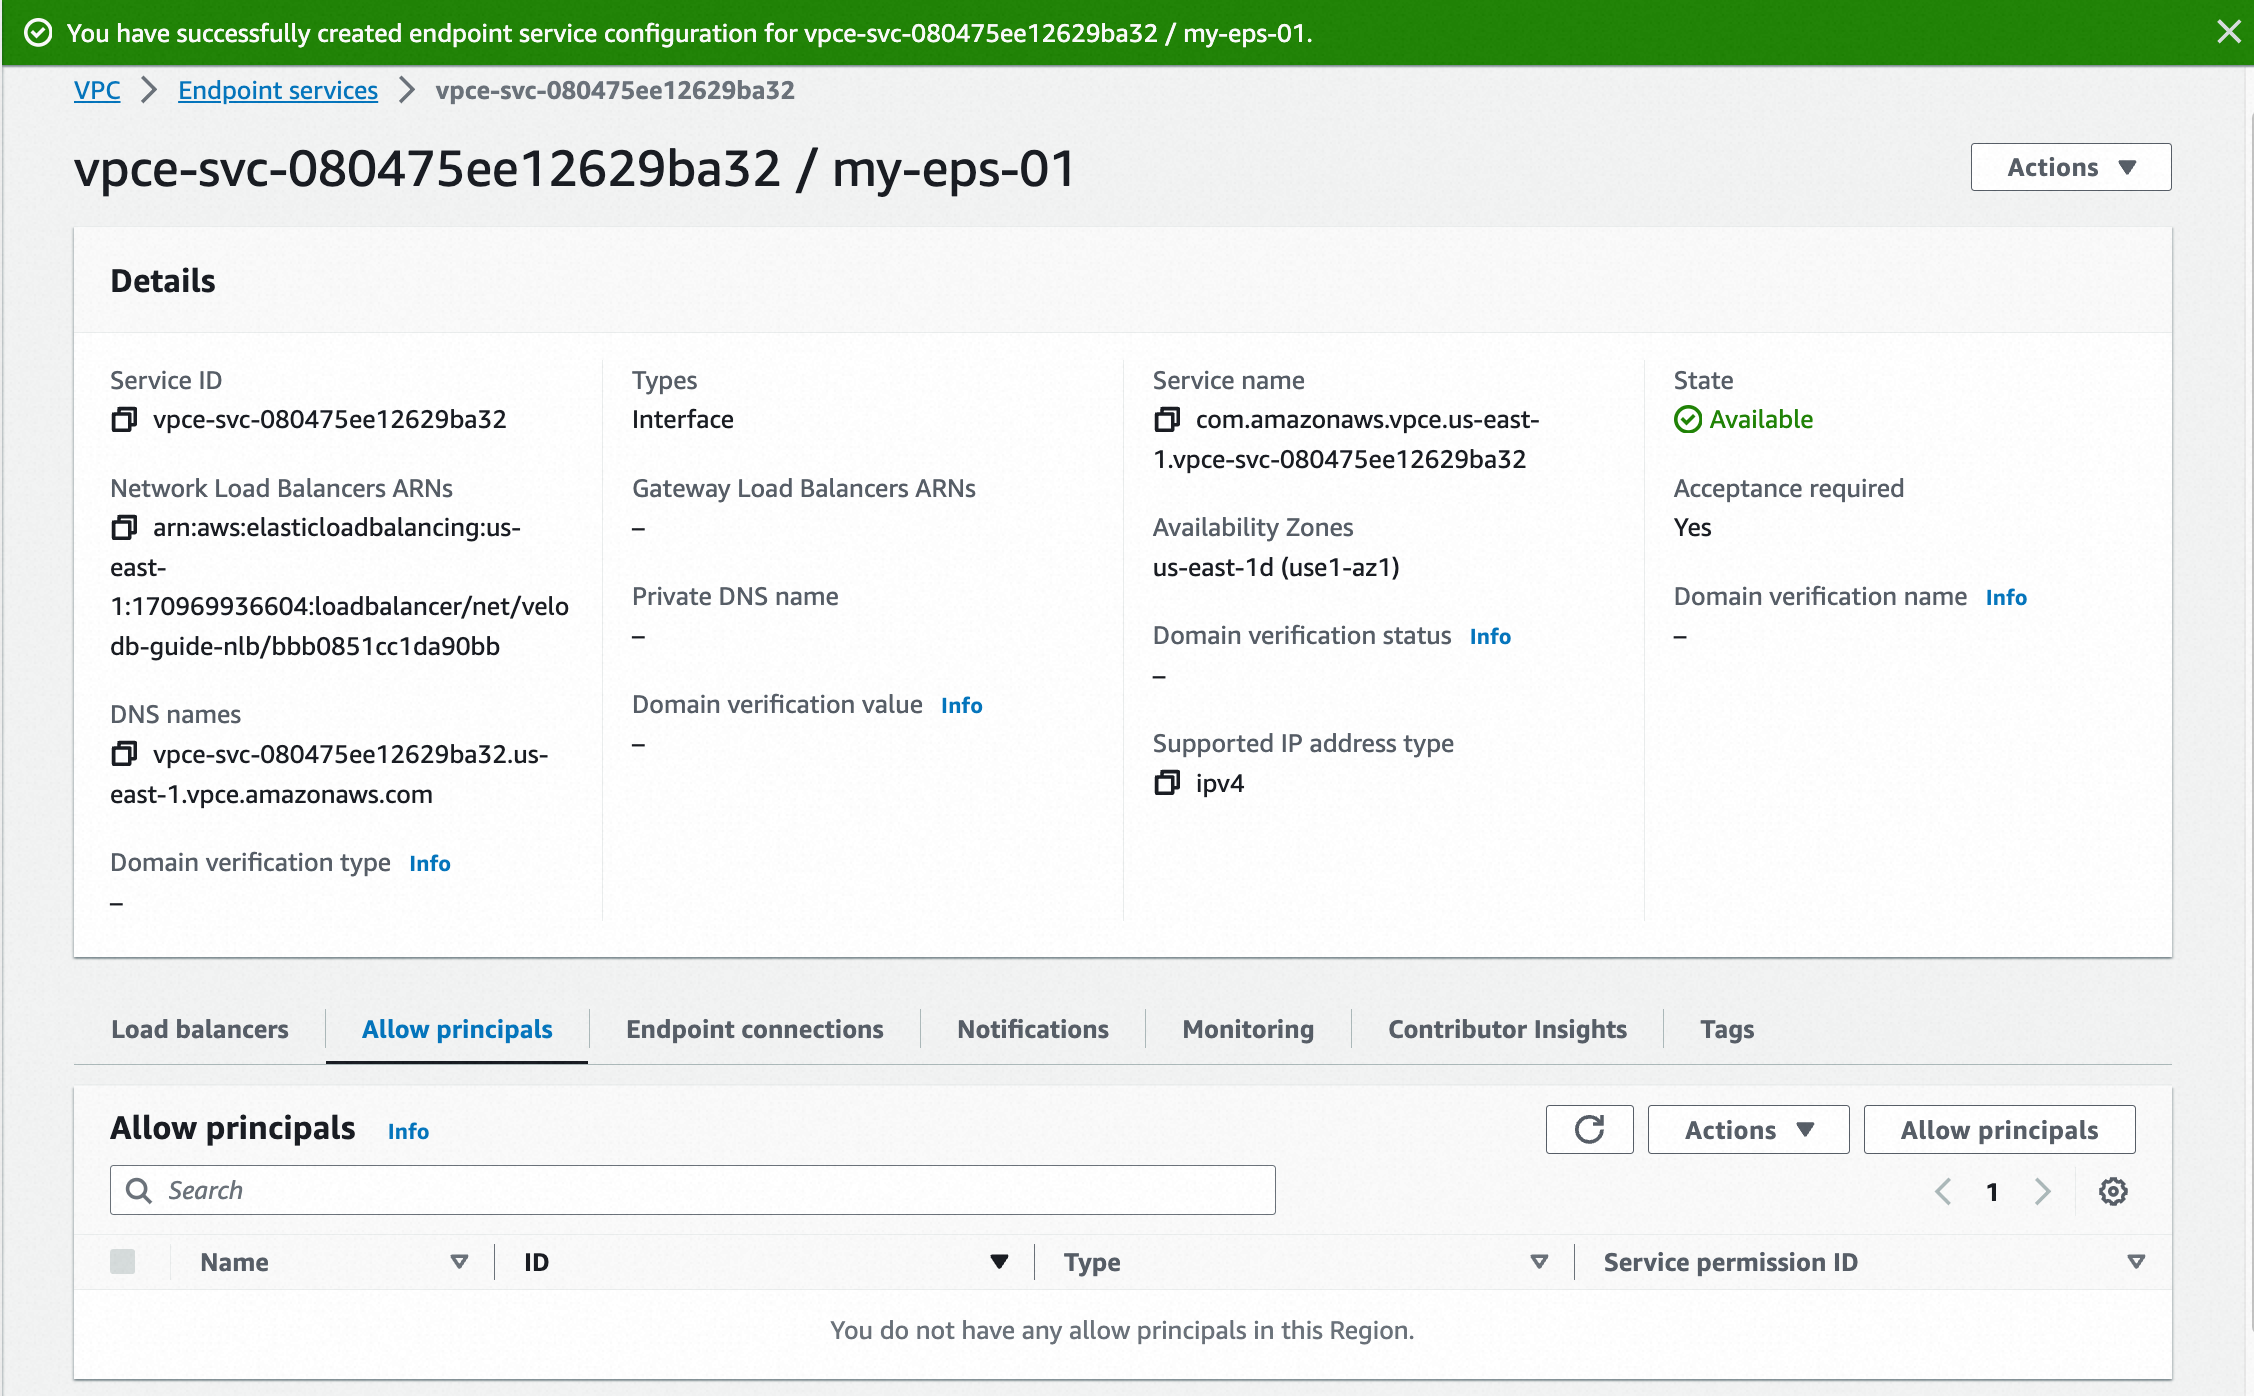
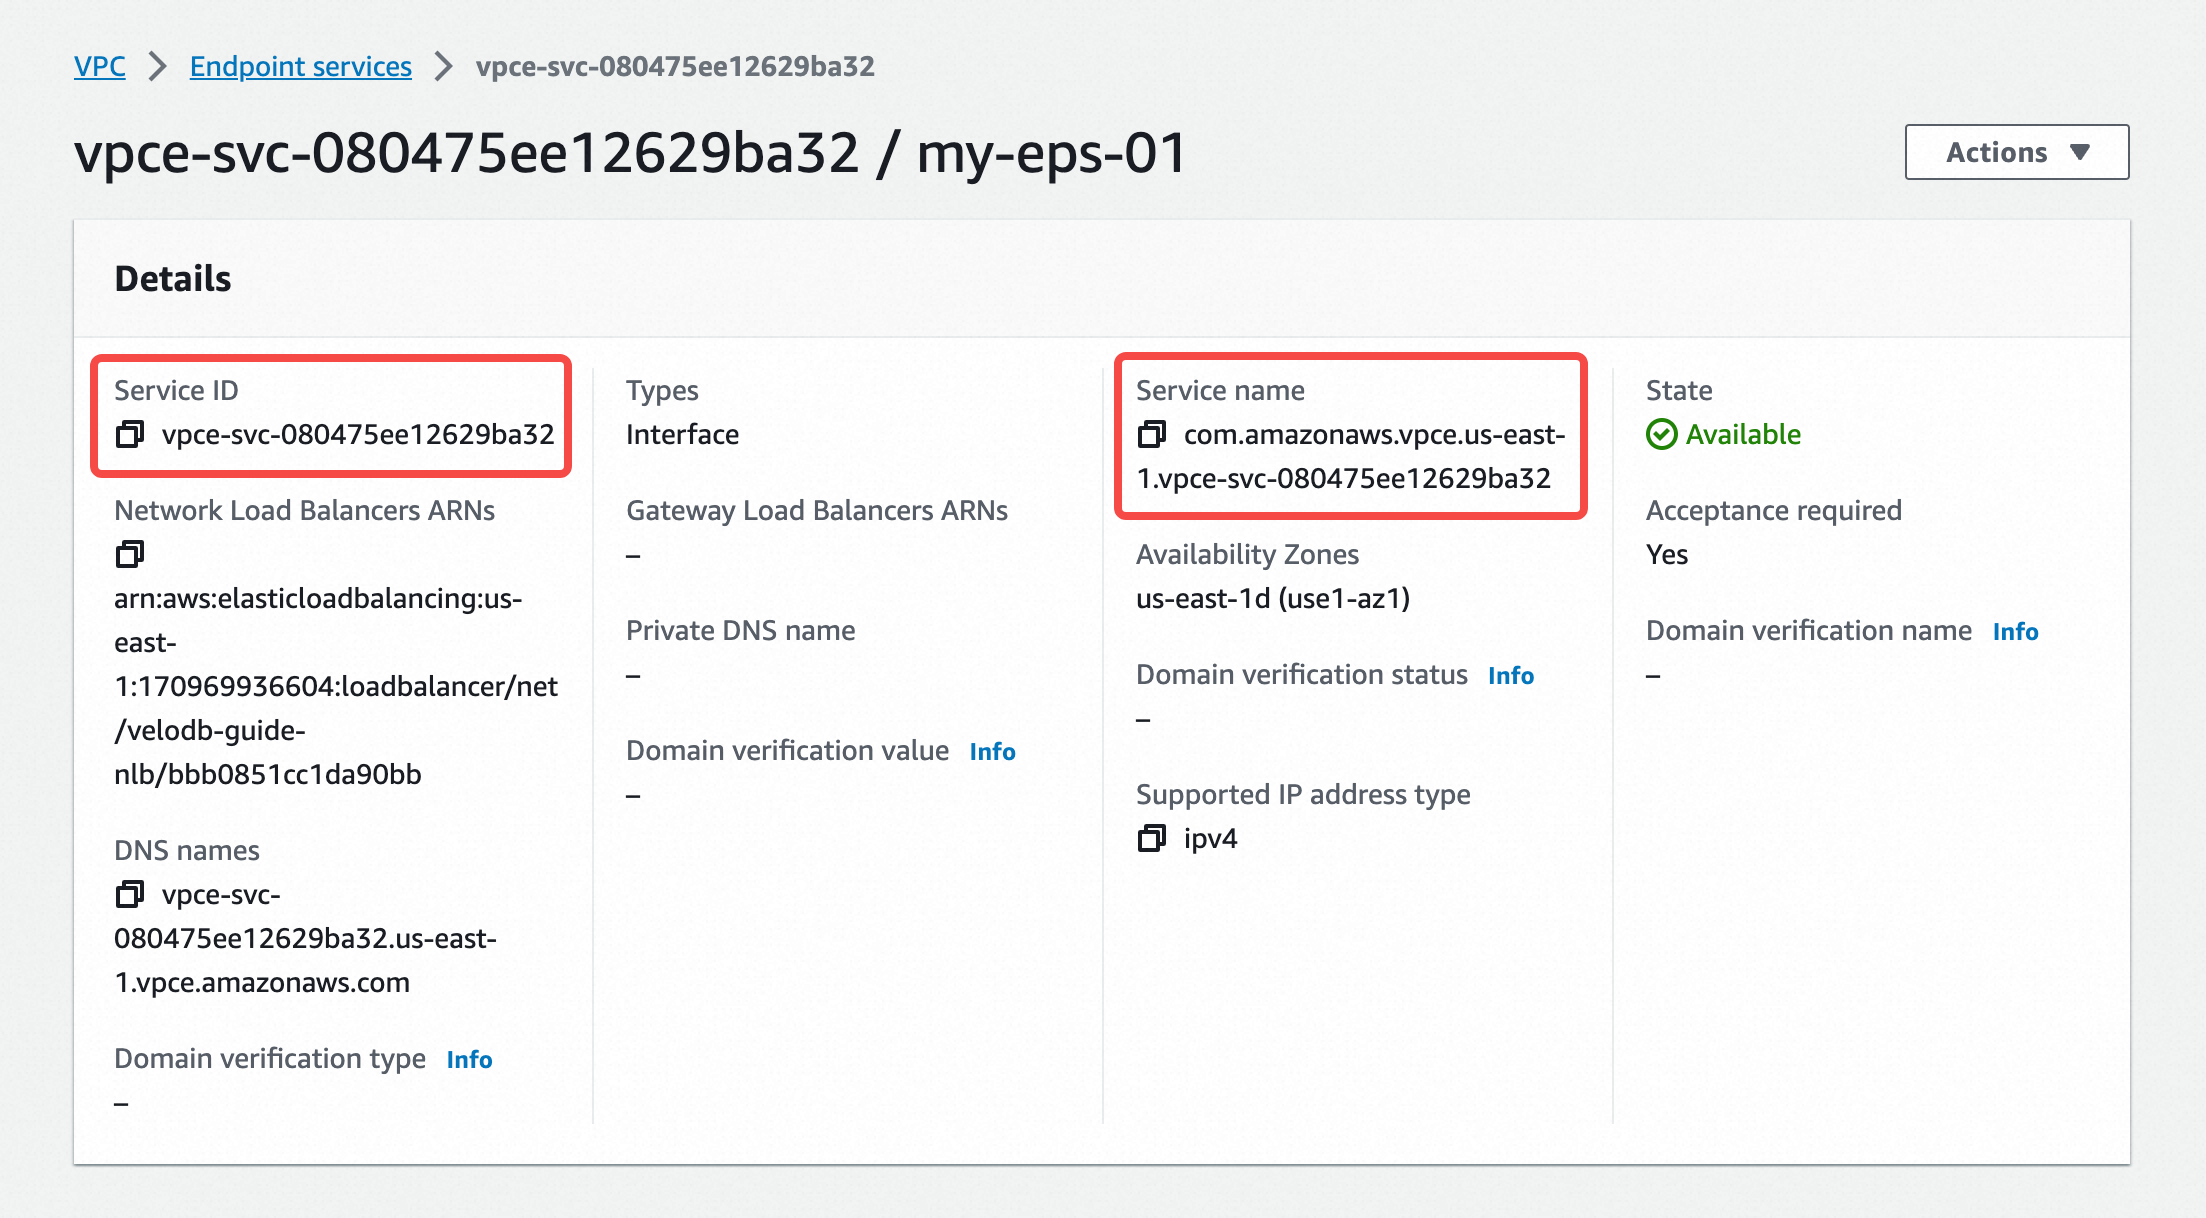
- Copy the Service ID and Service Name from the Endpoint Service Details page, and fill them in the Endpoint Service registration page of VeloDB Cloud.
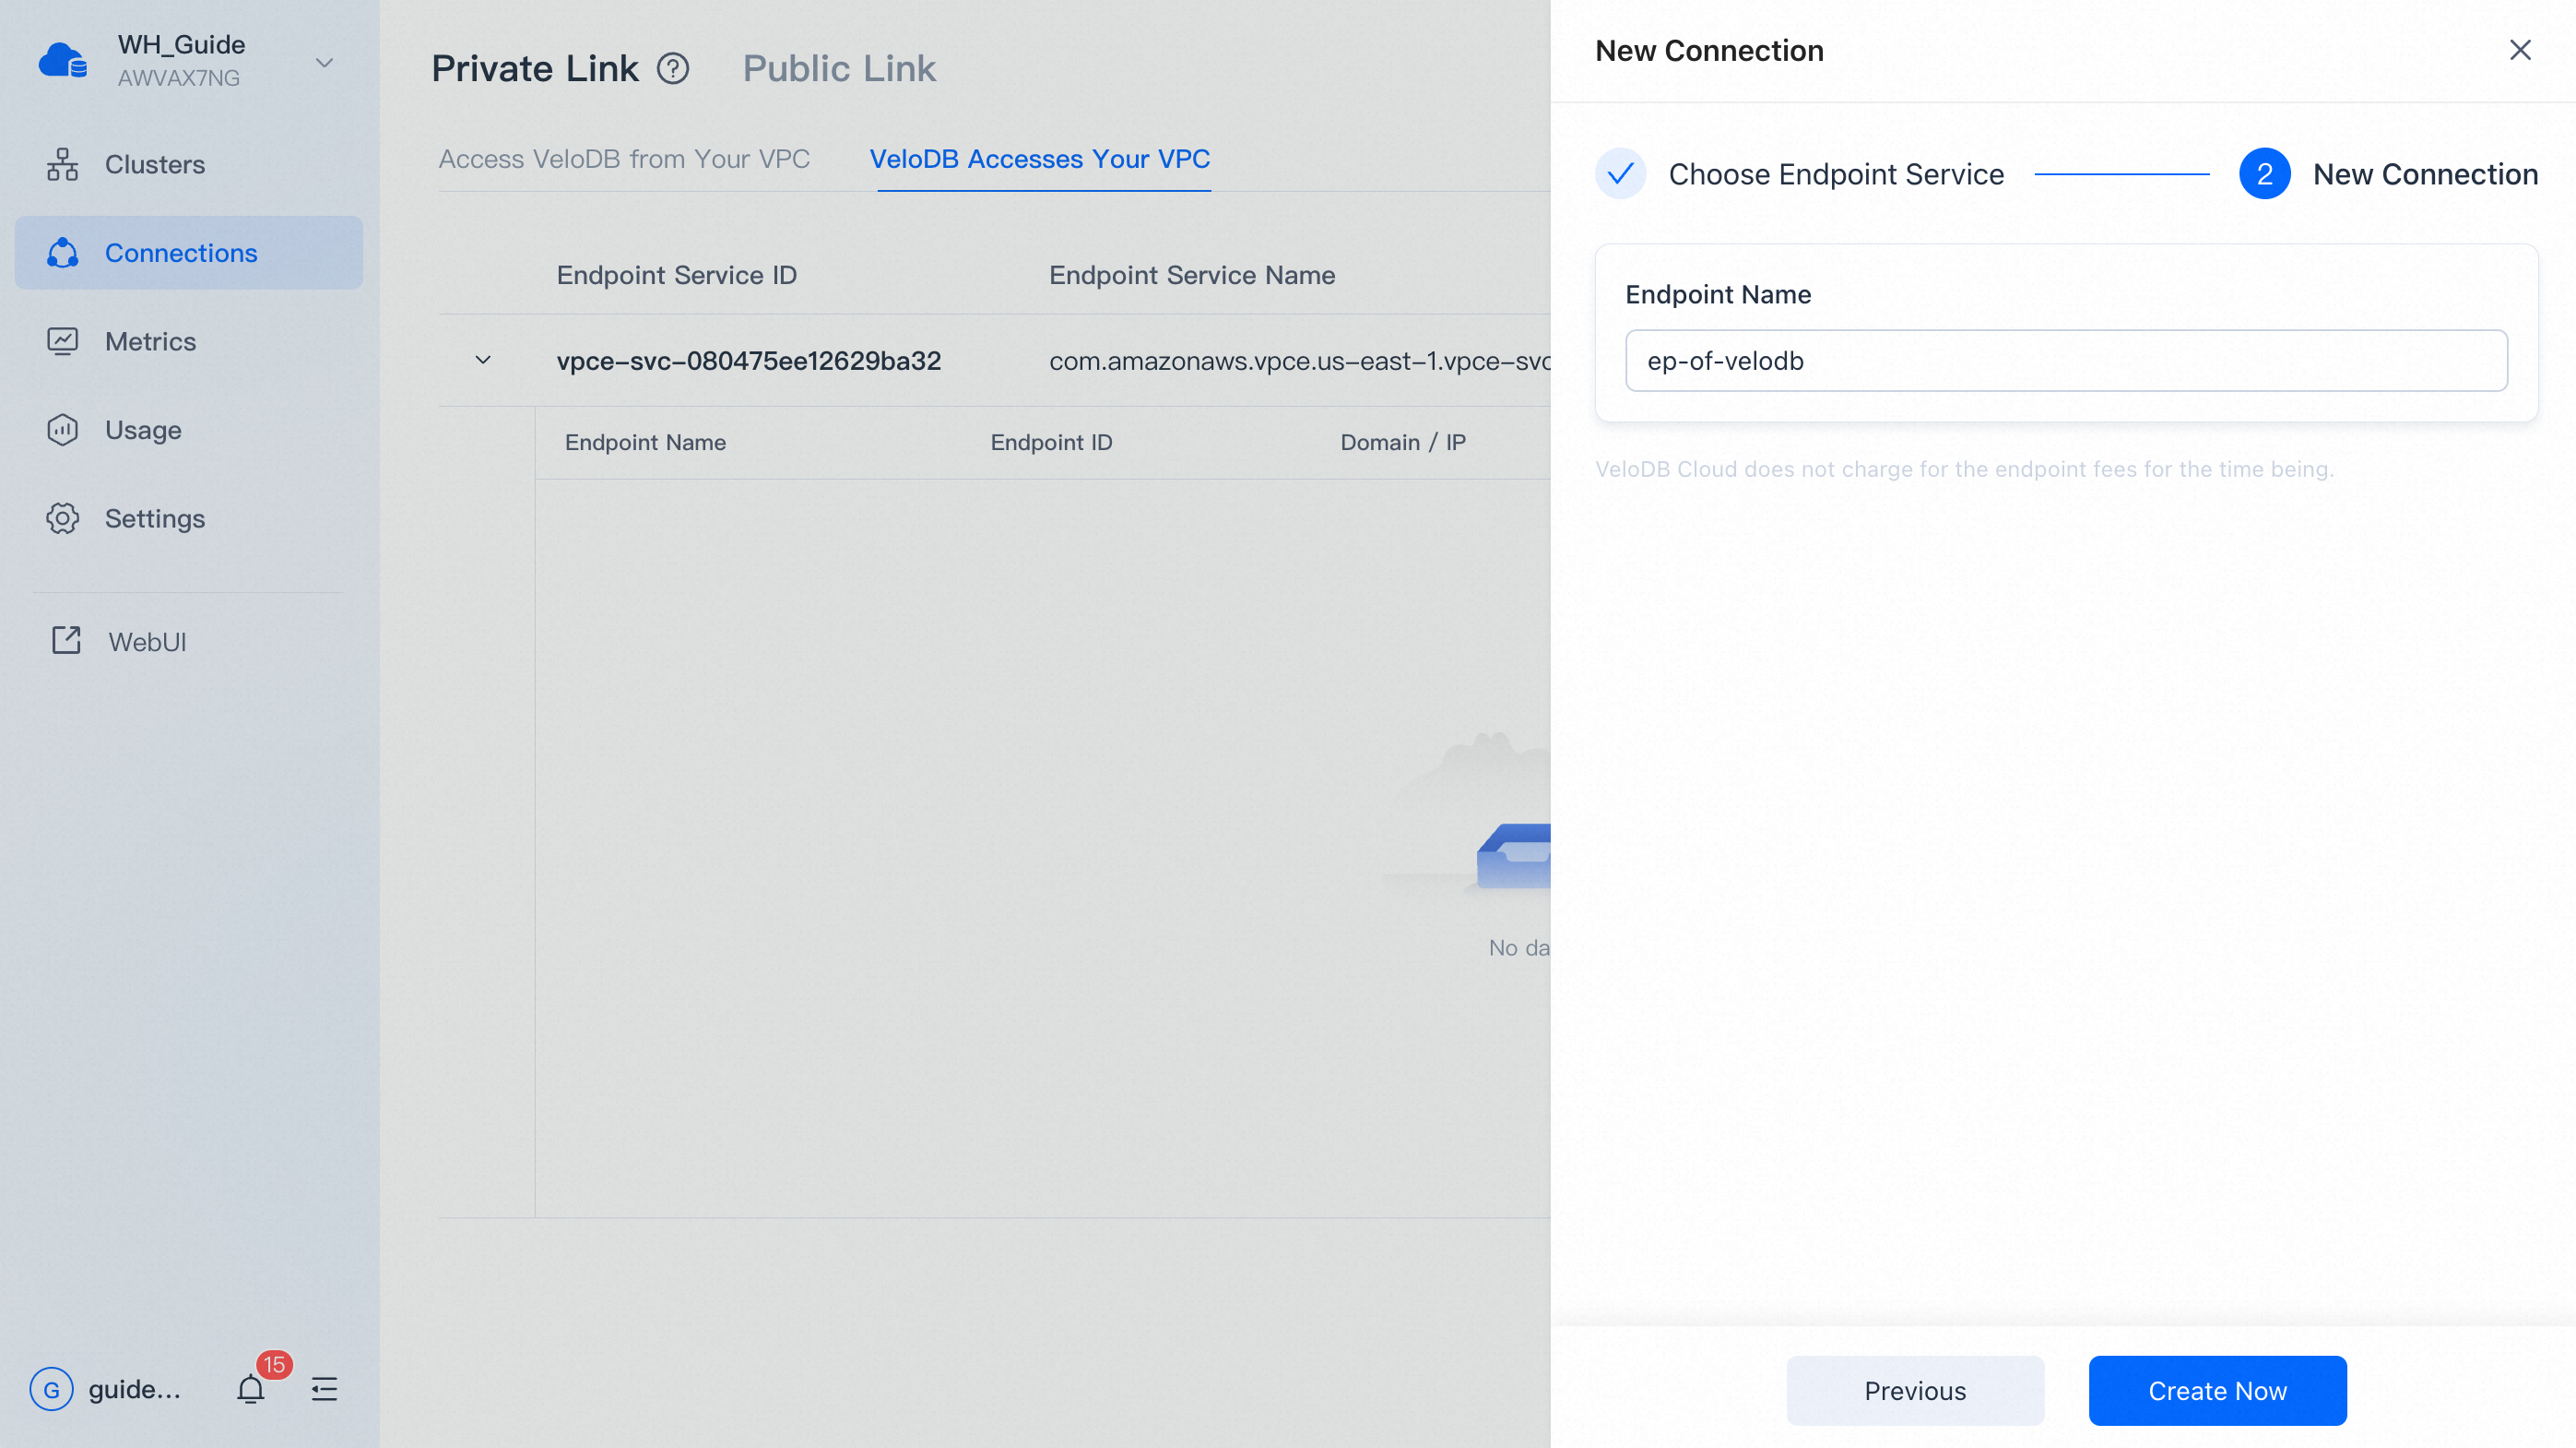
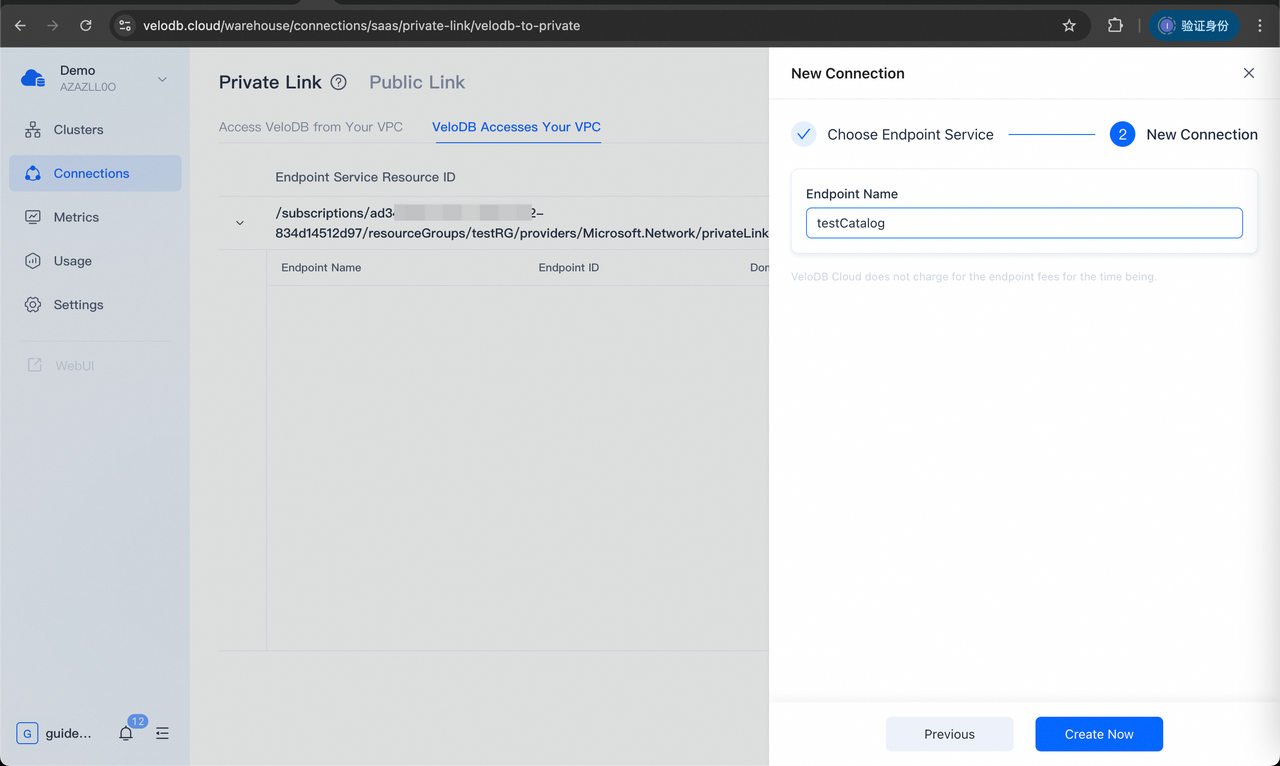
- After the registration is complete, go to the next step, specify the Endpoint Name of VeloDB Cloud warehouse, and click Create Now.

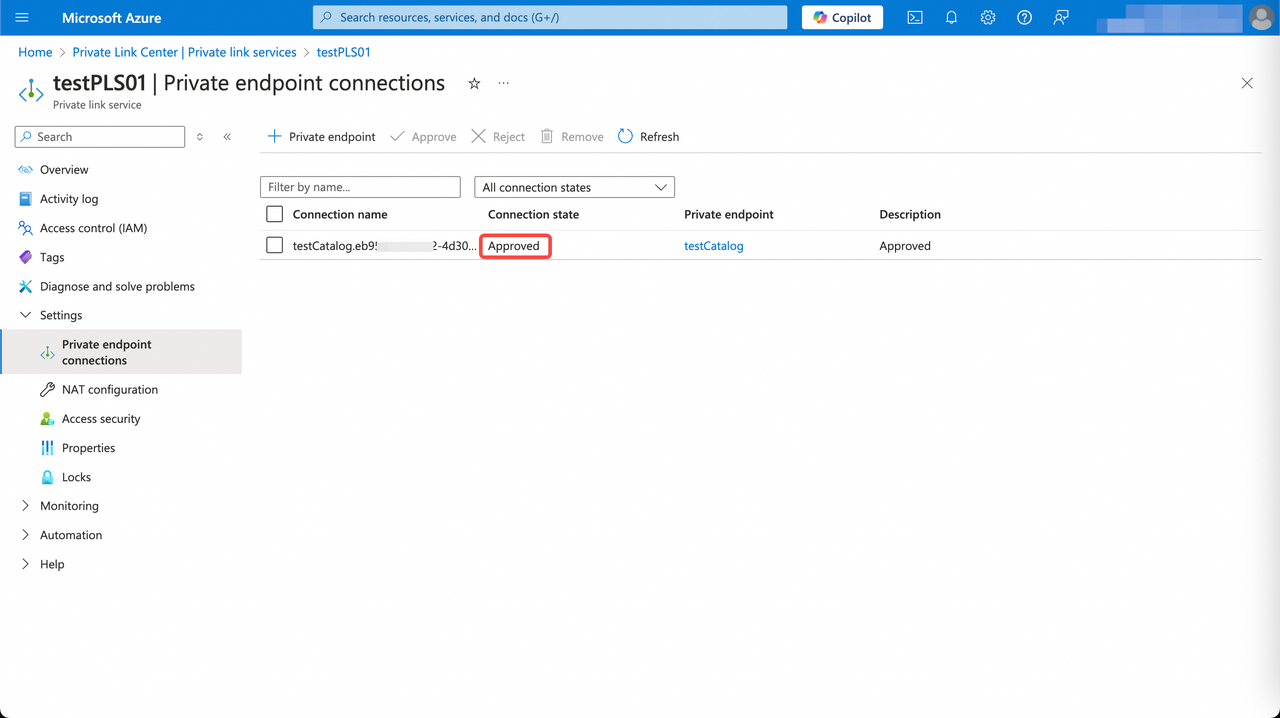
- Accept endpoint connection request in the Endpoint connections Tab of the endpoint service.

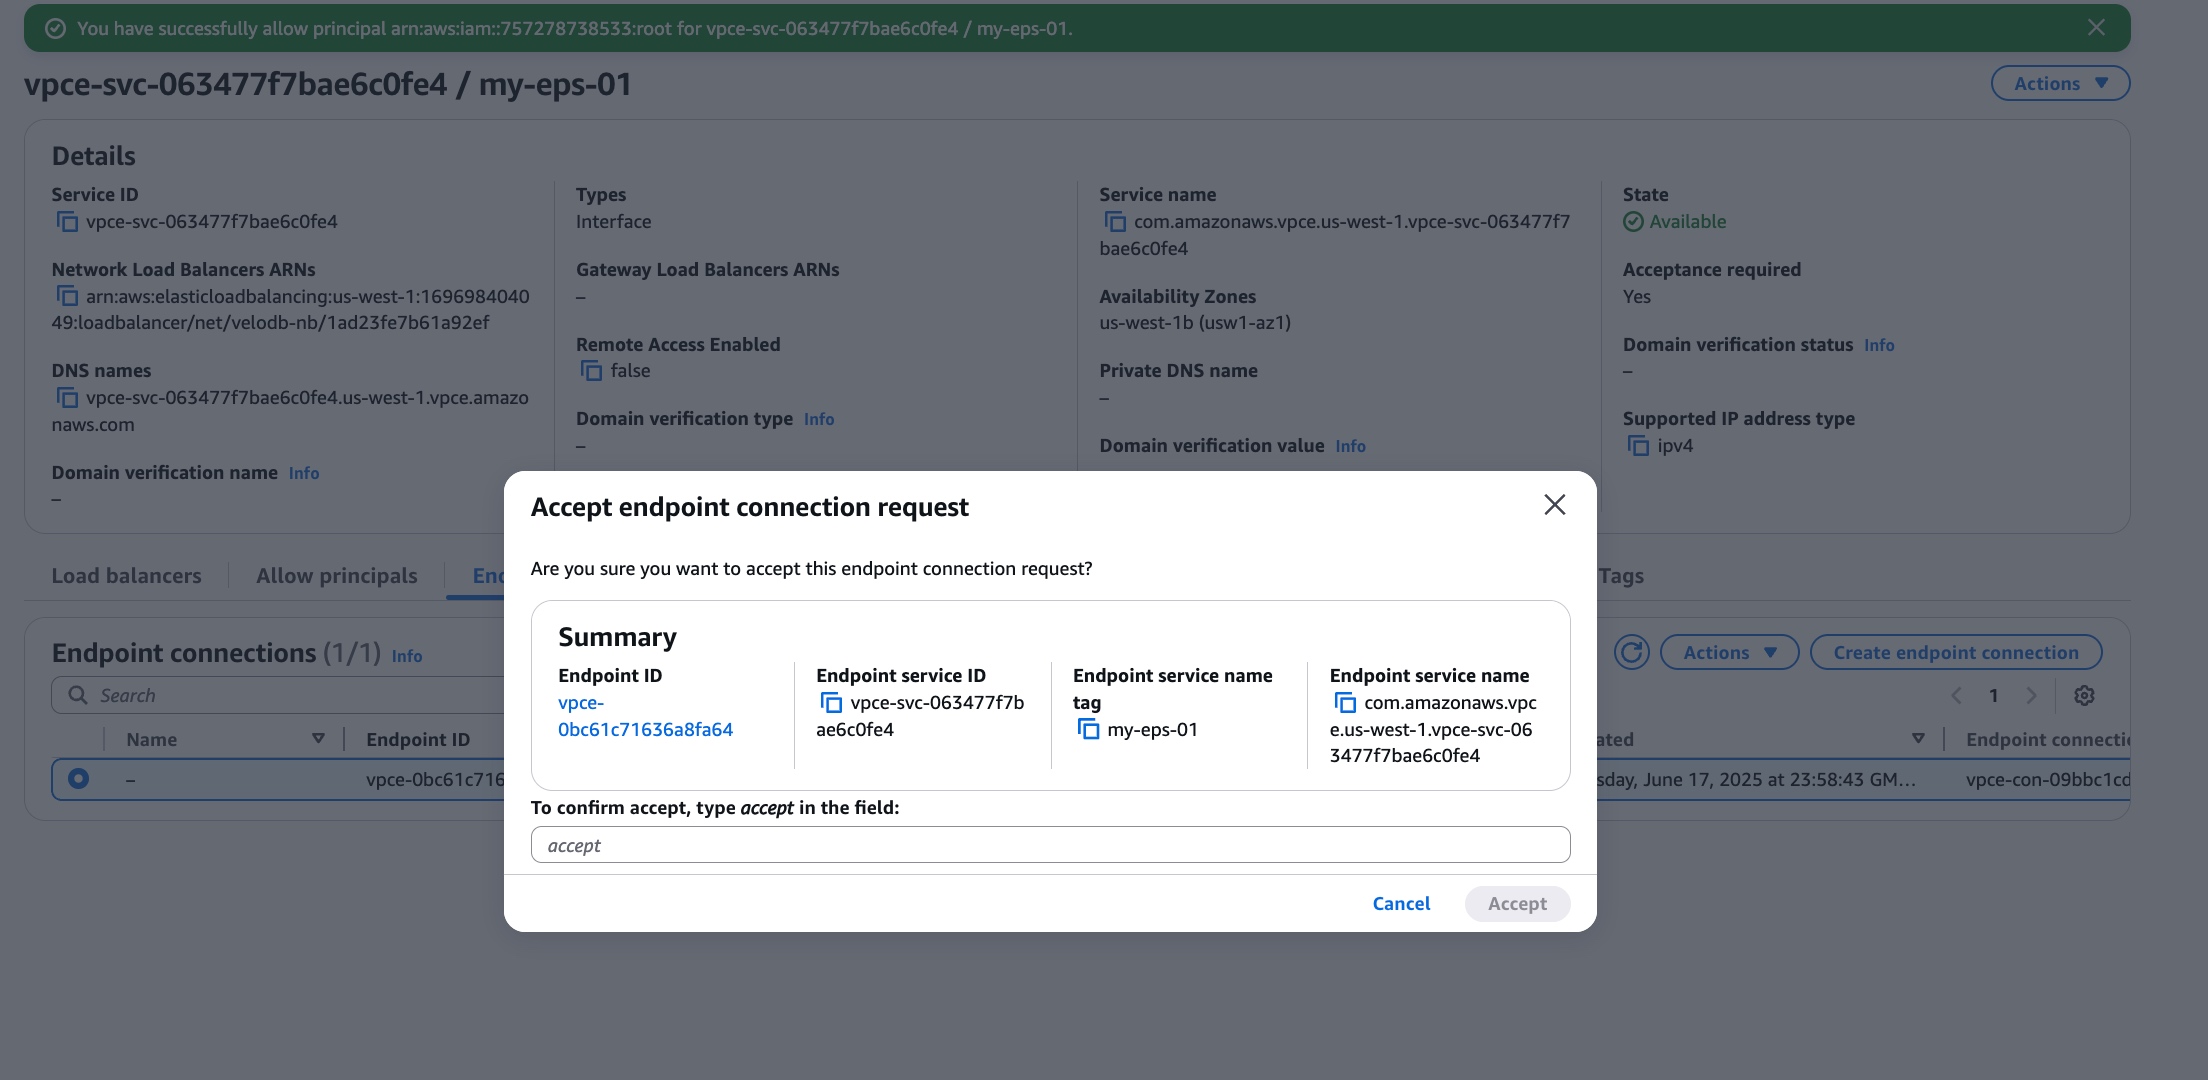
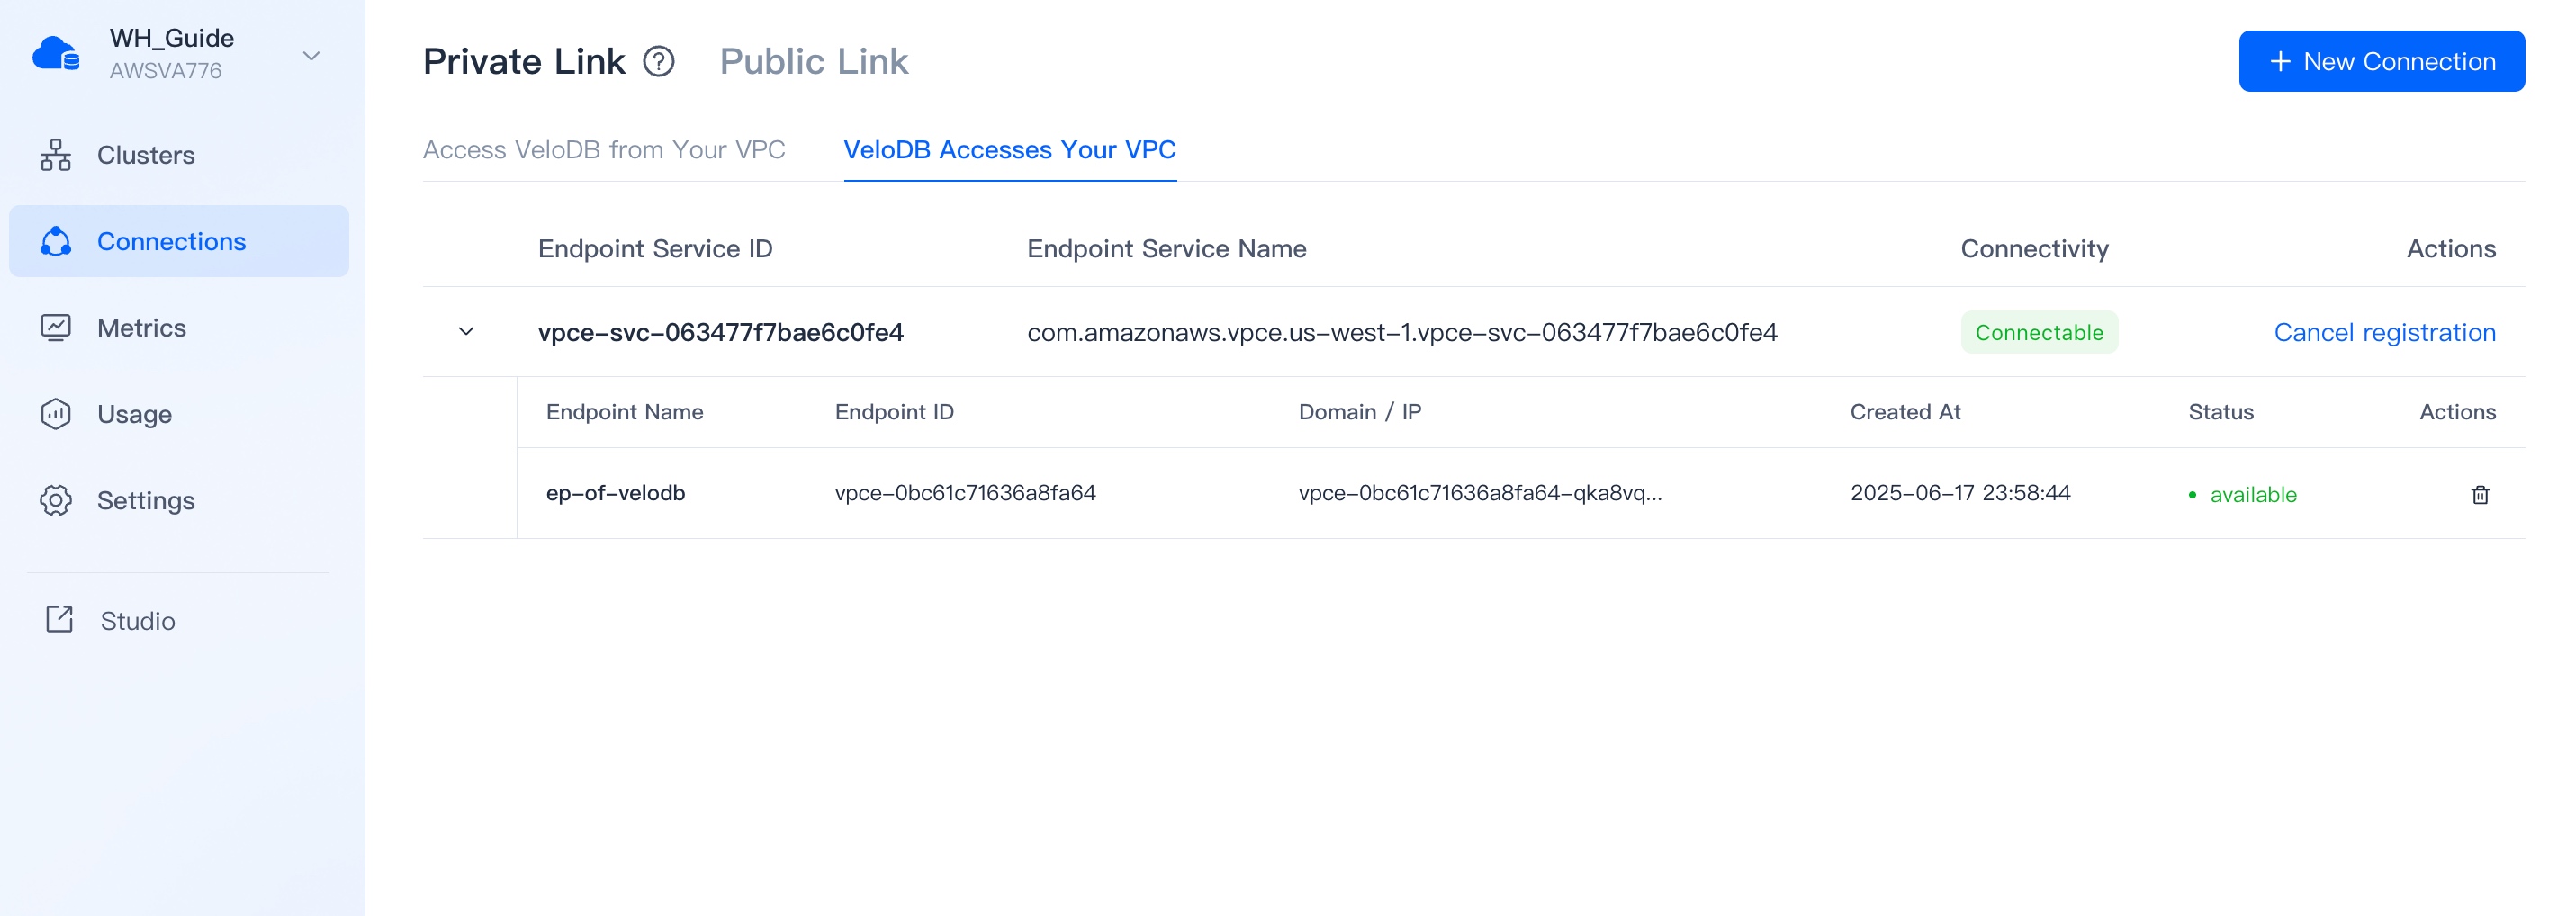
- Refresh the page and wait for the status of the endpoint of VeloDB Cloud warehouse to be changed from "pendingAcceptance" to "available", which means the connection is successful.
Azure
- Switch to the target warehouse, click Connections on the navigation bar, and click New Connection for VeloDB Accesses Your VPC on the Private Link tab to create a connection to your endpoint service.
- After clicking + Endpoint Service, the page will display the Current Region of the warehouse and the Subscription ID of VeloDB. You can click Go to Create to go to the cloud platform's Private Link product console and create an endpoint service (This refers to Azure private link service).
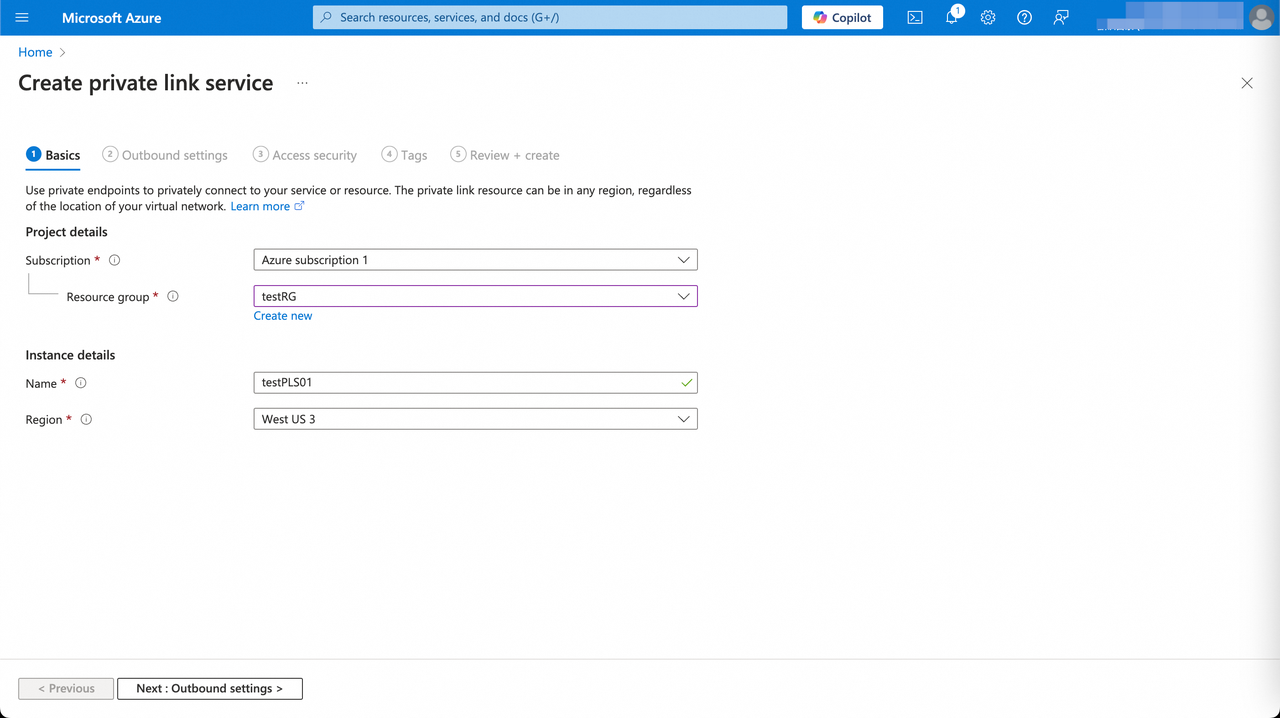
- Sign in to the Azure portal with your Azure account. In the Basics tab of the Create private link service page on the Private Link product console, you need to confirm that the region is the same as the VeloDB Cloud warehouse (limited by the cloud platform's Private Link product). Follow the wizard prompts to fill in the form as follows and click Next: Outbound settings.
| Parameter | Category | Description |
|---|---|---|
| Subscription | Project details | Required. Select the subscription to create the private link service for database or datalake. All resources in an Azure subscription are billed together. |
| Resource group | Project details | Required. Select a resource group for the private link service to be created in it. If there is no suitable one, you can create a new one. A resource group is a collection of resources that share the same lifecycle, permissions, and policies. |
| Name | Instance details | Required. The instance name of the private link service to be created. You can customize it. |
| Region | Instance details | Required. Select the Azure region for the private link service to be created and located in it.Note: You need to select the region is the same as the VeloDB Cloud warehouse (limited by the cloud platform's Private Link product). |
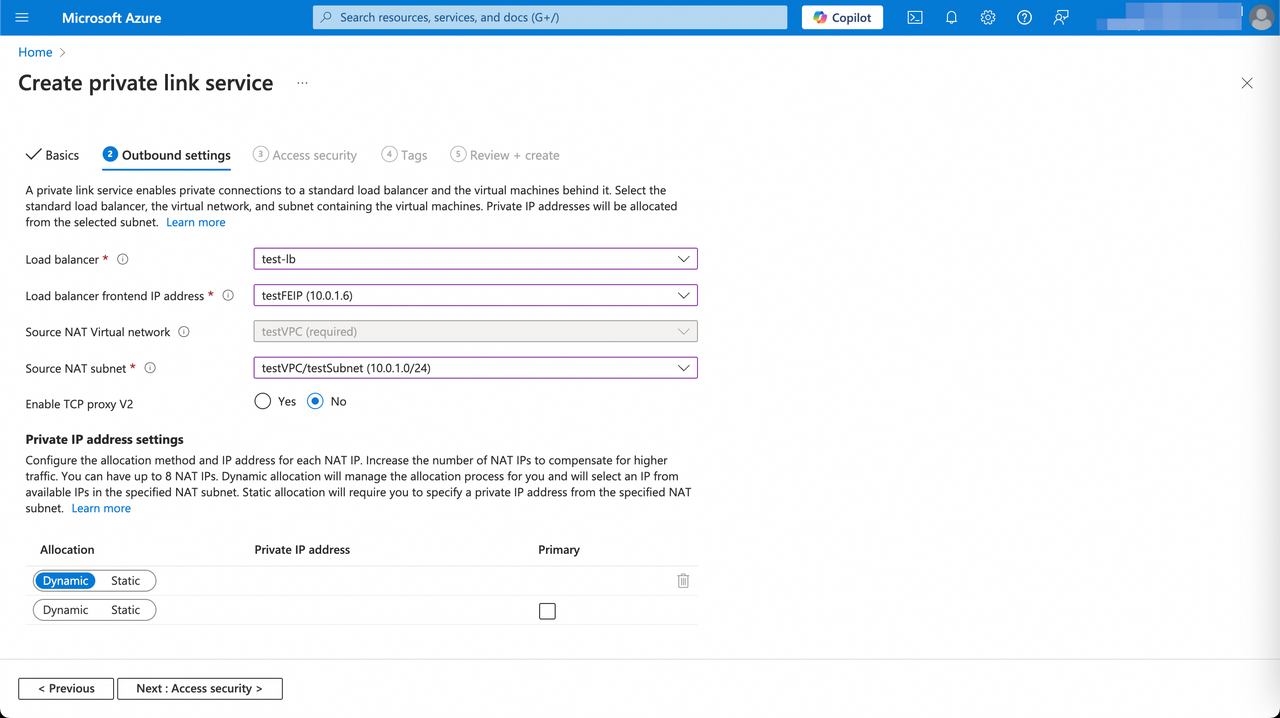
- In the Outbound settings tab of the Create private link service page. Follow the wizard prompts to fill in the form as follows and click Next: Access Security.
| Parameter | Description |
|---|---|
| Load balancer | Required. Select a load balancer behind the private link service to load balances database or datalake. If there is no suitable one, you can create a new one on the cloud platform's Load Balancer product console. |
| Load balancer frontend IP address | Required. Select frontend IP address of the load balancer you selected above. |
| Source NAT Virtual network | Required. |
| Source NAT subnet | Required. |
| Enable TCP proxy V2 | Required. Leave the default of No. If your application expects a TCP proxy v2 header, select Yes. |
| Private IP address settings | Leave the default settings |
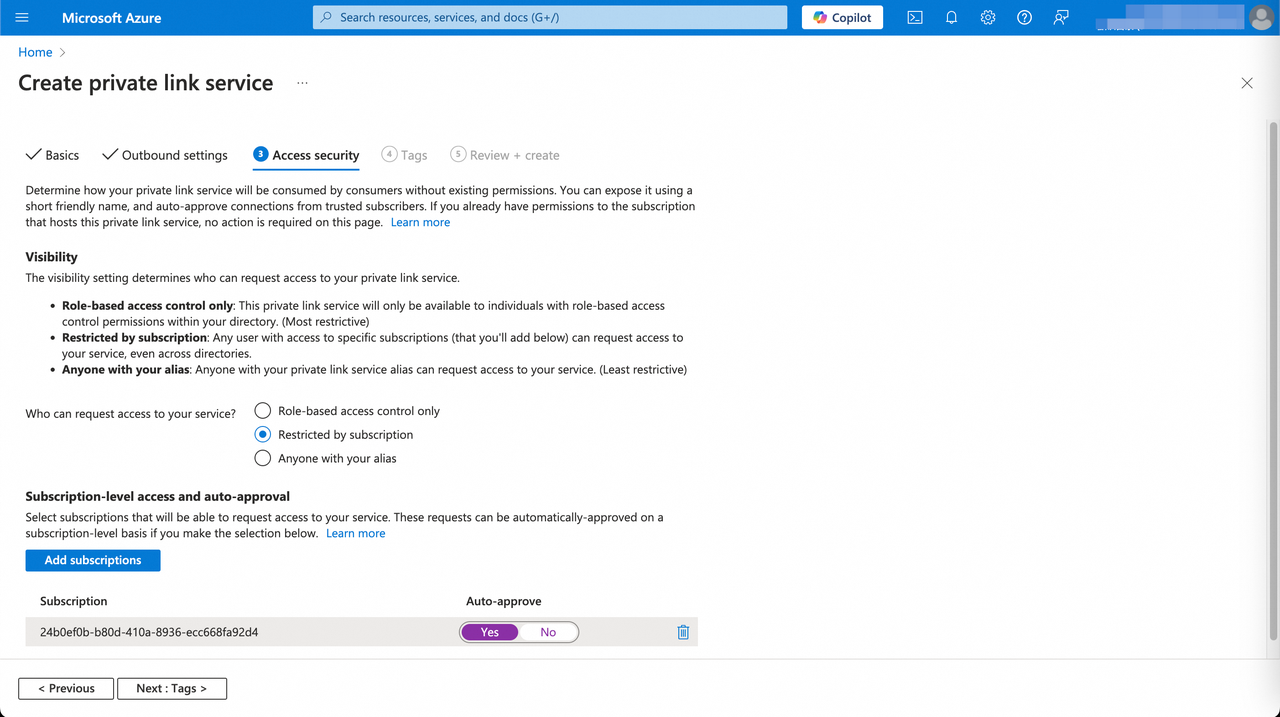
- In the Access Security tab of the Create private link service page, you need to choose Restricted by subscription for whom can request access to the private link service, and add the Subscription ID of VeloDB into the access whitelist of the private link service and choose Yes for auto-approve. Then click Next: Tags.
- In the Tags tab of the Create private link service page, keep the default settings and click Next: Review + create. Note: If you want to categorize the private link service and view consolidated billing, you can configure the tag for the private link service to be created.
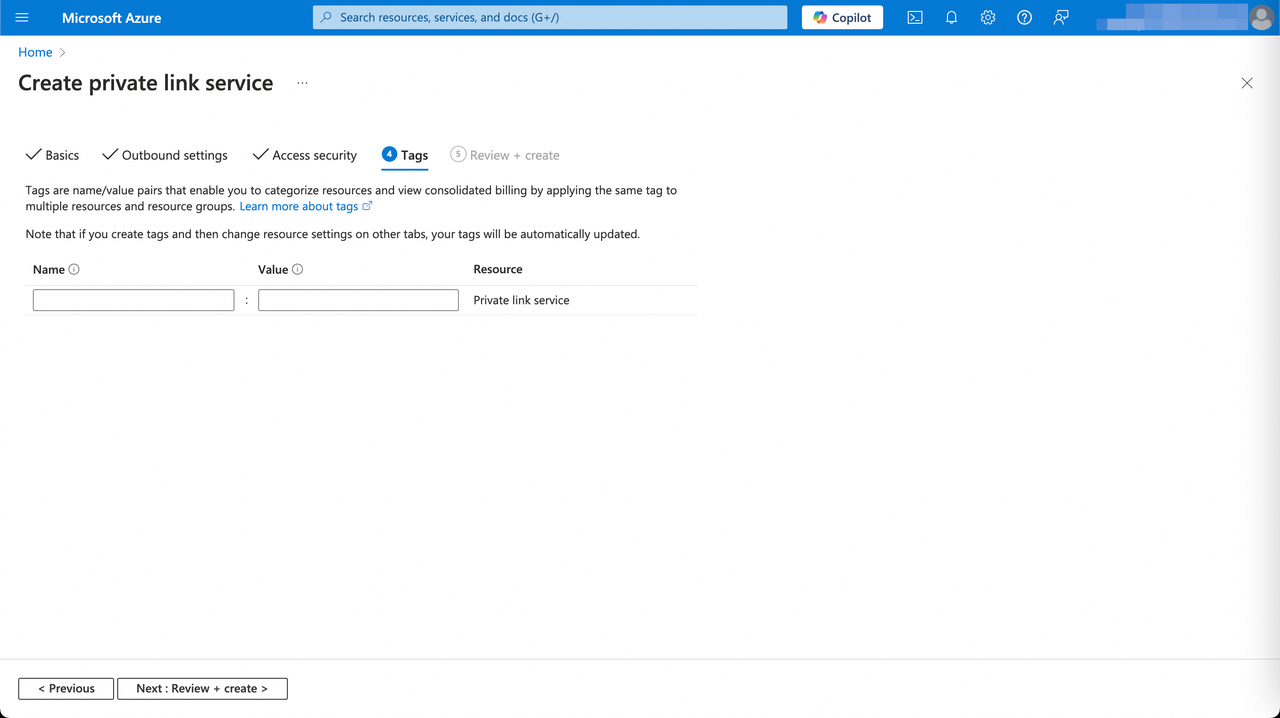
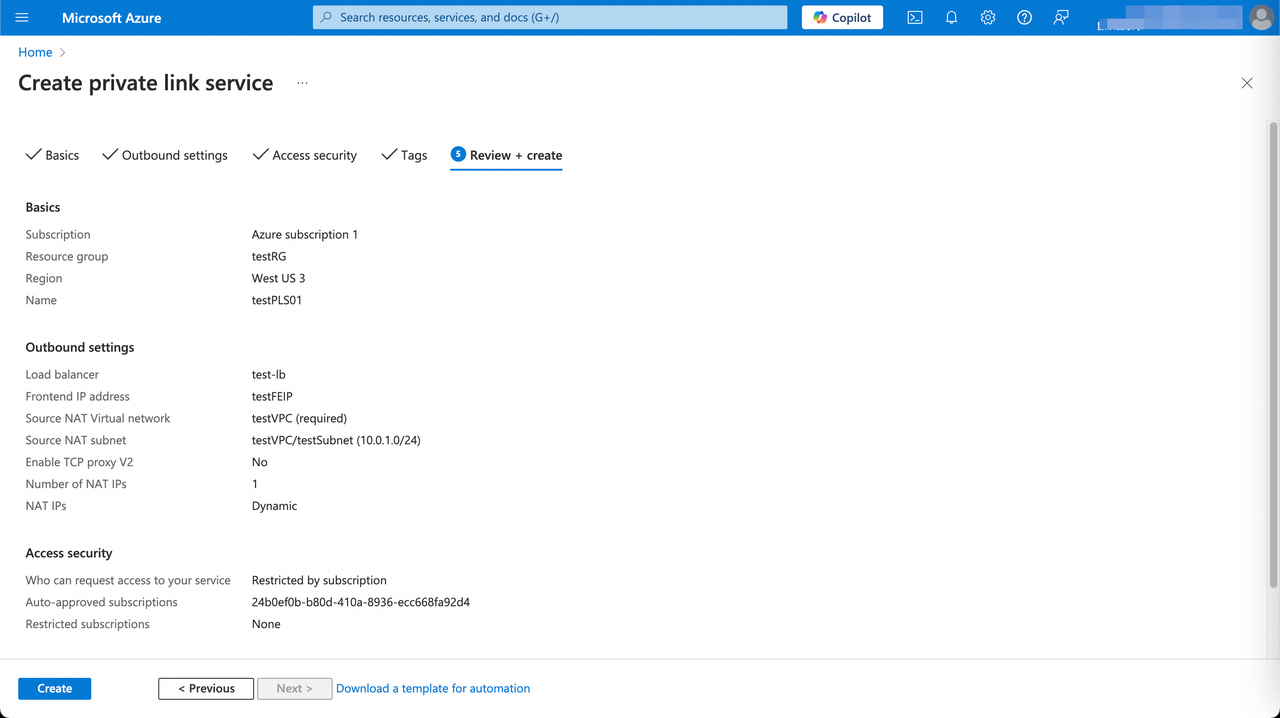
- In the Review + create tab of the Create private link service page, you can review the settings for the private link service to be created. If some settings are not as expected, you can click Previous back to modify. If there is no problem, you can click Create.
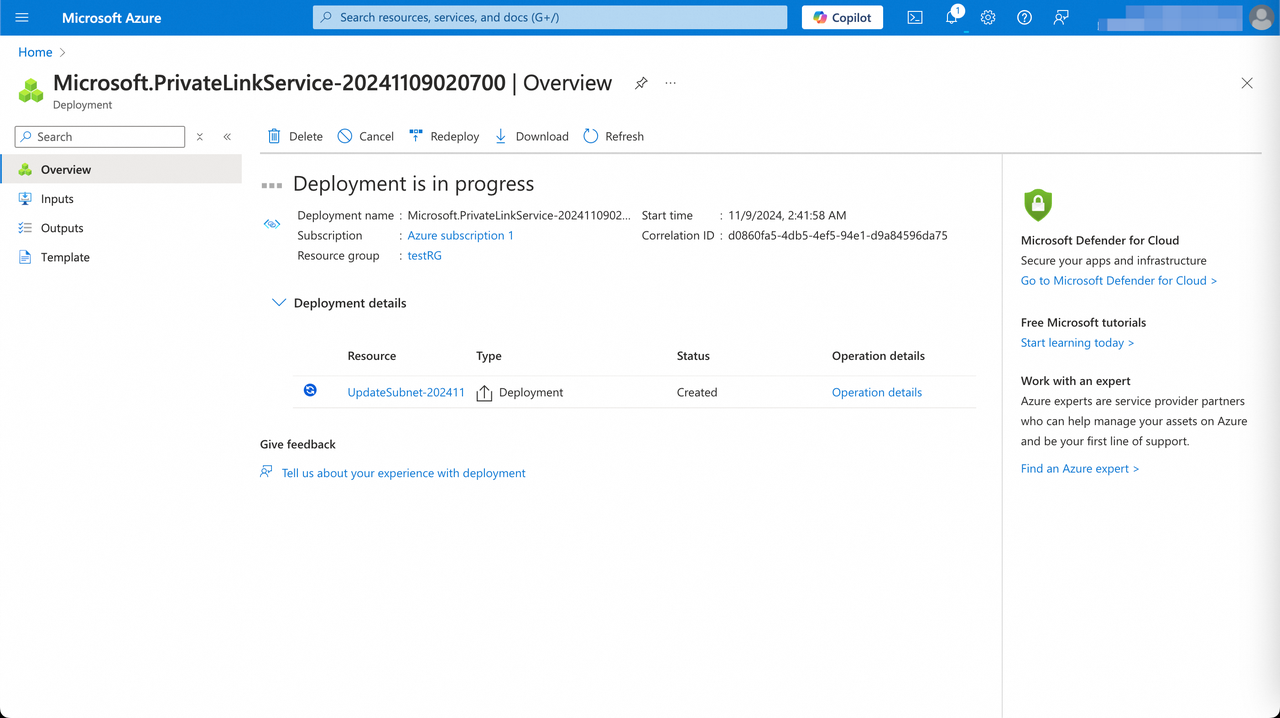
- After the private link service is created, its status will be changed from "Created" to "OK", indicating that the private link service has ready to be connected by the private endpoint of VeloDB Cloud warehouse.
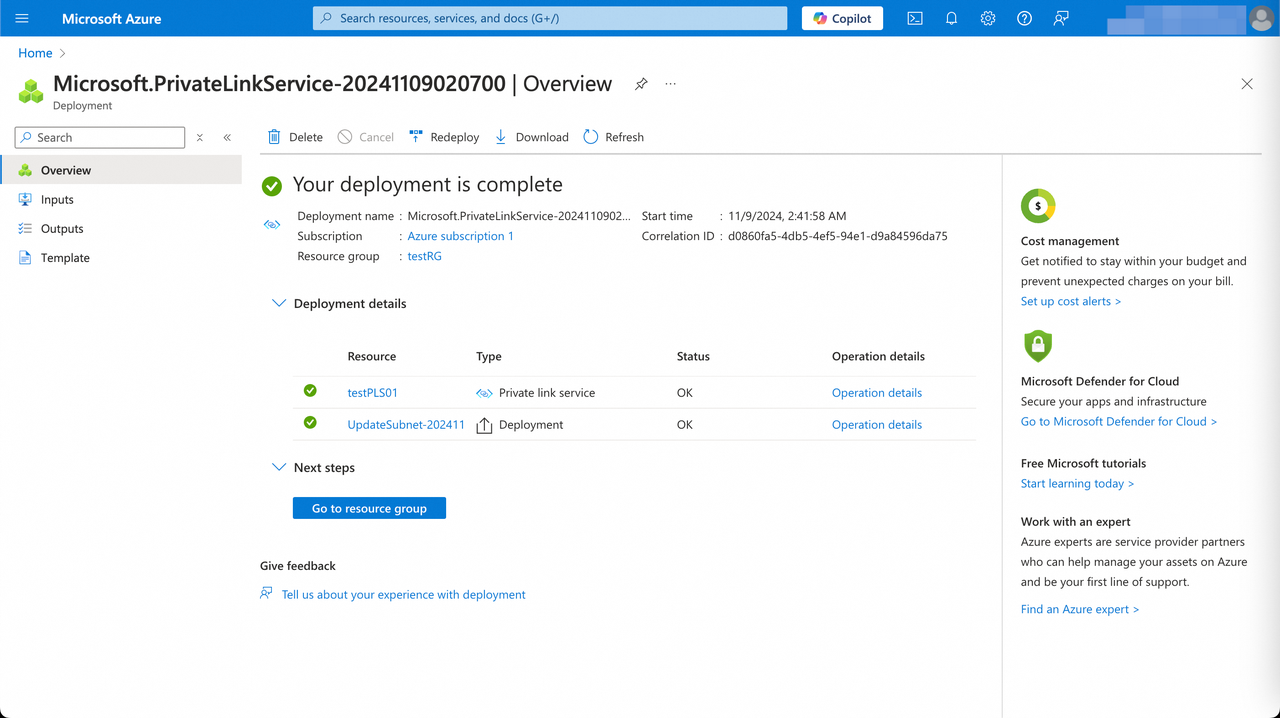
- After creating the private link service, copy the Rescource ID and Alias from the private link service Details page, and fill them in the Endpoint Service registration page of VeloDB Cloud.
- After the registration is complete, go to the next step, specify the Endpoint Name of VeloDB Cloud warehouse, and click Create Now.
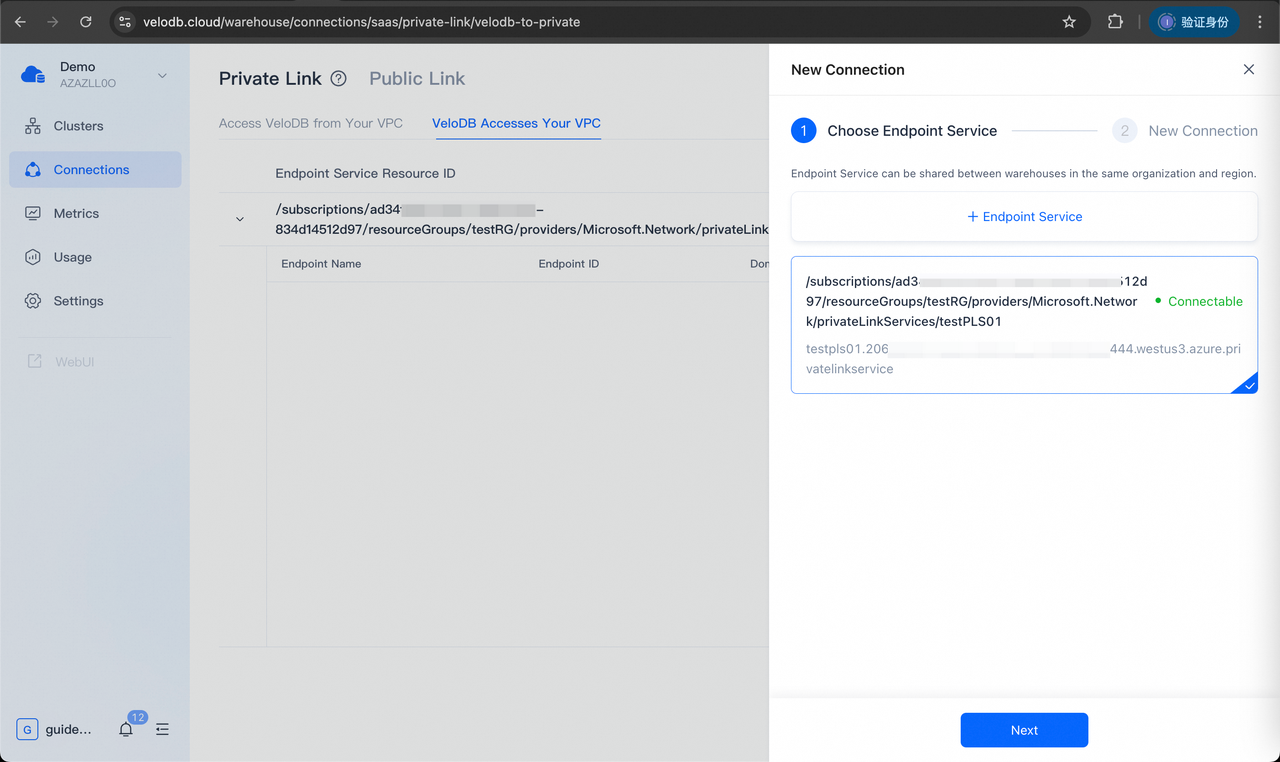
- Refresh the page and wait for the status of the endpoint of VeloDB Cloud warehouse to be changed from "pendingAcceptance" to "Approve", which means the connection is successful.

Public Link
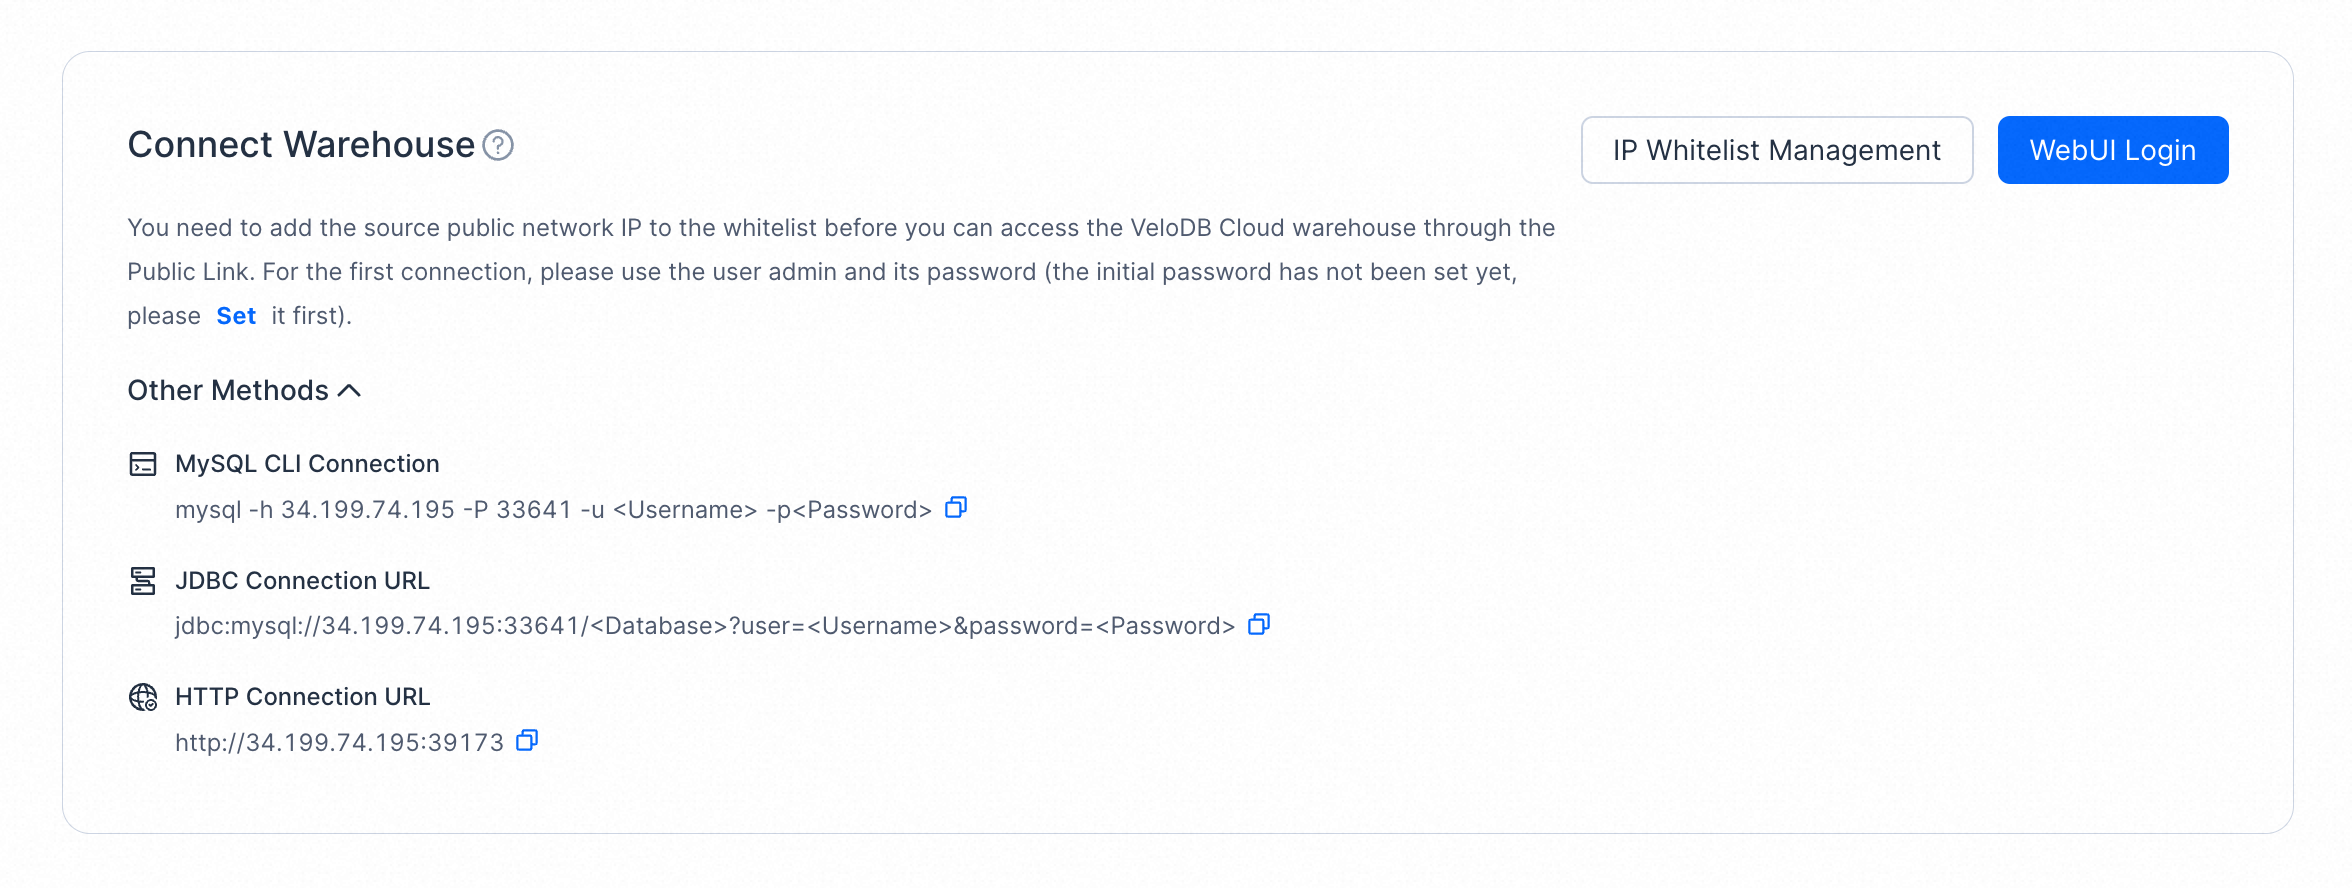
On the Connections page, switch to the Public Link tab to manage the public network connection.
Add IP Whitelist
In order to access the VeloDB Cloud warehouse via the public network, you need to add the source public network IP address to the whitelist.
Click IP Whitelist Management on the right of the Connect Warehouse card to add the source IP addresses or segments.

In the IP whitelist, you can add or delete IP addresses to enable or disable their access to the warehouse.
Note By default, the IP segment 0.0.0.0/0 is set, which means the warehouse is completely open to the public network. It is recommended to remove it in time after use to reduce security risks.
Access Warehouse
After adding the source public network IP address to the whitelist, you can click WebUI Login to access the VeloDB Cloud warehouse through the public network. For the specific connection method, please refer to the Other Methods.