BYOC on AWS: Cloud Resource Preparation
This guide is a reference for cloud administrators preparing AWS resources for a VeloDB Cloud BYOC warehouse. Most of these resources can be created by the CloudFormation template used in Template Mode; create them manually only if you use Wizard Mode or you need tighter control over individual resources.
For the end-to-end warehouse-creation flow, see Create a BYOC Warehouse Using Wizard Mode.
Data credential (S3 bucket + IAM role)
VeloDB uses a storage-compute separation architecture, data is stored in S3. A Data Credential grants the EC2 instance that runs the VeloDB warehouse read/write access to that bucket.
1. Create an S3 bucket
Note The bucket must be in the same AWS region as the warehouse.
- Sign in to the AWS S3 Console as an administrator and click Create bucket.
- Enter a bucket name and select the target region.
- Enable Bucket Versioning (recommended).
- Click Create bucket.
- Copy the bucket name for the VeloDB console.
2. Create an IAM policy
-
Open the AWS IAM Console and go to Policies → Create policy.
-
Switch to the JSON tab and paste the policy below, replacing
<your-bucket-name>with the bucket name from the previous step.{
"Version": "2012-10-17",
"Statement": [
{
"Effect": "Allow",
"Resource": "arn:aws:s3:::<your-bucket-name>",
"Action": [
"s3:GetBucketLocation",
"s3:GetBucketVersioning",
"s3:PutBucketCORS",
"s3:ListBucket",
"s3:ListBucketVersions",
"s3:ListBucketMultipartUploads"
]
},
{
"Effect": "Allow",
"Resource": "arn:aws:s3:::<your-bucket-name>/*",
"Action": [
"s3:GetObject",
"s3:GetObjectVersion",
"s3:PutObject",
"s3:DeleteObject",
"s3:DeleteObjectVersion",
"s3:AbortMultipartUpload",
"s3:ListMultipartUploadParts"
]
},
{
"Effect": "Allow",
"Action": ["sts:AssumeRole"],
"Resource": "*"
}
]
} -
Click Next, name the policy (for example,
VeloDBDataStorageAccess), and click Create policy.
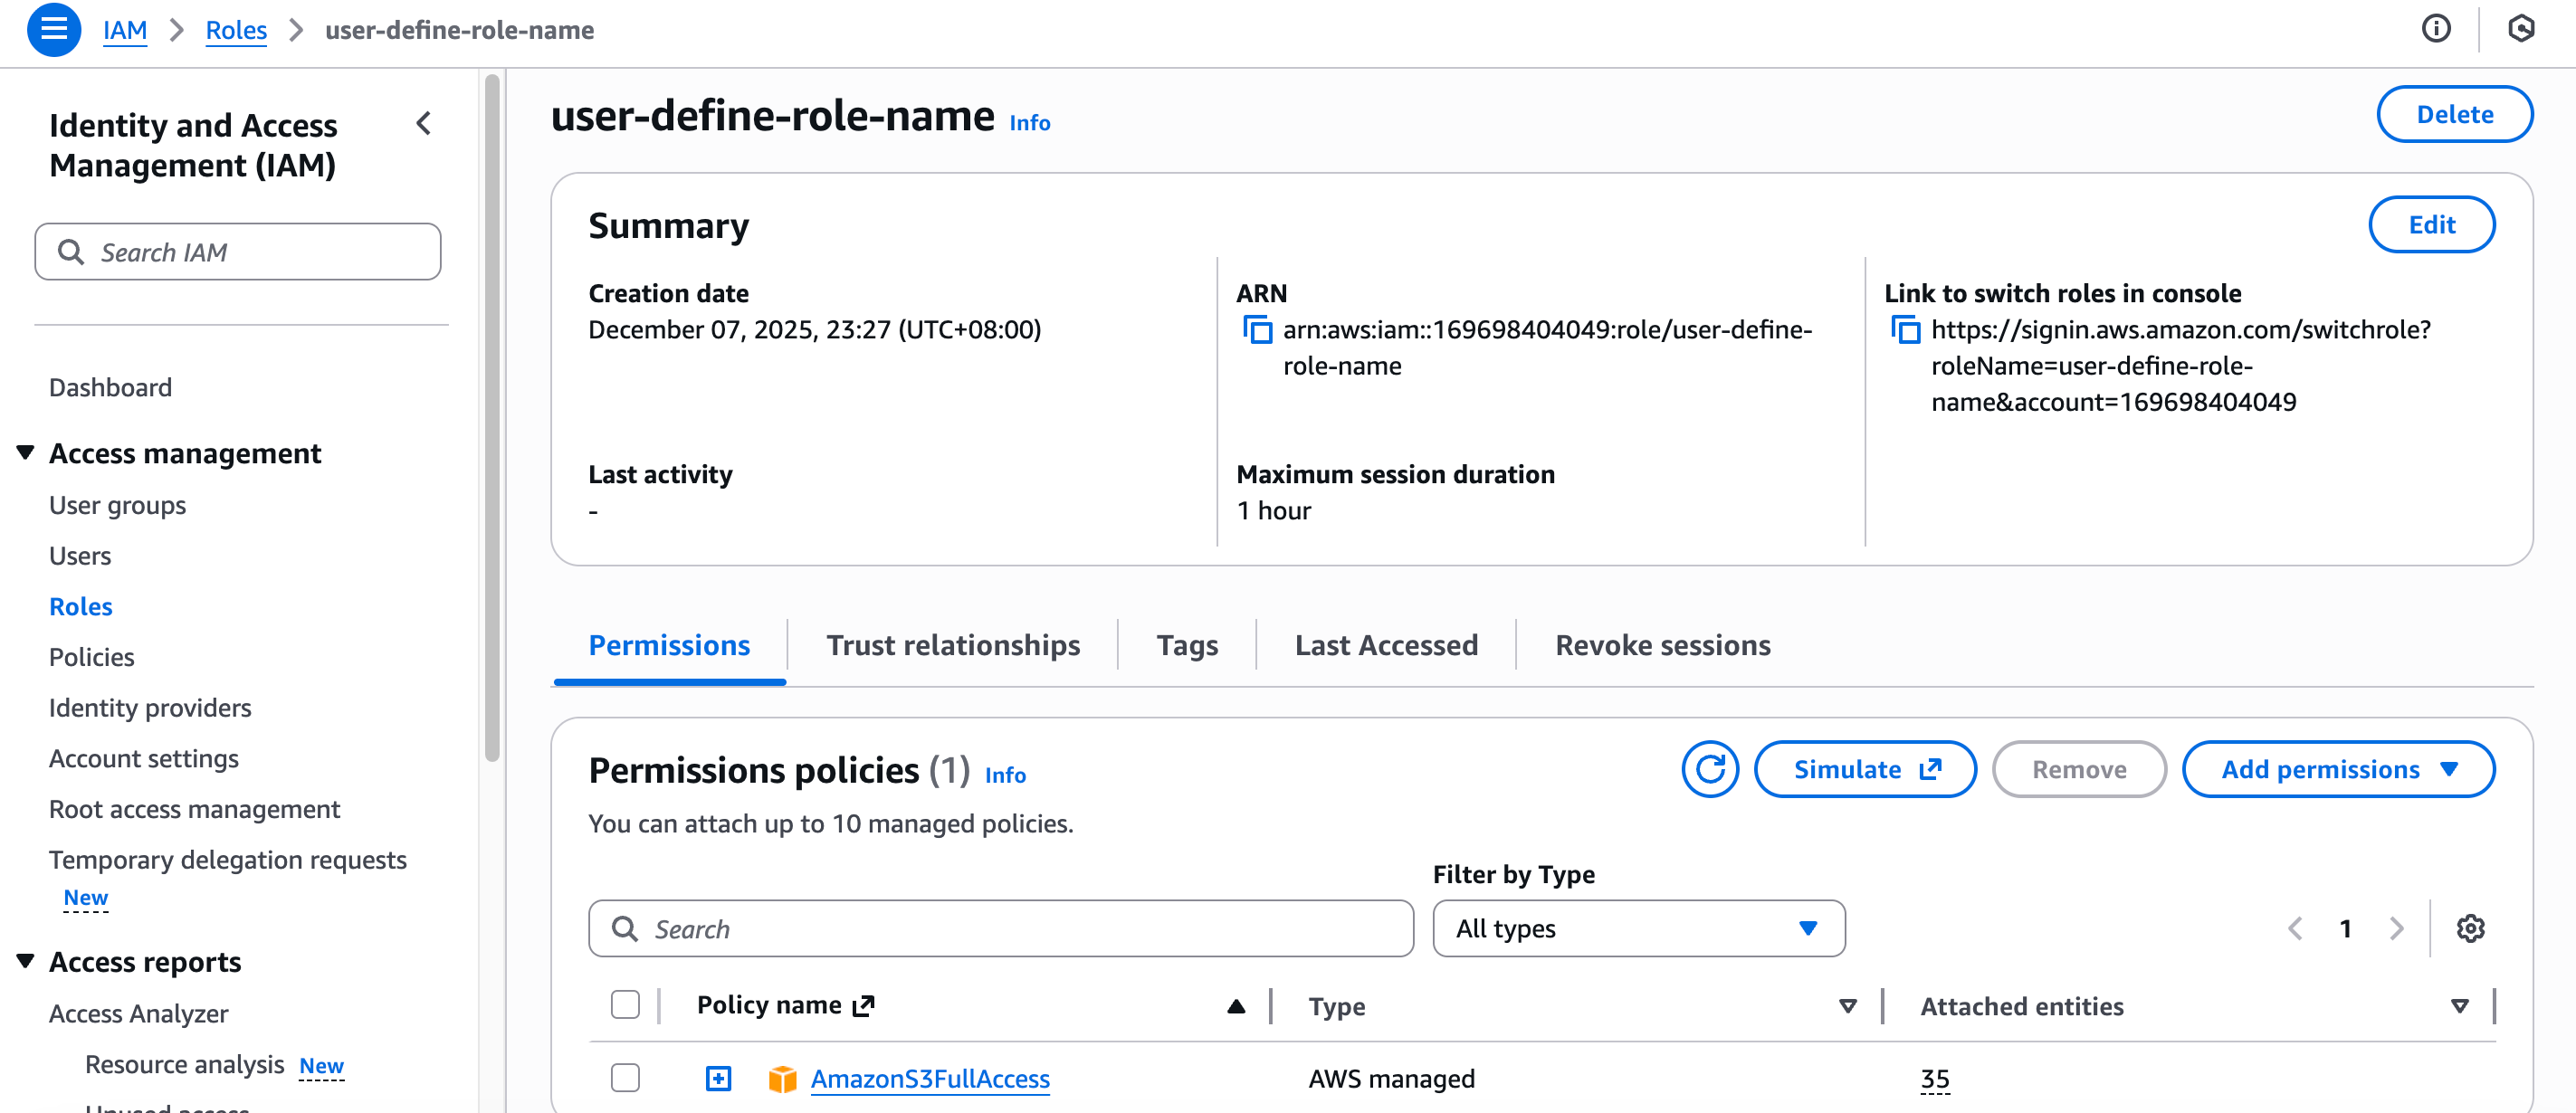
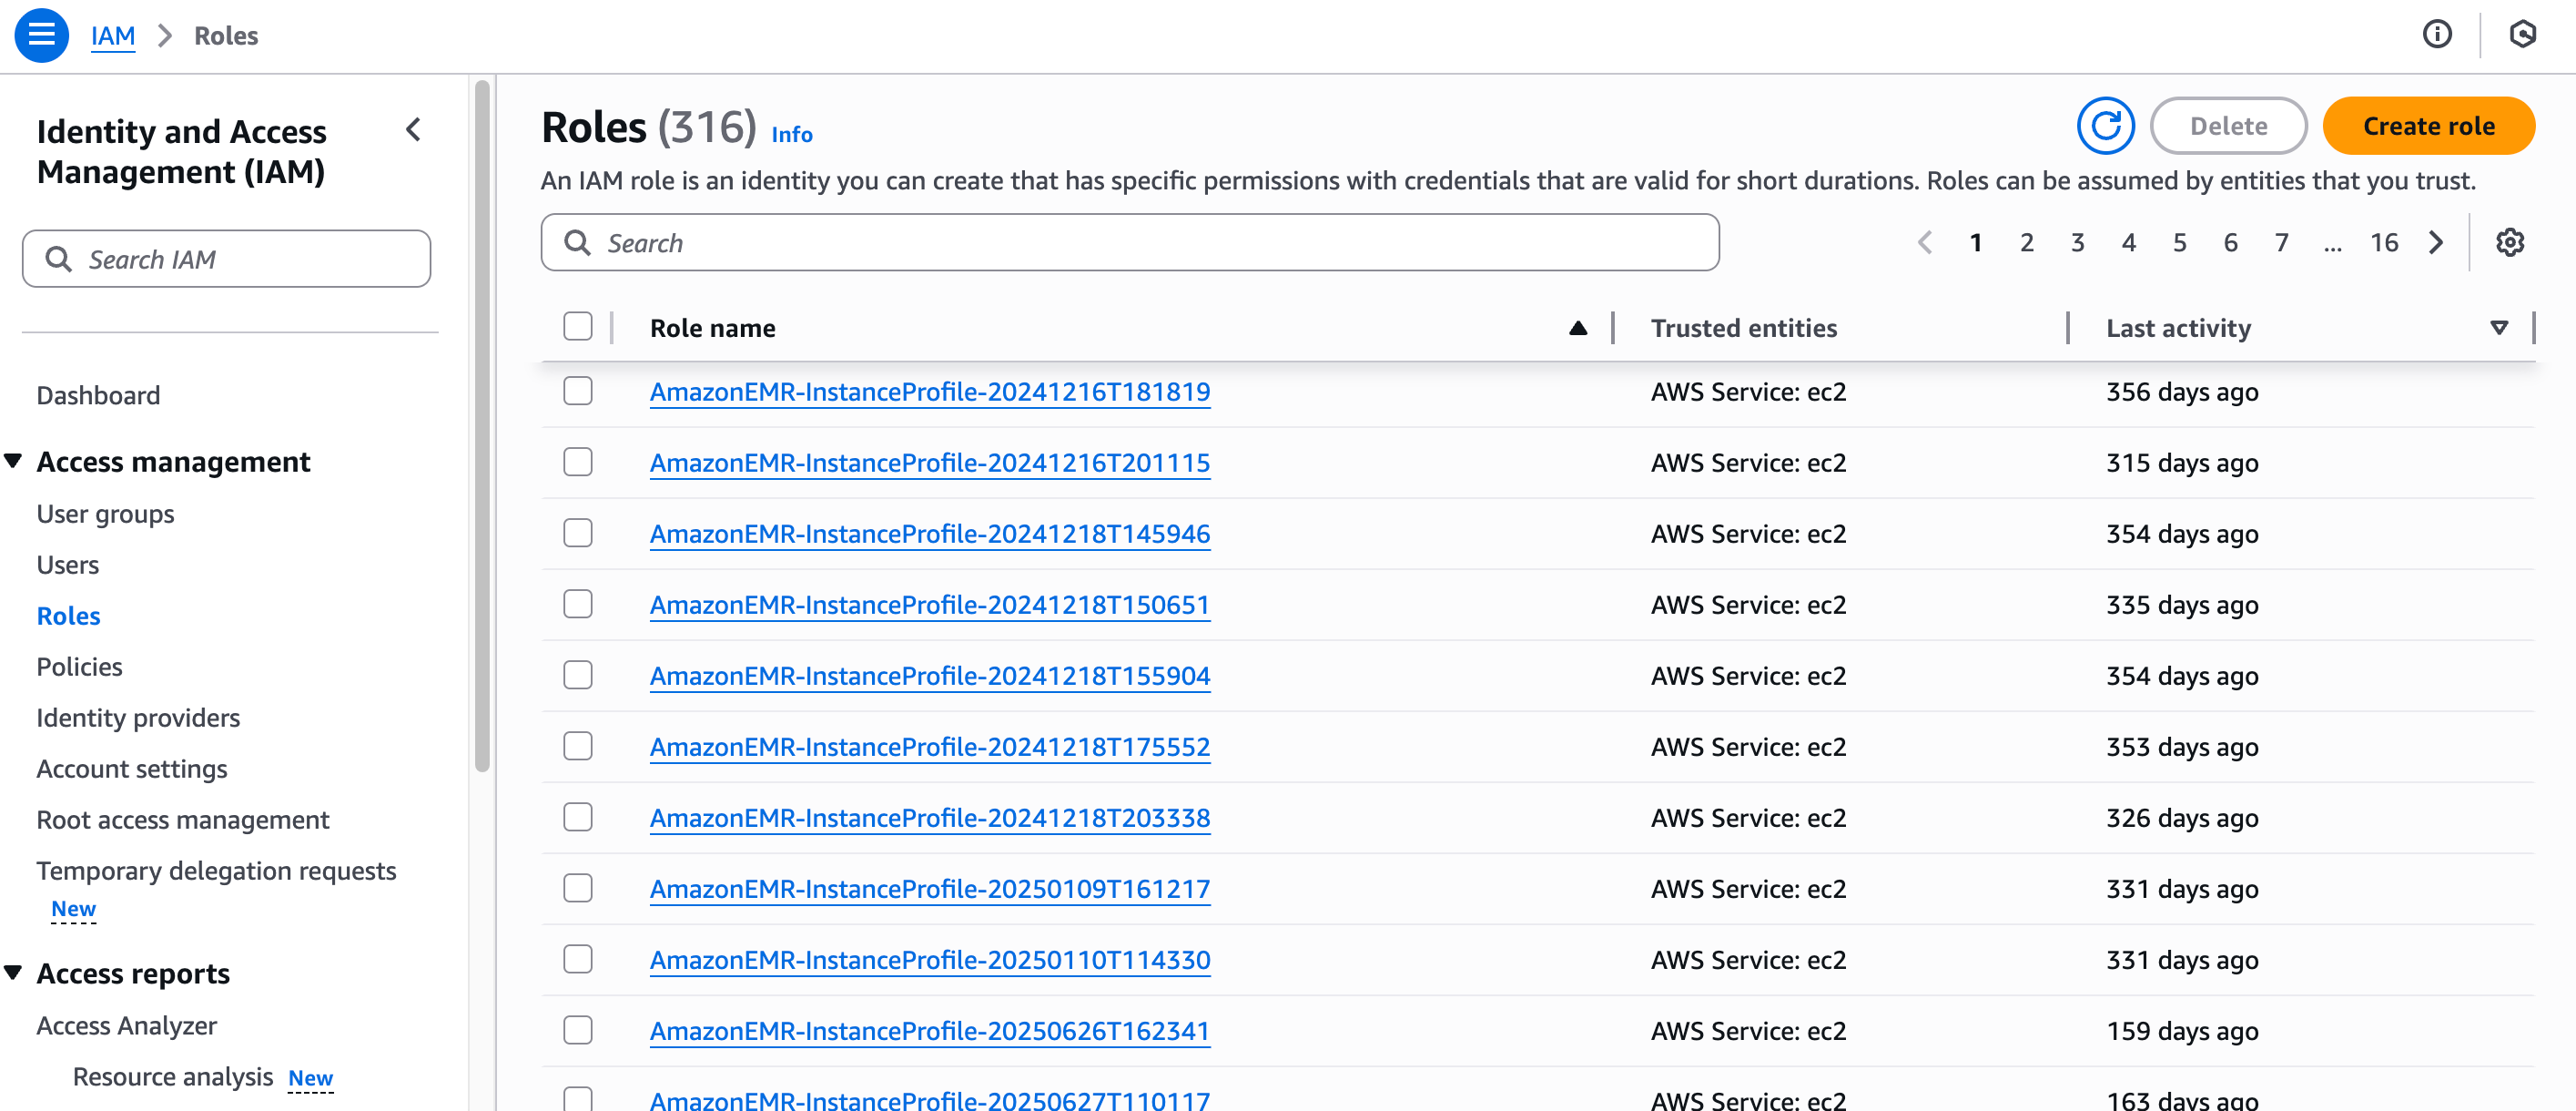
3. Create a service IAM role
-
In IAM, go to Roles → Create role.
-
Pick AWS service as the trusted entity type and EC2 as the use case.
-
Attach the policy you just created.
-
Name the role (for example,
VeloDBDataStorageAccessRole) and create it. -
On the role's Trust Relationships tab, replace the trust policy with the following, substituting
<your-aws-account-id>and<your-role-name>:{
"Version": "2012-10-17",
"Statement": [
{
"Effect": "Allow",
"Principal": {
"Service": "ec2.amazonaws.com",
"AWS": "arn:aws:iam::<your-aws-account-id>:role/<your-role-name>"
},
"Action": "sts:AssumeRole"
}
]
} -
Copy the Instance Profile ARN (format:
arn:aws:iam::<your-aws-account-id>:instance-profile/<your-role-name>) for the VeloDB console.
Deployment credential (cross-account IAM role)
The Deployment Credential lets VeloDB launch compute resources in your AWS account. You create a cross-account IAM role with an access policy.
Prerequisite
Complete the Data Credential section above; you will need the bucket name and service-role name.
1. Create an IAM policy
Note The VeloDB creation wizard shows a ready-to-use policy after you complete the Data Credential step, you can paste it directly without manual replacements. The block below is the full policy for reference.
-
In the IAM console, go to Policies → Create policy.
-
On the JSON tab, paste the policy below, replacing
<your-aws-account-id>,<your-bucket-name>, and<your-role-name>.{
"Version": "2012-10-17",
"Statement": [
{
"Effect": "Allow",
"Action": [
"ec2:TerminateInstances",
"ec2:StopInstances",
"ec2:StartInstances",
"ec2:RebootInstances",
"ec2:ModifyInstanceAttribute",
"ec2:ModifyVolume"
],
"Resource": [
"arn:aws:ec2:*:*:volume/*",
"arn:aws:ec2:*:*:instance/*"
],
"Condition": {
"StringEquals": {
"aws:ResourceTag/resource-created-by": "velodb"
}
}
},
{
"Effect": "Allow",
"Action": [
"ec2:DescribeVpcs",
"ec2:DescribeSubnets",
"ec2:DescribeAccountAttributes",
"ec2:DescribeAddresses",
"ec2:DescribeNatGateways",
"ec2:DescribeInternetGateways",
"ec2:DescribeInstances",
"ec2:DescribeSecurityGroups",
"ec2:DescribeSecurityGroupRules",
"ec2:DescribeAvailabilityZones",
"ec2:DescribeInstanceTypes",
"ec2:ModifyInstanceAttribute",
"ec2:DescribeVolumes",
"ec2:DescribeImages",
"ec2:DescribeVpcEndpoints",
"ec2:DescribePrefixLists",
"ec2:DescribeRouteTables",
"ec2:DescribeTags",
"elasticloadbalancing:DescribeLoadBalancers",
"elasticloadbalancing:DescribeListeners",
"elasticloadbalancing:DescribeLoadBalancerAttributes",
"elasticloadbalancing:DescribeTargetGroupAttributes",
"elasticloadbalancing:DescribeTags",
"elasticloadbalancing:DescribeTargetHealth",
"elasticloadbalancing:DescribeTargetGroups",
"iam:GetPolicy",
"iam:GetPolicyVersion"
],
"Resource": ["*"]
},
{
"Effect": "Allow",
"Action": ["ec2:RunInstances", "ec2:CreateTags"],
"Resource": [
"arn:aws:ec2:*:*:volume/*",
"arn:aws:ec2:*:*:instance/*",
"arn:aws:ec2:*:*:network-interface/*"
],
"Condition": {
"StringEquals": {
"aws:RequestTag/resource-created-by": "velodb"
}
}
},
{
"Effect": "Allow",
"Action": ["ec2:RunInstances"],
"Resource": [
"arn:aws:ec2:*:*:image/*",
"arn:aws:ec2:*:*:security-group/*",
"arn:aws:ec2:*:*:subnet/*"
]
},
{
"Effect": "Allow",
"Action": ["ec2:CreateTags", "ec2:DeleteTags"],
"Resource": [
"arn:aws:ec2:*:*:instance/*",
"arn:aws:ec2:*:*:volume/*",
"arn:aws:ec2:*:*:network-interface/*"
],
"Condition": {
"StringEquals": {
"ec2:ResourceTag/resource-created-by": "velodb"
}
}
},
{
"Effect": "Allow",
"Action": [
"elasticloadbalancing:CreateListener",
"elasticloadbalancing:CreateLoadBalancer",
"elasticloadbalancing:CreateTargetGroup"
],
"Resource": [
"arn:aws:elasticloadbalancing:*:*:targetgroup/*",
"arn:aws:elasticloadbalancing:*:*:loadbalancer/*",
"arn:aws:elasticloadbalancing:*:*:listener/*"
],
"Condition": {
"StringEquals": {
"aws:RequestTag/resource-created-by": "velodb"
}
}
},
{
"Effect": "Allow",
"Action": [
"elasticloadbalancing:RegisterTargets",
"elasticloadbalancing:DeleteLoadBalancer",
"elasticloadbalancing:ModifyTargetGroupAttributes",
"elasticloadbalancing:DeregisterTargets",
"elasticloadbalancing:DeleteTargetGroup",
"elasticloadbalancing:ModifyLoadBalancerAttributes",
"elasticloadbalancing:DeleteListener"
],
"Resource": [
"arn:aws:elasticloadbalancing:*:*:targetgroup/*",
"arn:aws:elasticloadbalancing:*:*:loadbalancer/*",
"arn:aws:elasticloadbalancing:*:*:listener/*"
],
"Condition": {
"StringEquals": {
"elasticloadbalancing:ResourceTag/resource-created-by": "velodb"
}
}
},
{
"Effect": "Allow",
"Action": [
"elasticloadbalancing:AddTags",
"elasticloadbalancing:RemoveTags"
],
"Resource": ["arn:aws:elasticloadbalancing:*:*:*"],
"Condition": {
"StringEquals": {
"elasticloadbalancing:ResourceTag/resource-created-by": "velodb"
}
}
},
{
"Effect": "Allow",
"Action": [
"s3:GetBucketLocation",
"s3:GetBucketVersioning",
"s3:GetBucketPublicAccessBlock",
"s3:GetLifecycleConfiguration",
"s3:PutLifecycleConfiguration",
"s3:ListBucket"
],
"Resource": ["arn:aws:s3:::<your-bucket-name>"]
},
{
"Effect": "Allow",
"Action": [
"iam:GetInstanceProfile",
"iam:GetRole",
"iam:GetRolePolicy",
"iam:ListRolePolicies",
"iam:ListAttachedRolePolicies"
],
"Resource": [
"arn:aws:iam::<your-aws-account-id>:instance-profile/<your-role-name>",
"arn:aws:iam::<your-aws-account-id>:role/<your-role-name>"
]
},
{
"Effect": "Allow",
"Action": ["iam:PassRole"],
"Resource": [
"arn:aws:iam::<your-aws-account-id>:role/<your-role-name>"
],
"Condition": {
"StringEquals": {
"iam:PassedToService": "ec2.amazonaws.com"
}
}
},
{
"Effect": "Allow",
"Action": ["iam:CreateServiceLinkedRole"],
"Resource": [
"arn:aws:iam::*:role/aws-service-role/elasticloadbalancing.amazonaws.com/AWSServiceRoleForElasticLoadBalancing"
],
"Condition": {
"StringEquals": {
"iam:AWSServiceName": "elasticloadbalancing.amazonaws.com"
}
}
}
]
} -
Click Next, name the policy (for example,
AllowVeloDBCrossAccountAccess), and click Create policy.
2. Create the cross-account IAM role
- In IAM, go to Roles → Create role.
- Trusted Entity Type: AWS account.
- Select Another AWS account.
- Account ID: enter the VeloDB account ID
757278738533. - External ID: paste the external ID from the VeloDB console.
- Attach the policy you created.
- Name the role (for example,
AllowVeloDBCrossAccountAccess) and create it. - Copy the Role ARN for the VeloDB console.
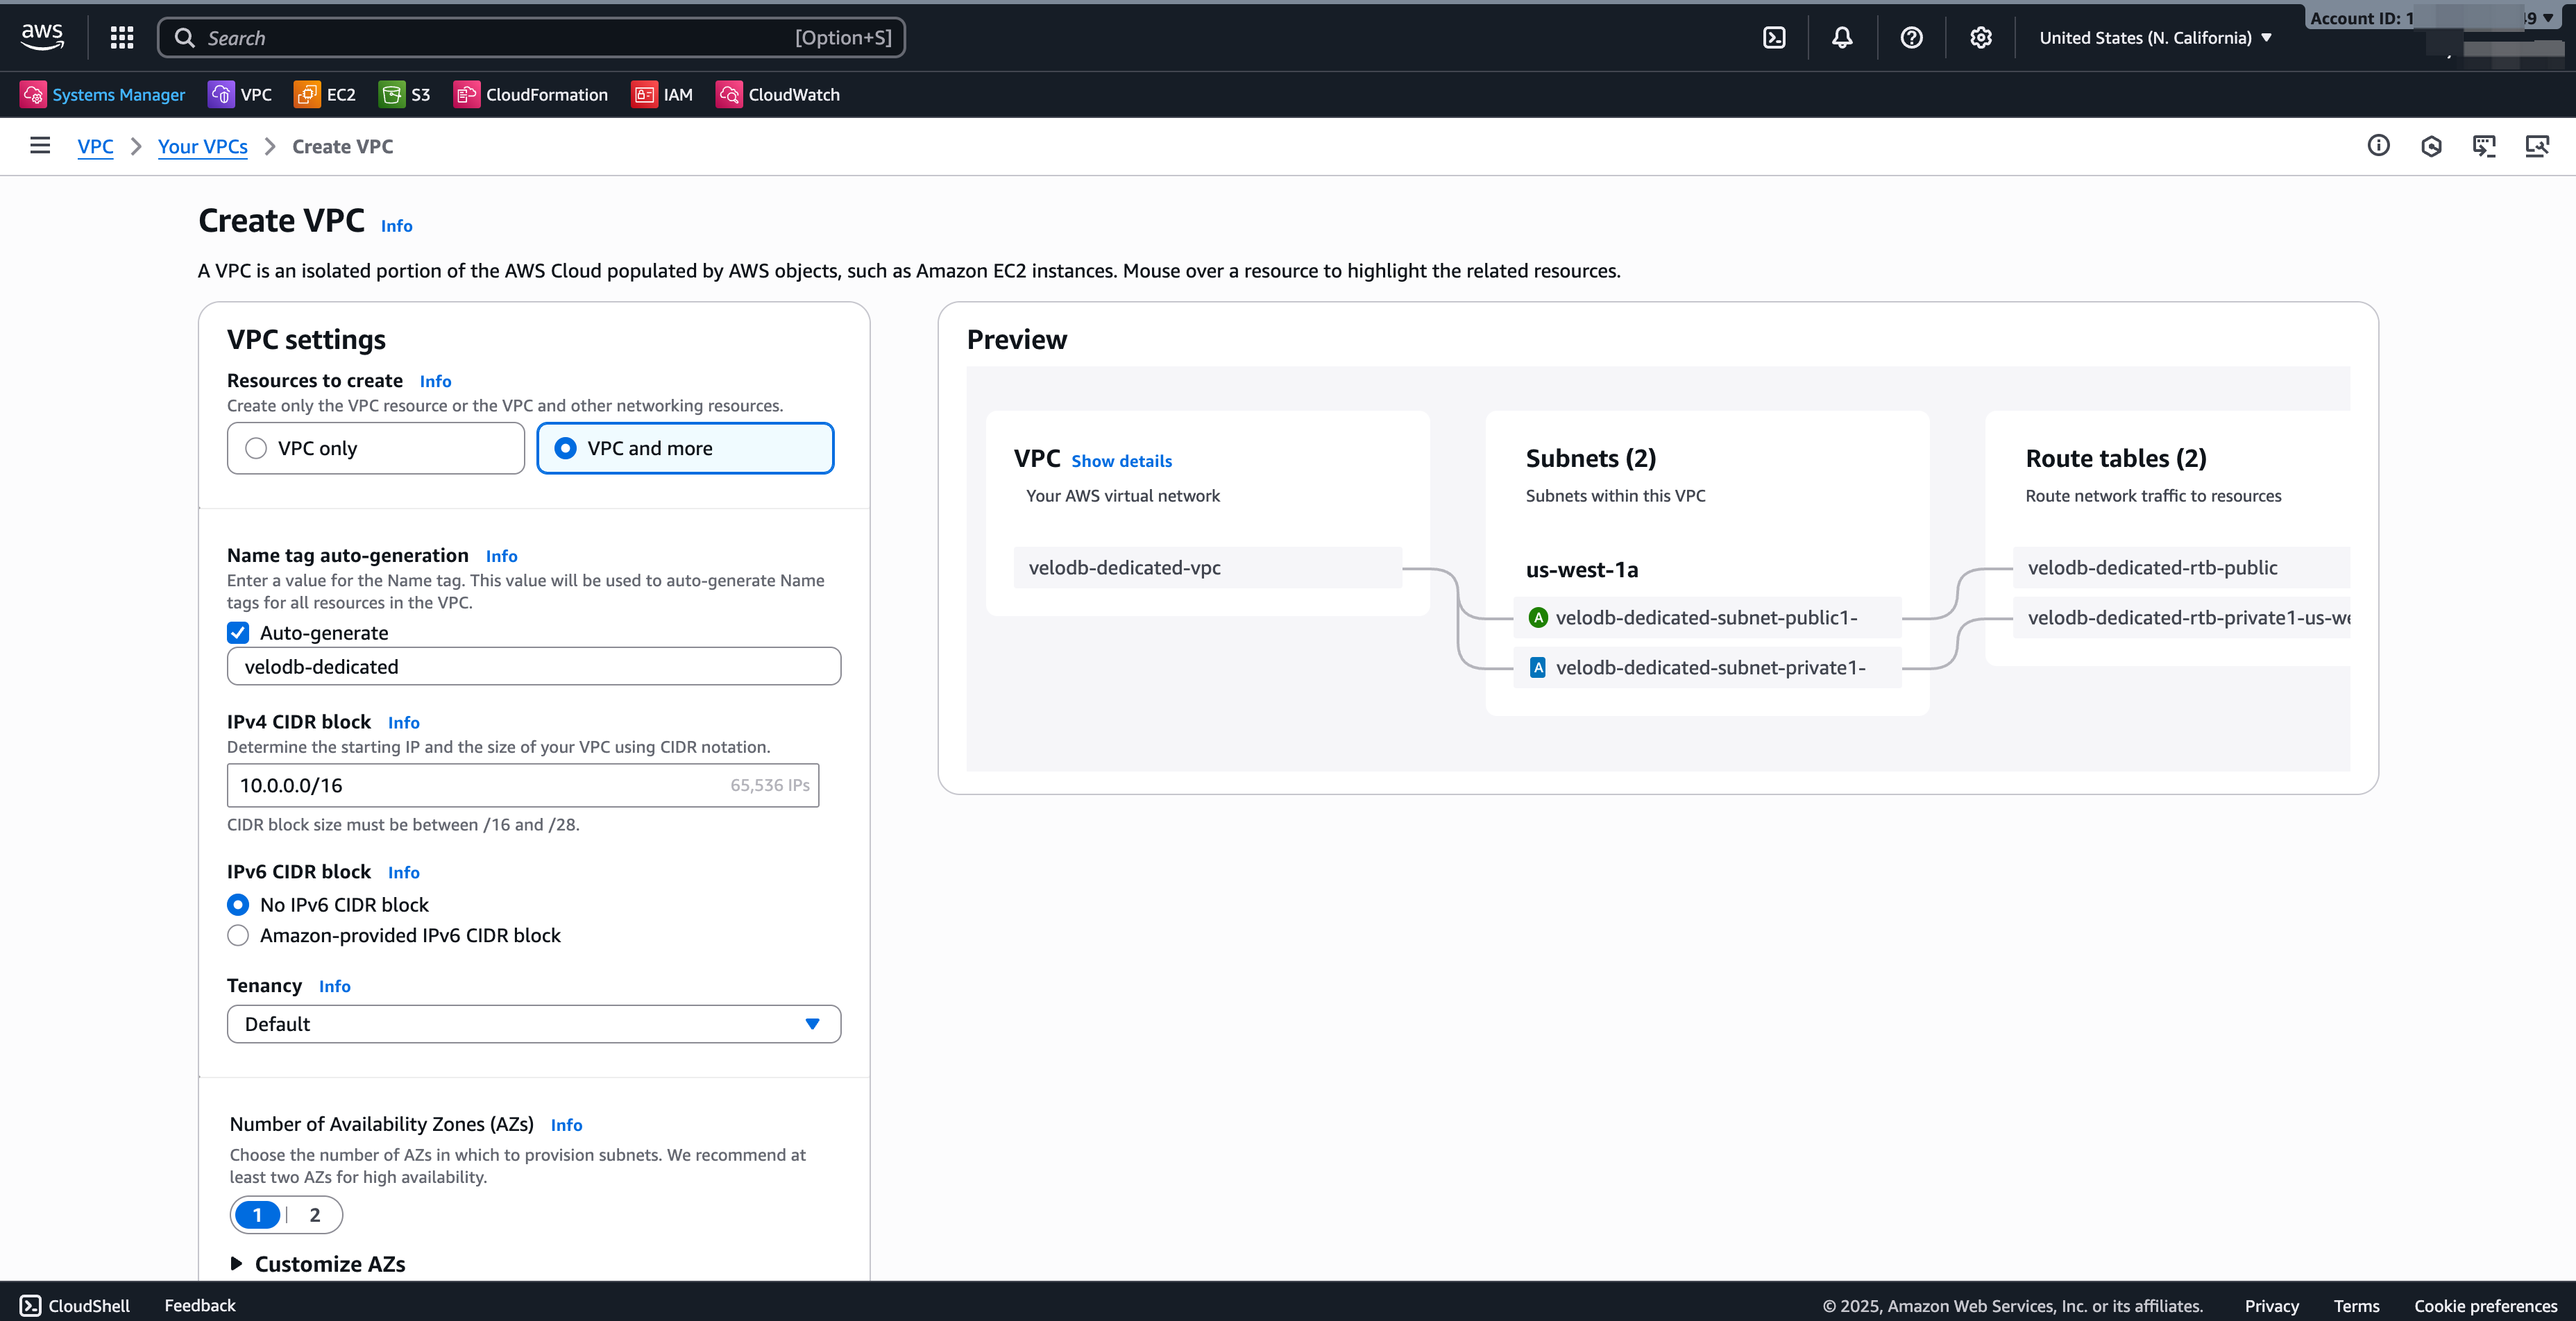
VPC and subnets
A VPC that matches VeloDB's network requirements is a prerequisite for a BYOC warehouse.
Note The VeloDB warehouse currently supports single-AZ deployment. We recommend two subnets, one public and one private. VeloDB is deployed in the private subnet.
-
Sign in to the AWS VPC Console as an administrator.
-
Select the target region and click Create VPC.
-
Resources to create: VPC and more.
-
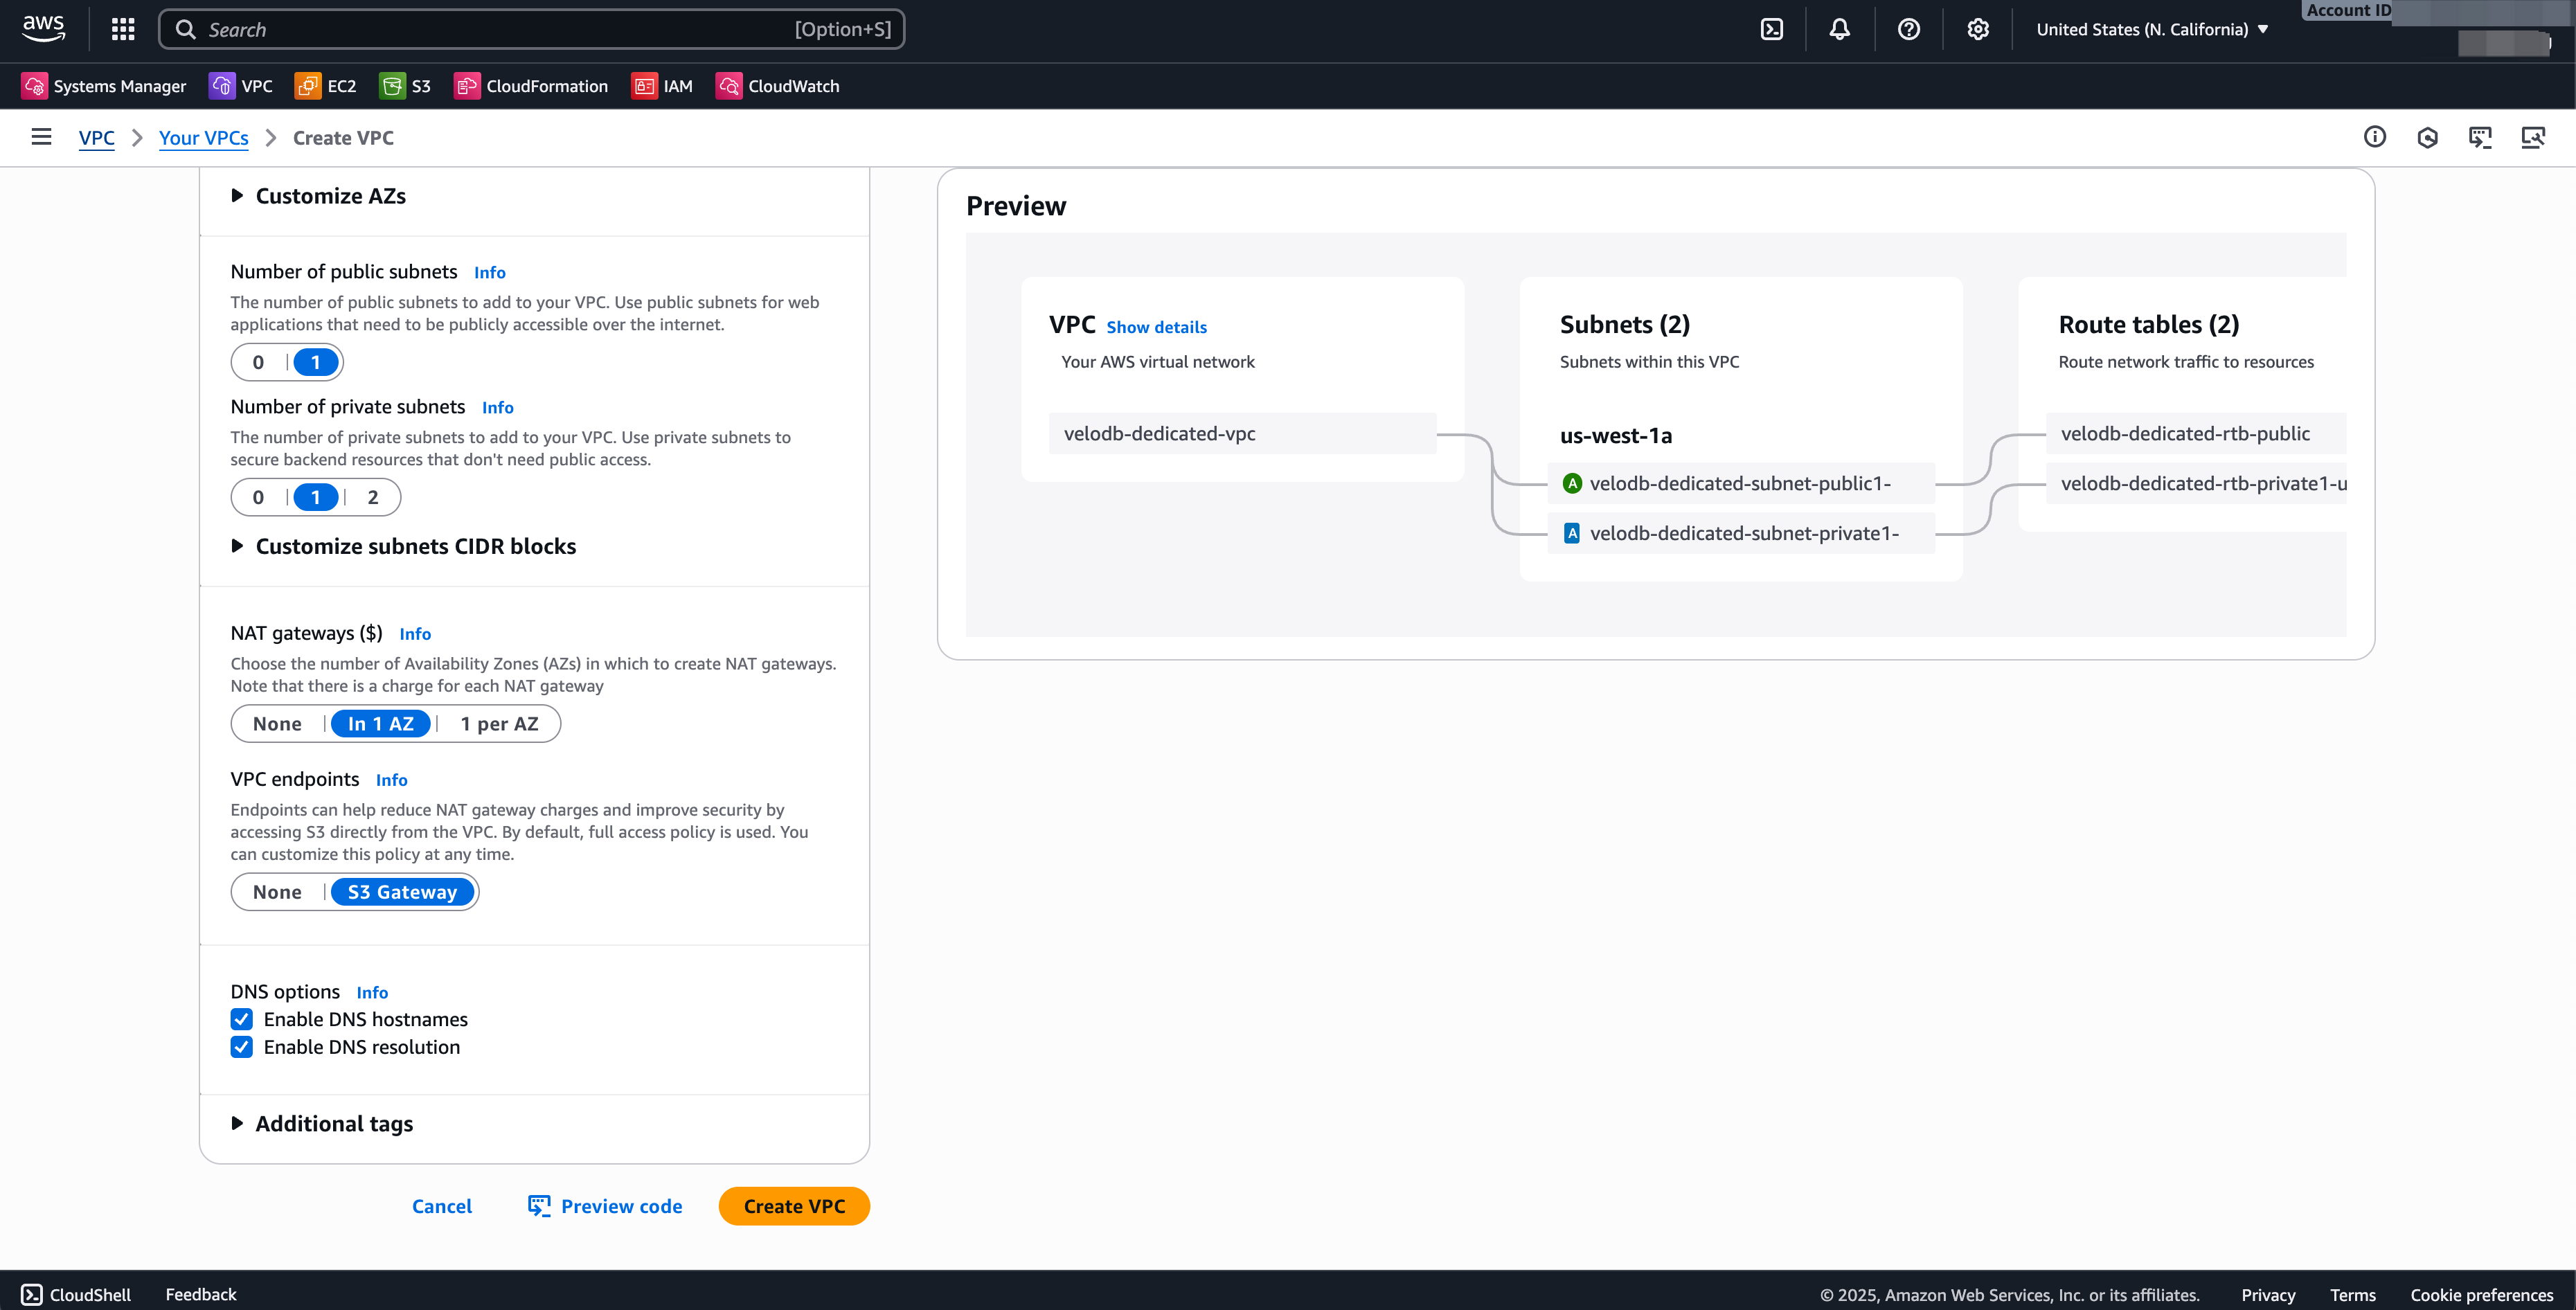
Adjust these fields (keep other defaults):
Field Value Name tag e.g. velodb-projectIPv4 CIDR block Your preferred starting IP and size. Number of Availability Zones 1 Number of public subnets 1 Number of private subnets 1 NAT gateways In 1 AZ VPC Endpoints S3 Gateway (reduces NAT charges; access S3 privately) -
Click Create VPC, then View VPC when the workflow completes.

Security groups
A security group is a virtual firewall controlling traffic to its associated AWS resources. You typically need two security groups for BYOC, one for the VeloDB EC2 instances and one for VPC interface endpoints.
For EC2
- In the VPC Console, go to Security groups → Create security group.
- Name it (for example,
velodb-server-sg) and select the VPC. - Add inbound rules:
- Rule 1: Type All TCP, Source this security group.
- Rule 2: Type Custom TCP, Port range 8000-10000, Source the CIDR of the VPCs that need to reach the warehouse.
- Leave outbound rules as the default (all outbound allowed).
- Click Save rules and copy the Security group ID for the VeloDB console.
For VPC endpoints
- In the VPC Console, go to Security groups → Create security group.
- Name it (for example,
vpce-sg-for-velodb) and select the VPC. - Add the same inbound rules as above:
- Rule 1: Type All TCP, Source this security group.
- Rule 2: Type Custom TCP, Port range 8000-10000, Source the CIDR of the VPCs that need to reach the warehouse.
- Leave outbound rules as the default.
- Click Save rules.
Private endpoint to VeloDB
To keep BYOC traffic on the AWS backbone, create a private endpoint so your warehouse talks to the VeloDB Cloud service over PrivateLink instead of the public internet.
-
In the VPC Console, go to Endpoints → Create endpoint.
-
Fill in:
Field Value Name e.g. vpce-for-velodbService category PrivateLink Ready partner services Service name From the region table below. Click Verify service: you should see "Service name verified". VPC The VPC to create the endpoint in. Subnets The private subnets where the endpoint ENIs should live. Security group The VPC-endpoint security group you created above (e.g. vpce-sg-for-velodb).Policy Full access (typical). -
Click Create endpoint.
VeloDB private endpoint service names
| AWS Region | Service Name |
|---|---|
| us-east-1 | com.amazonaws.vpce.us-east-1.vpce-svc-0fb96af7d8cd84d4d |
| us-west-2 | com.amazonaws.vpce.us-west-2.vpce-svc-0709eceab1c84431a |
| eu-west-1 | com.amazonaws.vpce.eu-west-1.vpce-svc-027fb01a146da1e29 |
| ap-southeast-1 | com.amazonaws.vpce.ap-southeast-1.vpce-svc-06e619c006c767a35 |
| ap-east-1 | com.amazonaws.vpce.ap-east-1.vpce-svc-07c3dac48f26cc10a |
| me-south-1 | com.amazonaws.vpce.me-south-1.vpce-svc-0f51549e7949898ca |
| eu-central-1 | com.amazonaws.vpce.eu-central-1.vpce-svc-0b44881fddef6b599 |
| ap-southeast-7 | com.amazonaws.vpce.ap-southeast-7.vpce-svc-0378cb9082f6839fd |
| me-central-1 | com.amazonaws.vpce.me-central-1.vpce-svc-01bb92d635d16039f |
S3 gateway endpoint
An S3 gateway endpoint gives instances in your VPC private connectivity to S3, avoiding the public internet and reducing NAT-gateway charges.
-
In the VPC Console, go to Endpoints → Create endpoint.
-
Fill in:
Field Value Name e.g. vpce-for-s3-gatewayService category AWS services Services Search S3, pickcom.amazonaws.{region}.s3with type Gateway.VPC The VPC to create the endpoint in. Route tables The route tables associated with your private subnets. Policy Full access or Custom. -
Click Create endpoint.
IAM role for cross-account S3 access (Catalogs integrations)
If you plan to use Catalogs integrations to read from S3 buckets in a different account, create an IAM role in the target account and grant VeloDB permission to assume it.
-
In the target AWS account, open IAM → Roles → Create role.
-
Select Custom trust policy and replace
<velodb-role-arn>with the IAM Role ARN of your VeloDB warehouse: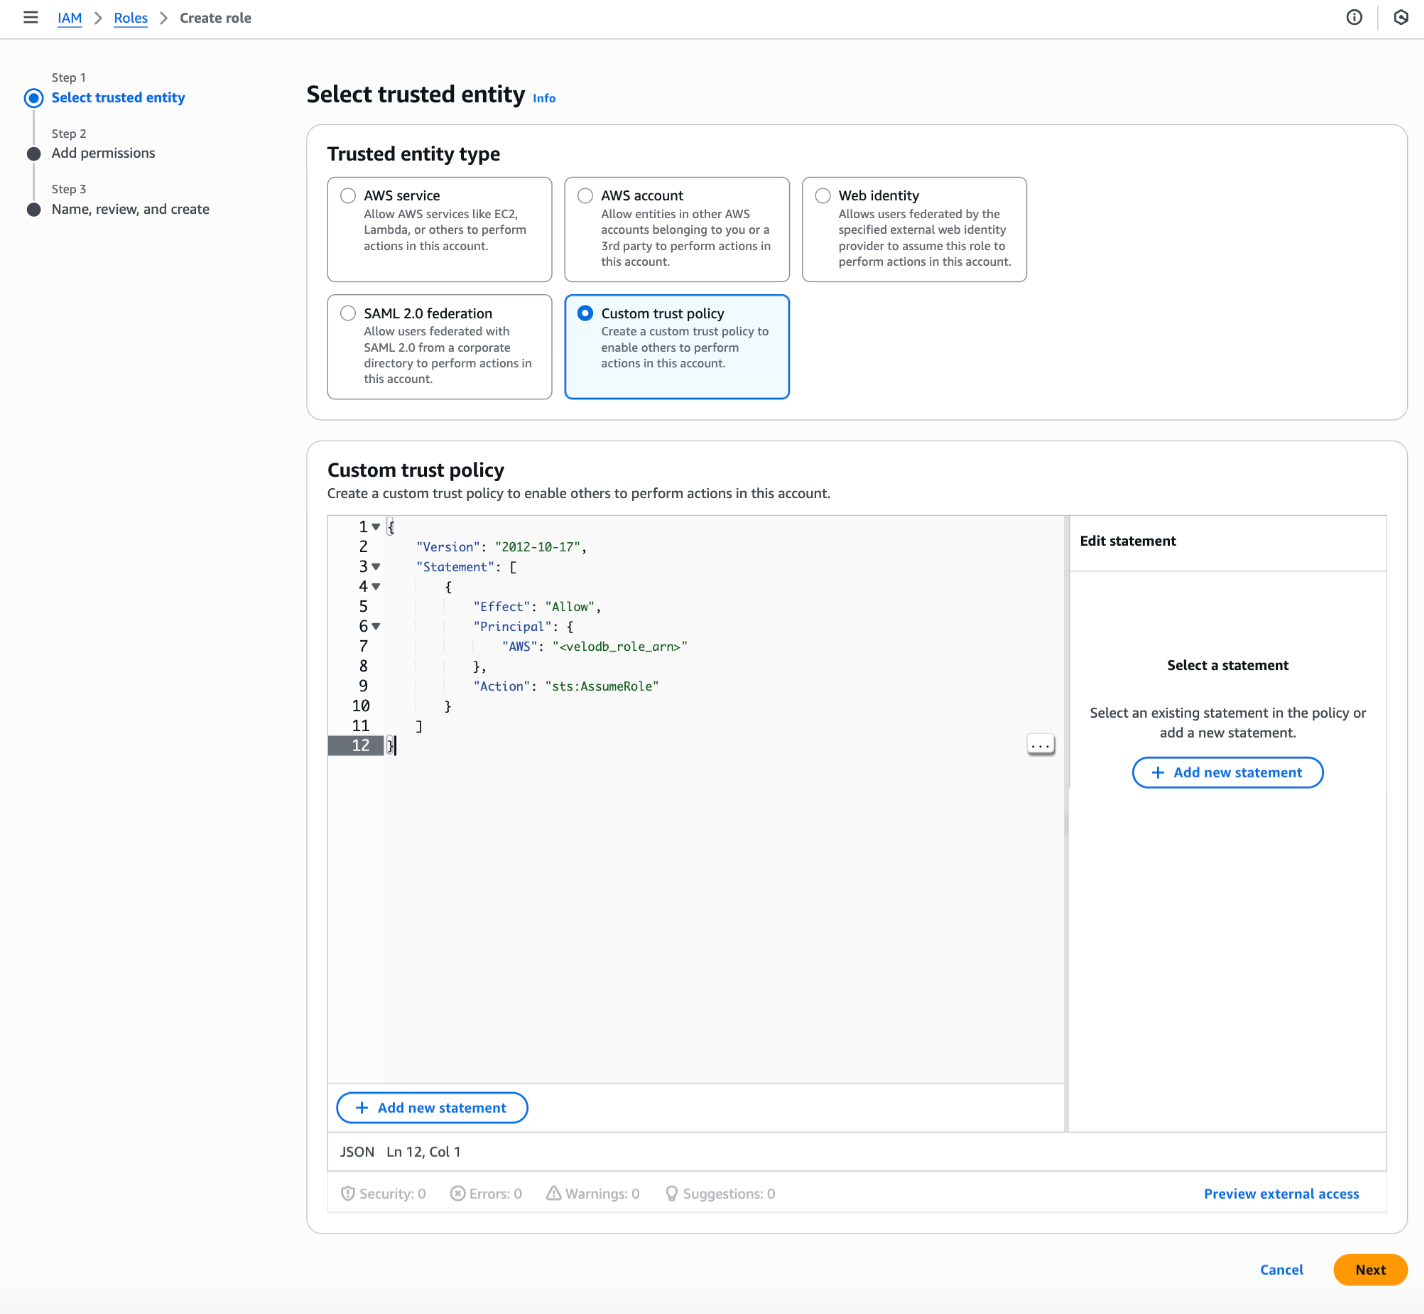
{
    "Version": "2012-10-17",
    "Statement": [
        {
            "Effect": "Allow",
            "Principal": {
                "AWS": "<velodb-role-arn>"
            },
            "Action": "sts:AssumeRole"
        }
    ]
} -
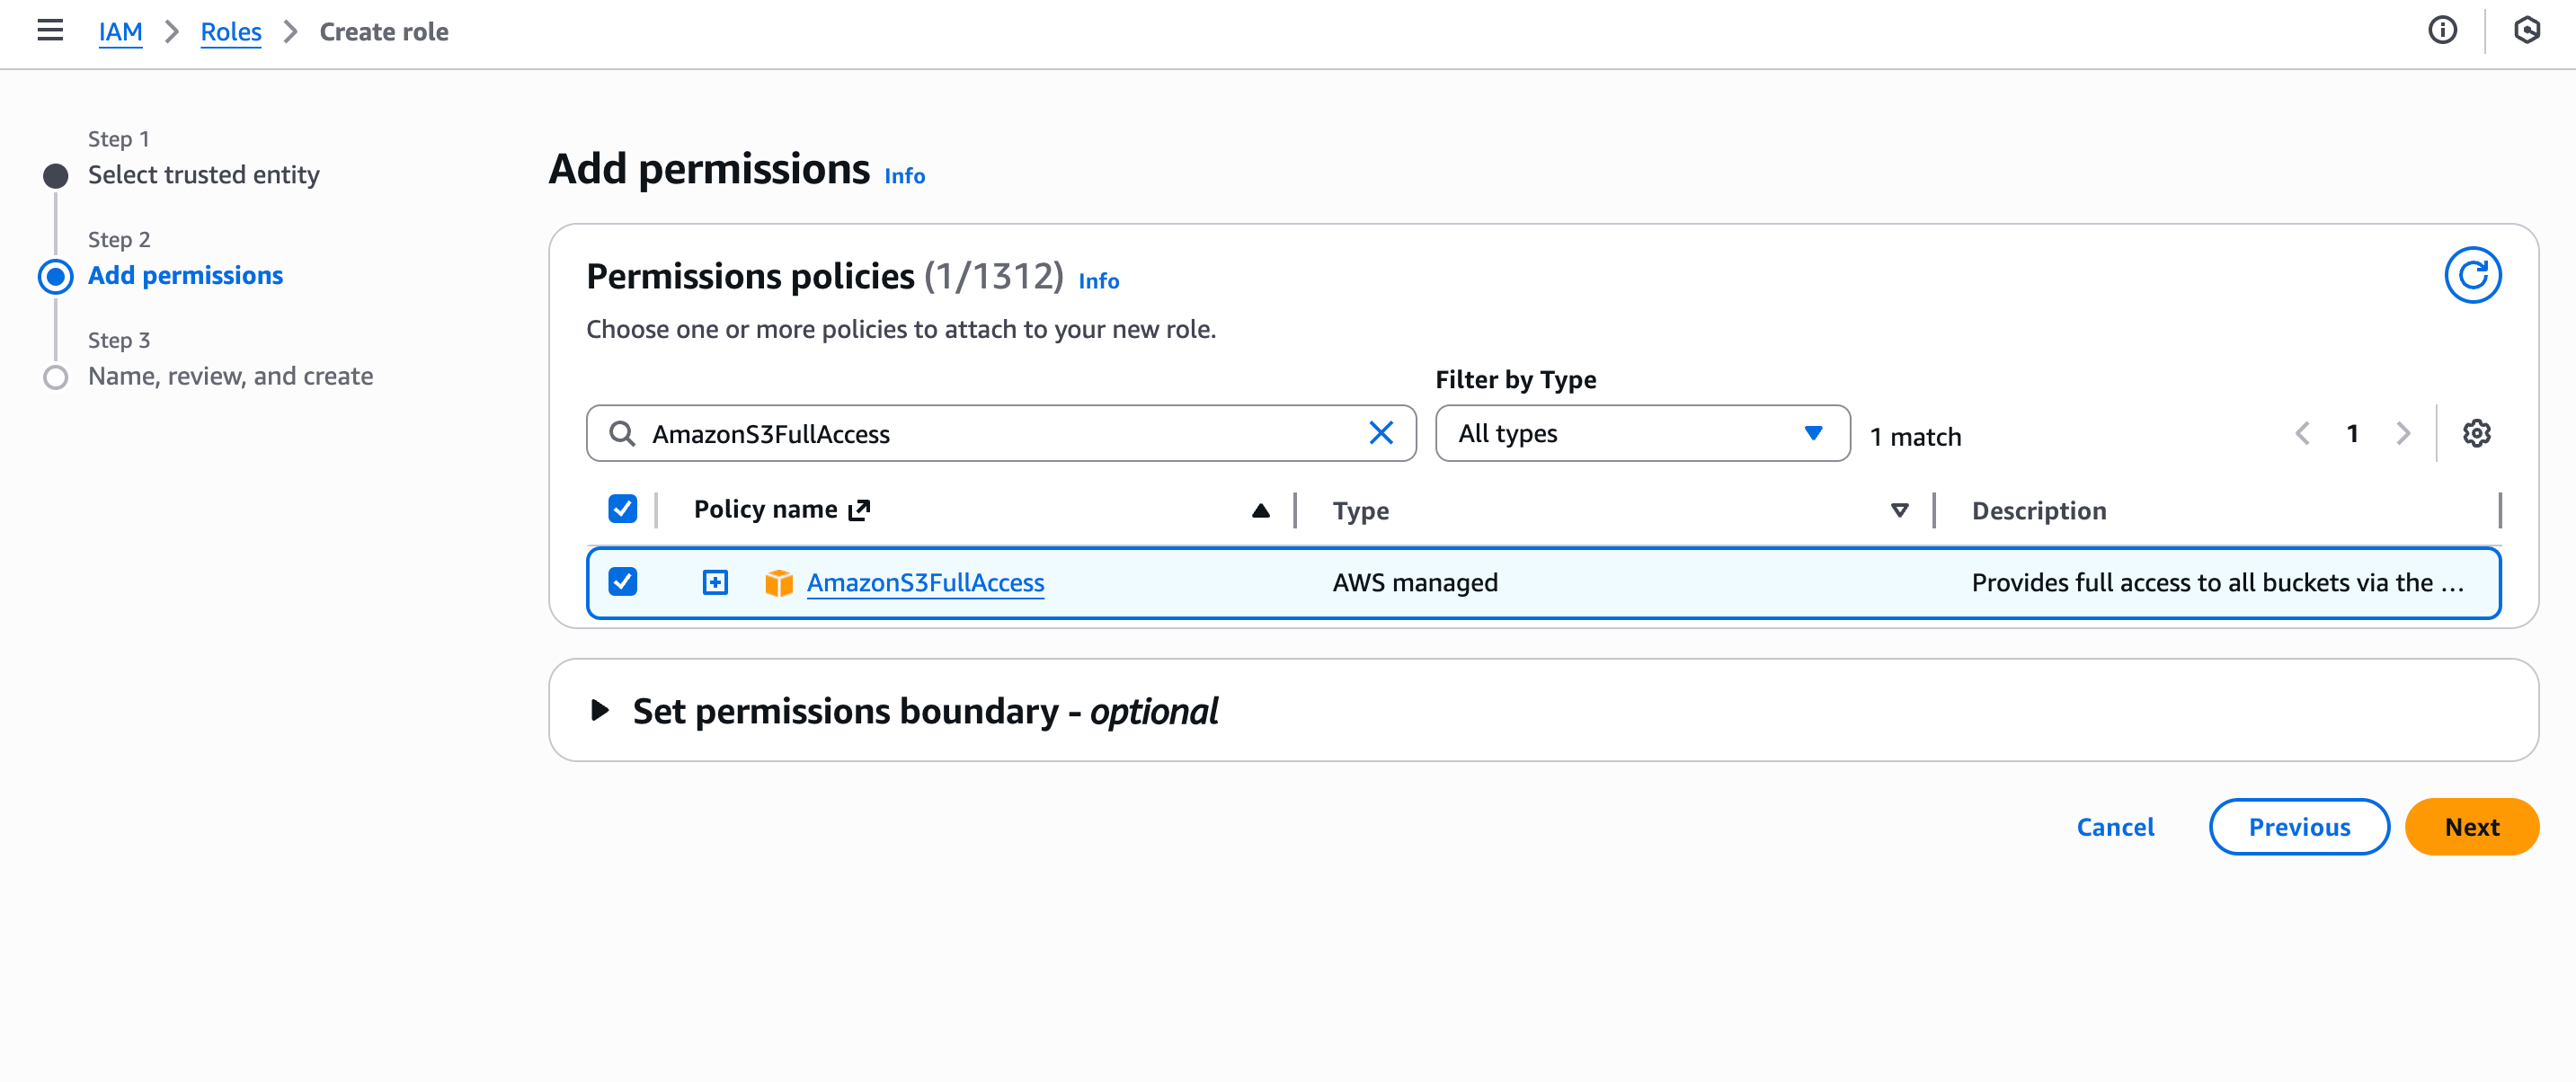
Attach the permission policies you want the role to have and click Next.
-
Name the role and click Create role.
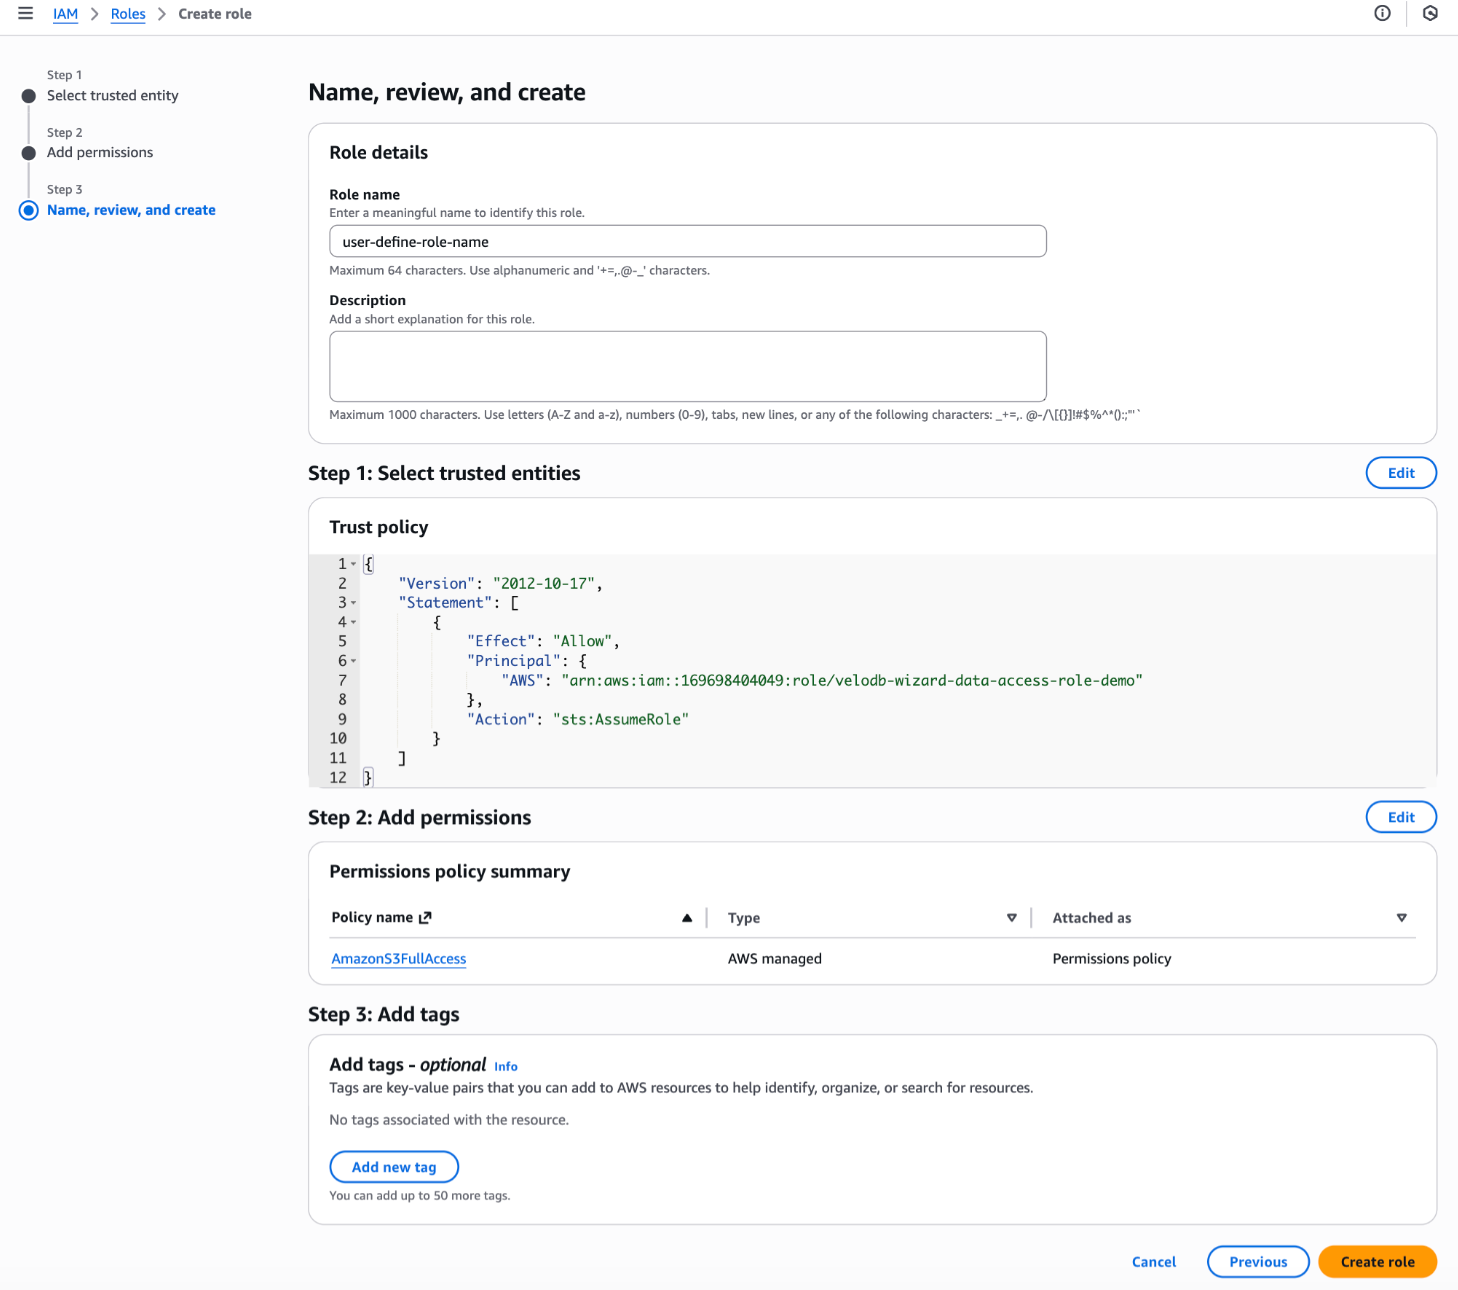
-
Open the role and copy the ARN from the summary, then paste it into VeloDB Cloud when configuring the integration.